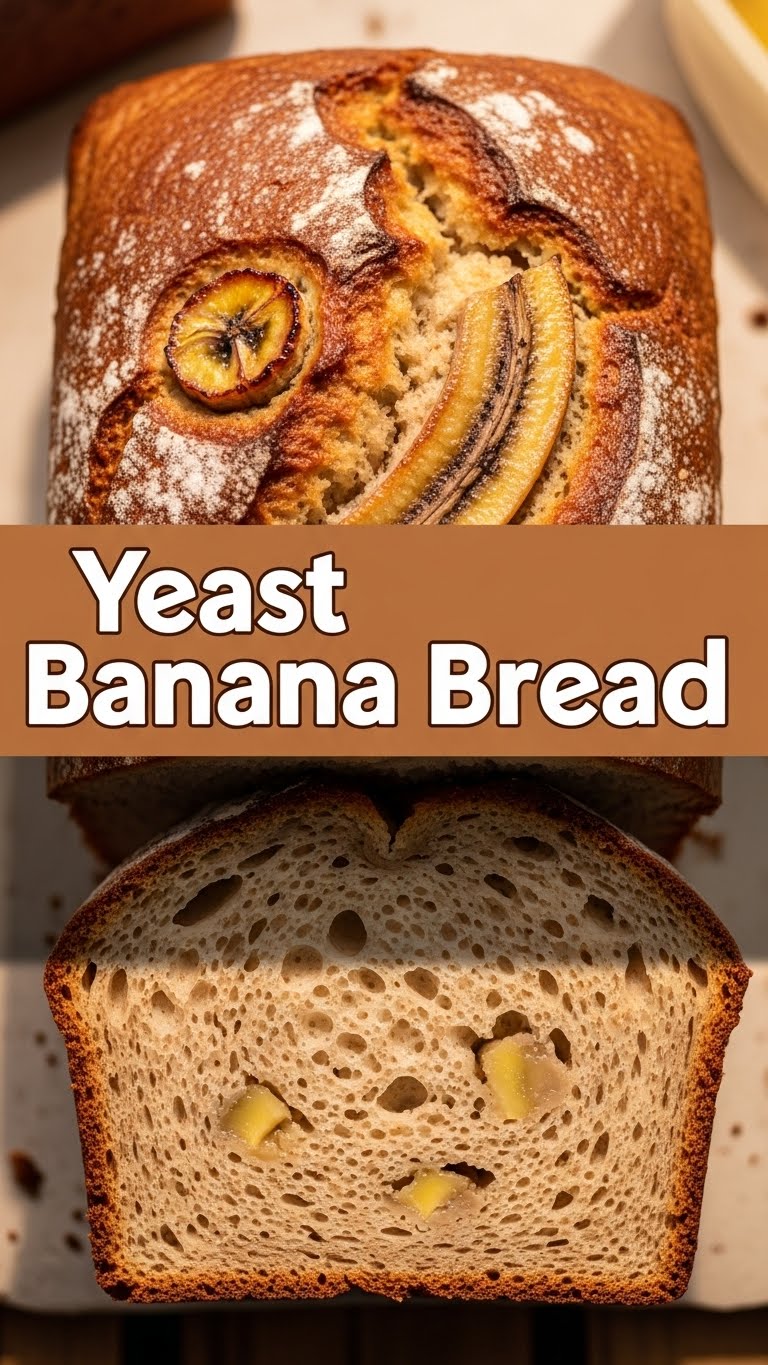
Ever stare at those sad, spotty bananas on your counter, knowing they’re *begging* to be transformed into something delicious, but dreading another dense, brick-like banana bread? Yeah, me too. We all love that classic banana bread flavor, but sometimes you just want something… airier. Something that feels a bit more special. Enter: Yeast Banana Bread! It’s the banana bread you never knew you needed, with a tender crumb that’ll make you wonder where it’s been all your life. Think fluffy, slightly sweet, and utterly addictive. So, let’s ditch the quick-bread woes and get our yeast on, shall we?
Why This Recipe is Awesome
Okay, so why bother with yeast when you can just whip up a quick bread? Great question, imaginary friend! Because this isn’t just *any* banana bread. This is the glow-up version. It’s like regular banana bread went to finishing school and learned how to be light, airy, and sophisticated instead of a dense doorstop. It’s practically foolproof – seriously, if I can make it without setting off the smoke alarm, you totally can too. You get that comforting banana flavor, but with the delightful texture of a sweet, tender loaf. Plus, the smell alone is worth the minimal effort, IMO. Your kitchen will smell like a bakery exploded, in the best way possible.
Ingredients You’ll Need
Gather your troops! Here’s what you’ll need to make this magic happen. Don’t worry, nothing too wild here.
- All-Purpose Flour: About 3 cups. The backbone of our deliciousness.
- Active Dry Yeast: 2 ¼ teaspoons (one standard packet). Our little puff-up magician. Don’t be scared of it!
- Granulated Sugar: ½ cup. Just enough sweetness to complement those bananas without making it cloyingly sweet.
- Salt: 1 teaspoon. Because even sweet things need a pinch of salt to truly shine.
- Warm Milk: ½ cup. Around 105-115°F (bathwater warm, not boiling hot!). This wakes up our yeast.
- Large Egg: 1, at room temperature. Gives structure and richness.
- Unsalted Butter: ¼ cup (½ stick), melted and cooled slightly. Because everything’s better with butter, right? Don’t skimp!
- Super Ripe Bananas: 3 medium-sized. We’re talking brown, spotty, almost-ready-for-compost bananas. The browner, the sweeter, the better.
- Vanilla Extract: 1 teaspoon. A hug for your tastebuds.
- Optional (but highly recommended!): ½ teaspoon cinnamon or a handful of chocolate chips/chopped nuts. Live a little!
Step-by-Step Instructions
Alright, apron on (or not, I’m not your boss), let’s get baking!
- Activate the Yeast: In a large bowl, whisk together the warm milk, sugar, and yeast. Let it sit for 5-10 minutes until it looks foamy and bubbly. This means your yeast is alive and ready to party!
- Combine Wet Ingredients: While the yeast is doing its thing, mash those ripe bananas like you’re trying to get out some aggression. Stir the mashed bananas, melted butter, egg, and vanilla extract into the foamy yeast mixture.
- Add Dry Ingredients: In a separate bowl, whisk together the flour, salt, and cinnamon (if using). Gradually add the dry ingredients to the wet ingredients, mixing with a wooden spoon until just combined. If adding chocolate chips or nuts, fold them in now. The dough will be soft and a bit sticky, and that’s totally fine.
- A Quick Knead: Turn the dough out onto a lightly floured surface. Knead for about 5-7 minutes until it’s smooth and elastic. You’re not looking for a super stiff bread dough here, just enough to develop some gluten.
- First Rise: Lightly grease a clean bowl. Place the dough in the bowl, turning it once to coat. Cover the bowl with plastic wrap or a clean kitchen towel and let it rise in a warm place for 1 to 1 ½ hours, or until doubled in size. This is where the magic happens, people!
- Shape and Second Rise: Gently punch down the dough (satisfying, right?). Shape it into a loaf and place it into a lightly greased 9×5-inch loaf pan. Cover again and let it rise for another 30-45 minutes, or until it looks puffy and almost doubled.
- Bake It Up: Preheat your oven to 375°F (190°C). Bake for 30-40 minutes, or until the top is golden brown and a wooden skewer inserted into the center comes out clean. If the top starts browning too quickly, you can loosely tent it with foil.
- Cool Down: Let the banana bread cool in the pan for 10 minutes before transferring it to a wire rack to cool completely. Or, if you’re like me, cut a slice immediately and burn your tongue. Worth it.
Common Mistakes to Avoid
Listen, we all make mistakes. But let’s try to avoid these rookie errors, shall we?
- Using Under-Ripe Bananas: Seriously, this is a cardinal sin in banana bread making. Greenish-yellow bananas just won’t give you the flavor or moisture you need. Wait for those brown spots!
- Water That’s Too Hot (or Cold) for Yeast: Too hot? You’ll kill the yeast. Too cold? It won’t activate. Aim for bathwater warm, around 105-115°F. A thermometer is your friend here.
- Skipping the Rise Times: This isn’t quick bread, remember? Those rise times are crucial for that fluffy texture. Don’t rush it, patience is a virtue (especially in baking).
- Over-Kneading (or Under-Kneading): You want enough kneading for a smooth, elastic dough, but don’t go at it for 20 minutes. About 5-7 minutes is usually perfect for this soft dough.
- Opening the Oven Door Too Early: Resist the urge! Let that loaf bake undisturbed, especially in the first 20 minutes, to ensure it sets properly.
Alternatives & Substitutions
Feeling adventurous? Or just out of something? Here are some ideas:
- Sugar Swap: Want a deeper, more molasses-y flavor? Swap half or all of the granulated sugar for packed light brown sugar. Delicious!
- Milk Alternatives: If you’re dairy-free, feel free to use your favorite non-dairy milk (almond, soy, oat milk all work).
- Butter Swap: While butter truly gives the best flavor and texture, a neutral-flavored oil (like canola or vegetable) or even melted coconut oil could work in a pinch. But, FYl, butter is queen.
- Mix-in Mania: This recipe is a blank canvas! Add a cup of chocolate chips, chopped walnuts, pecans, shredded coconut, or even a mix of dried cranberries and orange zest. Get wild!
- Spice it Up: A pinch of nutmeg, cardamom, or even a dash of ginger can add another layer of flavor.
FAQ (Frequently Asked Questions)
Got questions? I’ve got (casual) answers!
- My dough isn’t rising, what gives? Uh oh! Most likely, your yeast was old or your milk wasn’t the right temperature. Make sure your yeast foams up nicely in step 1. If it doesn’t, toss it and try again with new yeast.
- Can I use less sugar? You can slightly, but remember the sugar not only adds sweetness but also helps activate the yeast and contributes to browning. Don’t cut it by more than a quarter, or you might mess with the texture.
- How do I know if my bananas are ripe enough? They should be heavily spotted brown, almost black, and very soft to the touch. The uglier they look, the better they taste in this bread!
- Can I make this ahead of time? You bet! You can let the first rise happen slowly in the fridge overnight. Just pull it out an hour or so before you want to shape and bake to let it come to room temp.
- Can I use instant yeast instead of active dry? Yes! You can usually substitute instant yeast 1:1 for active dry. You don’t even *have* to proof it first, but I still like to mix it with the warm liquid to ensure it’s alive.
- How long does it last? This bread is best enjoyed within 2-3 days at room temperature (tightly wrapped, obvi). It also freezes beautifully for up to 3 months. Slice it before freezing for easy grab-and-go treats!
- Can I use margarine instead of butter? Well, technically yes, but why hurt your soul like that? Butter just tastes better, period. Your bread deserves the good stuff.
Final Thoughts
See? That wasn’t so scary, was it? You just whipped up a yeast banana bread that’s probably fluffier and more delicious than anything you’d buy at a fancy bakery. Go on, pat yourself on the back! This loaf is perfect for breakfast, a coffee break, or an anytime snack. Seriously, toast a slice and slather it with a little more butter (because why not?). Now go impress someone—or yourself—with your new culinary skills. You’ve earned it!
