So, you’re craving something warm, gooey, and utterly decadent but also… you know… don’t want to bake a gazillion tiny cookies? You want a cookie that says, “I’m here to party, and I brought my stretchy pants!” Same, friend, same. Get ready to bake some **XL Chocolate Chip Cookies** that are so good, they might just change your life. Or at least, your afternoon.
Why This Recipe is Awesome
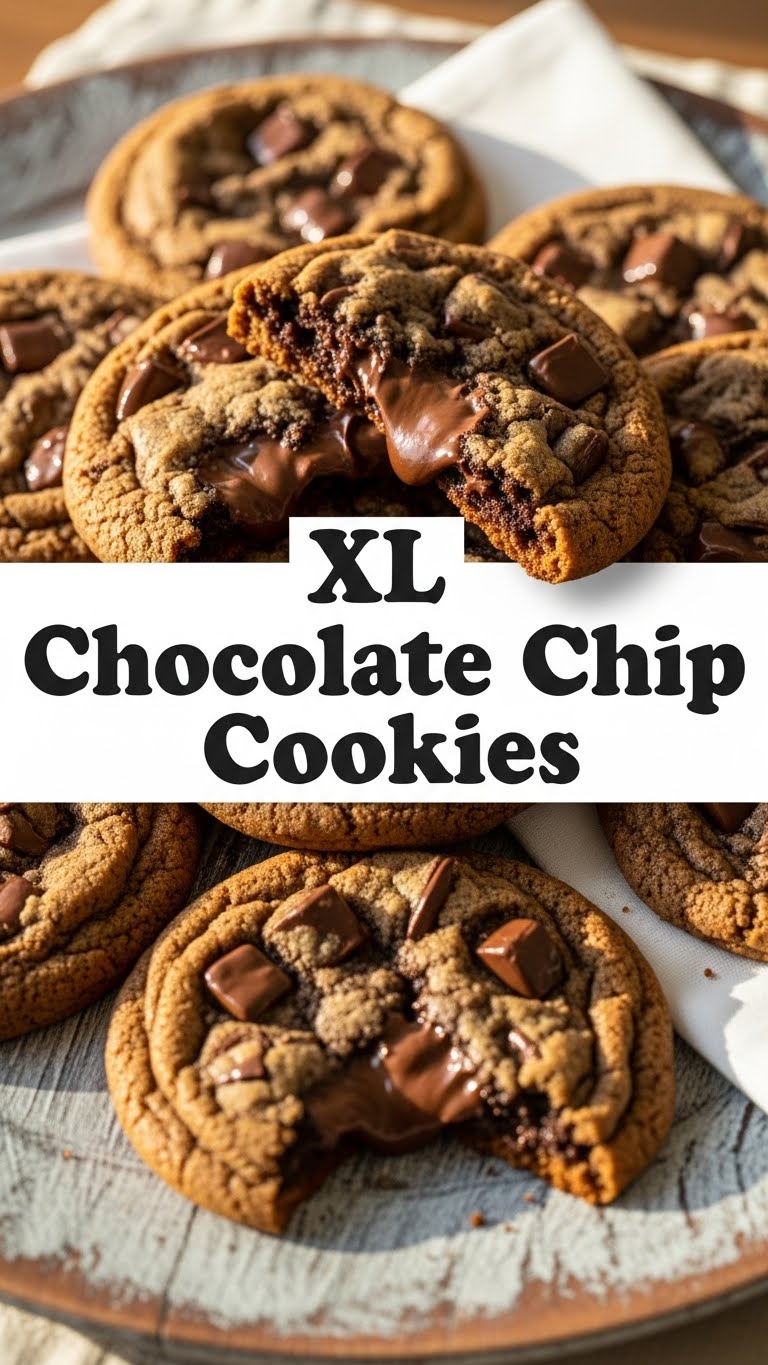
Okay, let’s be real. There are approximately 8,372 chocolate chip cookie recipes out there. So why *this* one? Because this isn’t just a recipe; it’s a manifesto for oversized joy! These cookies are **ridiculously easy**, even if your last baking attempt involved calling the fire department (no judgment, we’ve all been there). They come out chewy, crispy-edged, loaded with chocolate, and perfectly proportioned for when one cookie just isn’t enough – but two feels like too much work. Plus, they’re so big, you get to skip the whole “do I grab another?” internal debate. One and done, baby! It’s practically health food. Kidding! Mostly.
Ingredients You’ll Need
Gather your troops! Here’s what you’ll need for your cookie conquest:
- **1 cup (2 sticks) unsalted butter**, softened. Not melted, not rock hard. Think “spreadable but still holds its shape.” The good stuff, none of that questionable butter-adjacent spread, please.
- **¾ cup packed light brown sugar**. This is where the chewiness comes from. Don’t skimp!
- **½ cup granulated sugar**. For that perfect hint of crisp. Balance, my friend, balance.
- **2 large eggs**. Room temperature, if you’re feeling fancy. If not, whatever. It’ll be fine.
- **2 teaspoons vanilla extract**. Use the good stuff, it makes a huge difference. Don’t tell anyone, but sometimes I add a little extra. Shhh.
- **2¼ cups all-purpose flour**. The backbone of our cookie empire.
- **1 teaspoon baking soda**. Our lift-off agent!
- **½ teaspoon salt**. Crucial for balancing all that sweetness. Don’t skip it unless you want your cookies to taste flat.
- **1½ cups chocolate chips** (or chunks!). A mix of semi-sweet and milk chocolate is *chef’s kiss*. Or just whatever chocolate you’ve got lurking in the pantry.
- **Optional:** A sprinkle of flaky sea salt for sprinkling on top before baking. It makes them look fancy and taste even better. Trust me on this one.
Step-by-Step Instructions
- **Preheat Your Oven:** Set it to 375°F (190°C). And actually let it preheat! This isn’t a suggestion, it’s a command. Line a couple of baking sheets with parchment paper. This is your non-stick insurance policy.
- **Cream the Butter & Sugars:** In a large bowl, or your trusty stand mixer, beat the softened butter, brown sugar, and granulated sugar together until it’s light and fluffy. This usually takes about 2-3 minutes. Scrape down the sides of the bowl like your life depends on it.
- **Add Eggs & Vanilla:** Beat in the eggs one at a time, mixing well after each addition. Then stir in the vanilla extract. It’s gonna smell amazing already, I know.
- **Whisk the Dry Stuff:** In a separate medium bowl, whisk together the flour, baking soda, and salt. Make sure it’s all nicely combined so you don’t get a random pocket of baking soda in your cookie. Gross.
- **Combine Wet & Dry:** Gradually add the dry ingredients to the wet ingredients, mixing on low speed until *just* combined. **Don’t overmix!** Overmixing leads to tough cookies, and nobody wants a tough cookie.
- **Fold in the Chocolate:** Gently fold in the chocolate chips (or chunks, or whatever chocolatey goodness you chose). Make sure they’re evenly distributed. If you’re using the optional flaky sea salt, have it ready.
- **Scoop ‘Em Big:** This is the “XL” part! Use a large ice cream scoop (about ¼ cup) or just your hands to form huge balls of dough. Place them about 3 inches apart on your prepared baking sheets. These babies need room to spread. Sprinkle with flaky sea salt now, if you’re using it.
- **Bake to Perfection:** Bake for 12-15 minutes, or until the edges are golden brown but the centers still look a little soft and gooey. **Pro tip:** For ultimate gooiness, pull them out when they look slightly underdone. They’ll continue to cook on the hot pan.
- **Cool & Devour:** Let them cool on the baking sheet for 5-10 minutes before transferring to a wire rack. Or just eat one right off the sheet. I won’t tell.
Common Mistakes to Avoid
- **Thinking you don’t need to preheat the oven:** Rookie mistake! Cold ovens mean sad, flat cookies.
- **Overmixing the dough:** Seriously, stop. Once the flour is incorporated, step away from the mixer. It’s not a dance party, it’s a gentle blend.
- **Using cold butter (or melted butter):** Softened, my friends, softened. Consistency is key for that perfect texture.
- **Crowding the baking sheet:** These are XL cookies. They need personal space. Give them room to grow into their full, magnificent potential.
- **Not chilling the dough (if you have time):** Okay, for this recipe, you don’t *have* to chill. But if you have an hour or two (or overnight!), chilling the dough will make them even chewier and prevent too much spread. It concentrates the flavors too. Just FYI.
Alternatives & Substitutions
Feeling adventurous? Or just out of a specific ingredient? Here are some tweaks:
- **Chocolate Swap:** Use dark chocolate chunks for a more intense flavor, milk chocolate for extra sweetness, or even white chocolate chips for something different. A mix of all three? Go wild!
- **Add-ins Galore:** Throw in a handful of chopped nuts (pecans or walnuts are great), M&Ms for a colorful twist, or even a sprinkle of toffee bits. Just don’t get too crazy, we still want to taste the cookie!
- **Butter vs. Margarine:** Well, technically yes, you *could* use margarine. But why hurt your soul like that? Butter provides a flavor and texture that margarine just can’t quite replicate. If you’re dairy-free, look for a good quality plant-based butter alternative that bakes well.
- **Flour Power:** While all-purpose is standard, you can experiment with a small amount of whole wheat pastry flour for a nuttier flavor, but be warned, it might change the texture slightly.
FAQ (Frequently Asked Questions)
Got questions? I’ve got (casual, possibly humorous) answers!
- **Do I *have* to use two kinds of sugar?** Yes, for the best texture! The brown sugar adds moisture and chew, while the granulated sugar helps with spread and crispiness. It’s a cookie power couple!
- **Can I make these smaller?** You can, but then they wouldn’t be XL, would they? Just reduce baking time by a few minutes if you go for regular-sized cookies.
- **My cookies spread too much! What happened?** Could be several things: butter was too soft/melted, oven wasn’t hot enough, too much baking soda, or you didn’t chill the dough (if you were aiming for that). Also, sometimes it’s just the cookie gods having a laugh.
- **How long do these cookies last?** In my house? About 24 hours, tops. Realistically, stored in an airtight container at room temperature, they’re good for 3-4 days. But they’re best warm, fresh out of the oven.
- **Can I freeze the dough?** Absolutely! Scoop the dough balls, place them on a baking sheet, and freeze until solid. Then transfer to a freezer-safe bag. When you want a cookie, just bake from frozen, adding a few extra minutes to the baking time. Fresh cookies anytime! You’re basically a genius.
Final Thoughts
And there you have it! A recipe for XL Chocolate Chip Cookies that are practically guaranteed to make you the hero of your kitchen (or just your couch). These aren’t just cookies; they’re a warm, chocolatey hug in edible form. So go ahead, whip up a batch. You deserve this moment of pure, unadulterated cookie bliss. Now go impress someone—or yourself—with your new culinary skills. You’ve earned it!


