So you’re craving something tasty but too lazy to spend forever in the kitchen, huh? Same. What if I told you we could roast a whole chicken that tastes like you spent hours slaving away, but actually… you didn’t? Yep, get ready for some serious magic (and minimal effort!). This isn’t your grandma’s complicated Sunday roast; this is your ‘I-want-delicious-food-now-and-I’m-also-chilling-on-the-couch’ roast.
Why This Recipe Is Awesome
Okay, first off, it’s pretty much **hands-off** once it’s in the oven. You get to chill, binge-watch your favorite show, or contemplate the meaning of life while your kitchen smells like absolute heaven. Plus, it’s super versatile – you can carve it up for a fantastic dinner, then use the leftovers for sandwiches, salads, or even chicken soup. It’s like the gift that keeps on giving, without the awkward thank-you notes.
Seriously, it’s foolproof. Even I can do it, and my culinary exploits sometimes include burning water. This recipe guarantees juicy meat and crispy skin, making you look like a seasoned chef without any of the actual “seasoned chef” effort. Winner, winner, chicken dinner, right?
Ingredients You’ll Need
No obscure ingredients here, just the good stuff you probably already have. Or can easily grab without a treasure hunt.
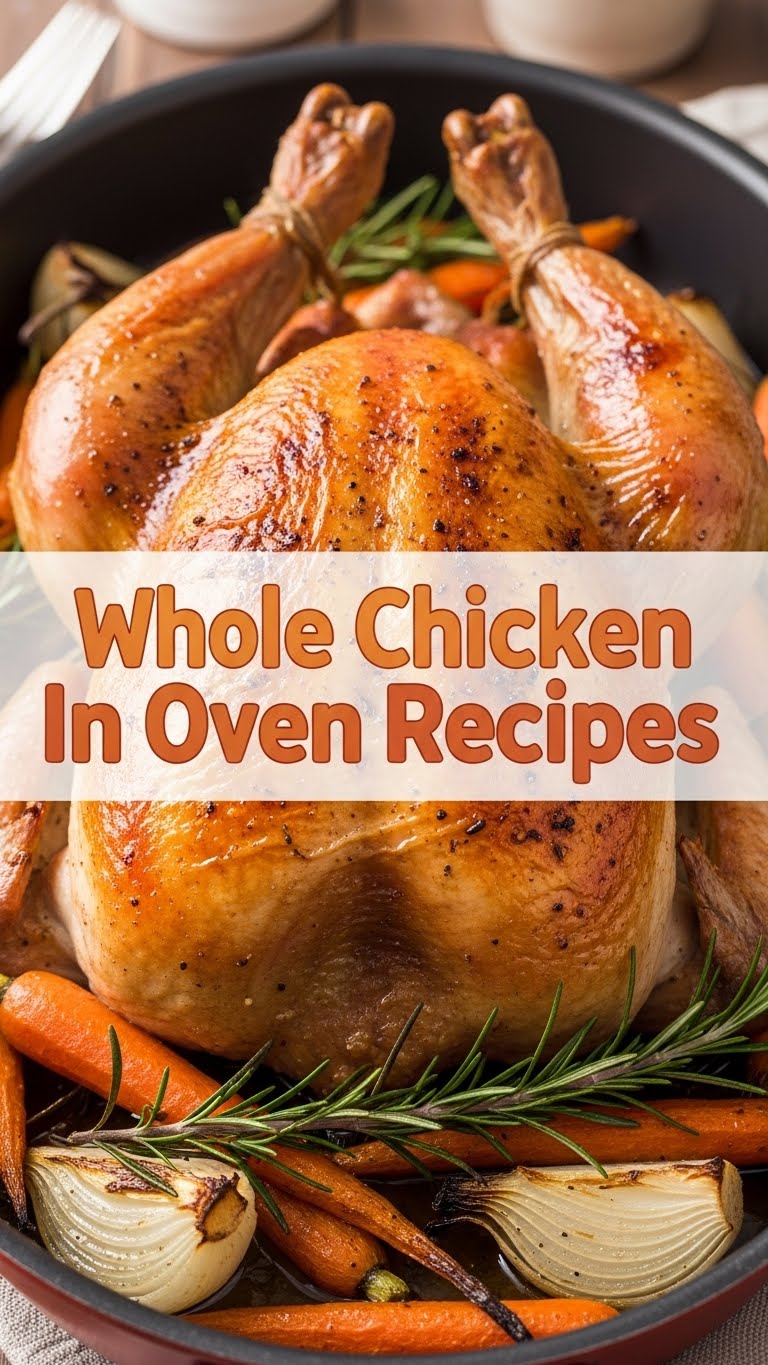
- **A whole chicken:** Around 3-4 lbs. Our majestic star! Make sure it’s thawed, obvs.
- **Butter or Olive Oil:** About 2-3 tablespoons. Because everything’s better with butter, right? Or, if you’re feeling *healthy*, olive oil works too.
- **Salt & Black Pepper:** Generous amounts. Don’t be shy, seasoning is key! Like, really key.
- **Garlic Powder:** 1-2 teaspoons. Or actual minced garlic if you’re feeling fancy and have extra time for chopping.
- **Paprika (smoked or sweet):** 1 teaspoon. For that gorgeous color and a little extra somethin’ somethin’.
- **Onion:** 1 medium, roughly chopped. Just for stuffing the cavity and adding flavor, not necessarily to eat. Unless you’re into that.
- **Lemon:** 1, halved. Another cavity stuffer for brightness!
- **Fresh Herbs (optional):** A few sprigs of rosemary or thyme. Make it smell extra boujee and aromatic.
Step-by-Step Instructions
Alright, let’s get this bird in the oven! These steps are so easy, you could probably do them blindfolded (but please don’t).
- **Prep Time!** First things first, get that oven preheating to **400°F (200°C)**. While it warms up, unwrap your chicken, pat it super dry with paper towels (this is crucial for crispy skin!), and remove any giblets from the cavity. Don’t forget to wash your hands after touching raw chicken, please!
- **Rub-a-dub-dub.** In a small bowl, mix your salt, pepper, garlic powder, and paprika. Now, rub that beautiful spice mix all over the chicken – top, bottom, and under the skin if you’re feeling adventurous. Don’t miss a spot! Every inch deserves love.
- **Butter Up!** Melt your butter (or grab that olive oil). Generously brush or rub it all over the chicken. This is our secret weapon for that glorious golden, crispy skin. Oh, and slip a few butter pats under the skin over the breast meat if you want *extra* juicy results.
- **Stuff It!** Shove those onion chunks and lemon halves into the chicken’s cavity. If you have fresh herbs, toss those in too. They’re going to infuse flavor from the inside out and make your kitchen smell like a fancy restaurant.
- **Truss, or Don’t.** You *can* tie the legs together with kitchen twine if you want it to cook more evenly and look picture-perfect. But honestly, if you skip this, it’s not the end of the world. Just less Instagrammable, maybe.
- **Into the Oven!** Place the chicken breast-side up in a sturdy roasting pan or a cast-iron skillet. Pop it into your preheated oven.
- **Roast Away!** Roast for about **60-90 minutes**. Cooking time varies depending on your chicken’s size and oven. A good rule of thumb is about 15 minutes per pound. You’ll know it’s getting close when your house smells incredible.
- **Check for Doneness.** The most important part! Use a meat thermometer and insert it into the thickest part of the thigh (without touching bone). It should read **165°F (74°C)**. The juices should also run clear when you pierce the thigh.
- **Rest, You Deserve It!** Once done, take the chicken out, cover it loosely with foil, and let it **rest for 10-15 minutes** before carving. This step is non-negotiable for juicy meat. Seriously, don’t skip it! It lets the juices redistribute, ensuring every bite is moist and flavorful.
Common Mistakes to Avoid
We’ve all been there. Learn from my past kitchen mishaps (so you don’t have to!).
- **Not patting the chicken dry:** This is a huge no-no! **Dry skin = crispy skin.** Wet skin = sad, soggy skin. Don’t be sad.
- **Forgetting to preheat the oven:** Rookie mistake! Cold oven means uneven cooking and a longer wait for deliciousness. It’s like jumping into a cold pool; no one likes it.
- **Skipping the resting step:** I get it, you’re hungry. But if you cut into it too soon, all those glorious juices will escape, leaving you with dry chicken. It’s a tragedy, truly.
- **Under-seasoning:** A bland chicken is a wasted chicken. Be generous with your spices; the chicken can take it!
- **Not using a thermometer:** Guessing game? No thanks. A meat thermometer is your best friend here. No one wants raw chicken (or dry, overcooked chicken, for that matter).
Alternatives & Substitutions
Feeling creative? Or just missing an ingredient? No stress, we’ve got options!
- **Spice blends:** Don’t have garlic powder or paprika? Use whatever you fancy! Italian seasoning, herbs de Provence, a Cajun rub… get wild! Just make sure it complements chicken.
- **Butter alternative:** Olive oil works perfectly for that crispy skin. Coconut oil could even give it a unique twist, but that might be *too* adventurous for some tastes.
- **Cavity stuffers:** No lemon or onion? Try apple wedges for a subtle sweetness, or a head of garlic cut in half for a deep, aromatic flavor. Potatoes and carrots can also go in the pan around the chicken, soaking up all the drippings – yummy!
- **For an extra crispy skin:** Want to really impress? Start the chicken at a higher temp (like 450°F/230°C) for the first 15-20 minutes, then reduce to 375°F/190°C to finish cooking. It’s a little extra effort but totally worth it, IMO, for that crackling skin.
FAQ (Frequently Asked Questions)
Got questions? I’ve got answers! (Mostly.)
- **”My chicken is cooking unevenly! Help!”** Are you using a roasting rack? That helps with air circulation. Also, try rotating the pan halfway through. And make sure your oven isn’t having a temper tantrum (some ovens have hot spots!).
- **”Can I use frozen chicken?”** Uh, no. **Always thaw your chicken completely** before roasting. Otherwise, you’ll have an icy center and a burnt outside. Not exactly a five-star meal, my friend.
- **”What about brining?”** Ooh, fancy! Brining can definitely make your chicken even juicier and more flavorful. But for this “lazy chef” recipe, we’re skipping it. This is about minimal effort, maximal taste.
- **”How do I get super crispy skin?”** Pat it dry, use butter/oil, and don’t overcrowd the pan. Some people even put a tiny bit of baking powder in their spice rub (like 1/2 tsp) for extra crispiness. Don’t tell anyone I told you that secret.
- **”What if I don’t have a roasting pan?”** No worries! A sturdy oven-safe dish or even a large baking sheet with a rim will work just fine. Just make sure the juices don’t overflow onto the bottom of your oven – that’s a cleaning nightmare.
- **”Can I stuff the chicken with actual stuffing?”** You *can*, but it significantly increases cooking time and can be tricky to ensure the stuffing reaches a safe temperature. For ease and safety, I’d recommend cooking stuffing separately.
Final Thoughts
See? You’re practically a poultry pro now! Roasting a whole chicken might seem intimidating at first, but it’s really one of the most rewarding and forgiving things you can do in the kitchen. Plus, your house will smell amazing, which is a bonus no one complains about. So go ahead, crank up the tunes, pour yourself something nice, and let that oven do all the hard work. Now go impress someone—or yourself—with your new culinary skills. You’ve earned it!


