So you’re craving something warm and comforting, but the idea of slaving away in the kitchen for hours makes you want to order takeout? Been there, bought the t-shirt, regretted the delivery fee. But what if I told you there’s a way to get that glorious, fall-off-the-bone roasted chicken vibe with minimal effort and *maximum* payoff? Enter: the humble whole chicken, your trusty Dutch oven, and this super chill recipe. Get ready to impress yourself!
Why This Recipe is Awesome
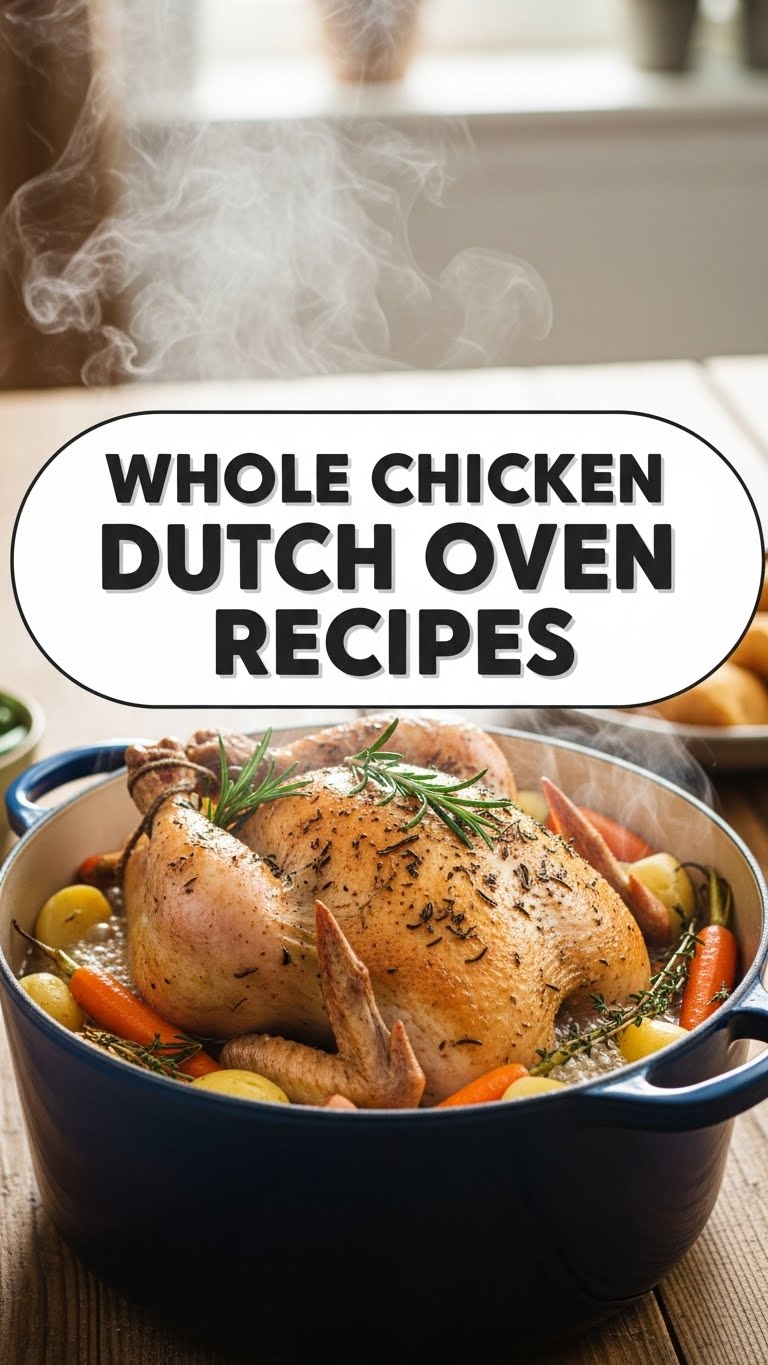
Okay, let’s be real. We all want to look like culinary geniuses without actually having to *be* one, right? This recipe is basically your cheat code. It’s a one-pot wonder, which means way less cleanup (hooray for lazy chefs!). The Dutch oven works its magic, creating a steamy, flavorful environment that keeps your chicken ridiculously moist on the inside, while still giving you that crave-worthy, crispy skin. It’s truly idiot-proof; even I haven’t messed it up, and that’s saying something. Plus, the whole house will smell like a gourmet restaurant, not just your average kitchen after a microwave meal. You’re welcome.
Ingredients You’ll Need
Gather your squad, because we’re about to make some magic happen. No fancy stuff, just good, honest ingredients.
- 1 Whole Chicken (3-4 lbs): The undisputed star of our show! Make sure it’s fully defrosted, unless you’re into icy surprises.
- 2 tbsp Olive Oil: Your trusty friend for getting things golden and delicious.
- 2 tbsp Unsalted Butter: Because butter makes everything better, duh. It adds that rich flavor and helps with the crispy skin.
- 1 Large Onion: Roughly chopped. Don’t stress about perfection; it’s all going to melt into pure deliciousness.
- 1 Head of Garlic: Yes, a whole head! Smash the cloves, peel ’em, and toss ’em in. Vampires aren’t invited to this dinner party.
- 3-4 Carrots: Chopped into chunky bits. They’ll soak up all those amazing chicken juices.
- 4-5 Medium Potatoes: Cut into large chunks (or use smaller ones whole). Russets, red potatoes, Yukon Golds – whatever floats your boat. Crispy on the outside, fluffy on the inside. Carb heaven, IMO.
- A Few Sprigs of Fresh Herbs: Rosemary, thyme, sage – pick your poison! They make your chicken smell like a dream.
- 1 Lemon: Halved. Squeeze some over the chicken, then pop the halves right inside the bird for extra zest.
- Salt and Freshly Ground Black Pepper: The OG flavor enhancers. Don’t be shy!
- ½ cup Chicken Broth or Dry White Wine (Optional): A splash for extra moisture and to create some glorious pan drippings. If you’re feeling fancy, wine is a great choice.
Step-by-Step Instructions
Alright, apron on (or not, we don’t judge!), let’s get cooking. These steps are super straightforward.
- Prep Your Chicken: First things first, get that chicken nice and dry. **Pat it down thoroughly with paper towels** – we want crispy skin, not soggy skin! Rub it all over with the olive oil, then sprinkle generously with salt and pepper. Stuff the lemon halves and a few sprigs of herbs into the cavity.
- Sear for Glory: Place your Dutch oven over medium-high heat. Add the butter and let it melt. Once it’s shimmering, carefully place your chicken in the pot, breast-side down. Sear for about 5-7 minutes until beautifully golden brown. Flip it over and sear the other side for another 5-7 minutes. Remove the chicken from the pot and set it aside.
- Sauté the Veggies: Toss the chopped onion, garlic, carrots, and potatoes into the same pot. Add any remaining herb sprigs. Sauté for about 5-7 minutes, stirring occasionally, until they start to soften and pick up all those delicious browned bits from the bottom of the pot.
- Nestle and Roast: Create a little bed of veggies in the Dutch oven, then nestle your seared chicken right on top. If you’re using chicken broth or wine, pour it into the bottom of the pot around the veggies. Put the lid on your Dutch oven tightly.
- Bake It Up: Transfer the lidded Dutch oven to your preheated oven at **400°F (200°C)**. Roast for about 60-75 minutes. Then, remove the lid and continue roasting for another 20-30 minutes, or until the chicken skin is deeply golden brown and crispy.
- Rest, Then Devour: This is a crucial step, don’t skip it! Carefully remove the Dutch oven from the oven and let the chicken rest, still in the pot, for at least 10-15 minutes before carving. **Resting allows the juices to redistribute**, ensuring every bite is super moist and tender. Carve and serve with those amazing roasted veggies and pan juices.
Common Mistakes to Avoid
We all make mistakes, but let’s try to avoid these rookie blunders for maximum chicken deliciousness.
- Not Patting the Chicken Dry: Seriously, I cannot stress this enough. If your chicken is wet, it will steam, not crisp. And nobody wants steamed chicken skin. Nobody!
- Forgetting to Season: A bland bird is a sad bird. Be generous with your salt and pepper. It makes all the difference, FYI.
- Skipping the Sear: That initial sear isn’t just for looks; it locks in flavor and kickstarts that amazing crispy skin. Don’t be lazy here!
- Overcrowding the Pot: If your veggies are packed in too tight, they’ll steam instead of roast and get that nice caramelization. Give them some breathing room!
- Not Letting It Rest: Impatience is a virtue sometimes, but not after roasting a chicken. If you carve too soon, all those delicious juices will run out, leaving you with dry meat. **Give it time to chill.**
Alternatives & Substitutions
Feeling a little adventurous, or just missing an ingredient? No worries, we’ve got options!
- Veggies: Swap carrots and potatoes for sweet potatoes, parsnips, bell peppers, parsnips, or even Brussels sprouts. Whatever you have lurking in your fridge that needs using up!
- Herbs: No fresh herbs? Dried will totally work! Just use about ⅓ of the amount (e.g., 1 tsp dried for every 1 tbsp fresh). Or, if you’re not an herb person, skip ’em entirely – the chicken will still be tasty.
- Butter: You can definitely use more olive oil instead of butter for searing, but I gotta say, the butter really adds that extra richness and helps with browning. It’s worth it!
- Broth/Wine: No broth or wine? A splash of water will work in a pinch, or you can just omit it if you prefer a drier pan.
- Spice It Up: Want some extra zing? Add a teaspoon of smoked paprika, onion powder, or a pinch of cayenne pepper to your seasoning mix for a different flavor profile.
FAQ (Frequently Asked Questions)
Got questions? I’ve got (casual) answers!
- Do I *really* need a Dutch oven? Okay, *technically* you can use any heavy, oven-safe pot with a tight-fitting lid. But a good quality Dutch oven truly is the MVP here. It distributes heat like a dream and makes for the most even, delicious cook. So, yeah, get one if you can!
- My chicken isn’t getting crispy! What gives? Did you pat it dry? Did you sear it properly? And most importantly, did you take the lid off for the last 20-30 minutes of cooking? That’s where the magic truly happens for the skin!
- Can I add more liquid for gravy? Absolutely! A bit more broth or wine at the beginning will give you more drippings for a fantastic pan gravy. Just thicken it up at the end with a cornstarch slurry (a mix of cornstarch and cold water). So good!
- How do I know when it’s cooked through? **The internal temperature should reach 165°F (74°C) in the thickest part of the thigh (avoiding the bone).** The juices should also run clear when you poke it with a knife. Don’t eyeball it; a meat thermometer is your best friend here!
- What if I don’t have fresh herbs? No stress! Dried herbs are totally fine. Just remember the general rule: 1 teaspoon of dried herbs for every tablespoon of fresh. The smell will still be amazing!
- Can I prep this ahead of time? You can definitely prep your veggies and season your chicken a few hours before, even overnight. Just keep it chilled in the fridge until you’re ready to cook. Super convenient for busy days!
- My Dutch oven is too small for my chicken! Help! Rookie mistake! Kidding. If your chicken is too snug, consider cutting it into pieces (spatchcocking is great for this) or perhaps getting a slightly bigger pot next time. Or, embrace the cozy chicken!
Final Thoughts
See? I told you it was easy! Now you’ve got a ridiculously delicious, perfectly roasted whole chicken, all thanks to your awesome self and a trusty Dutch oven. Go forth and conquer that craving! Impress your friends, your family, or just yourself with your new culinary skills. You’ve earned it! Now go enjoy that juicy, crispy goodness, and don’t forget to send me a pic of your masterpiece (and maybe a bite)!


