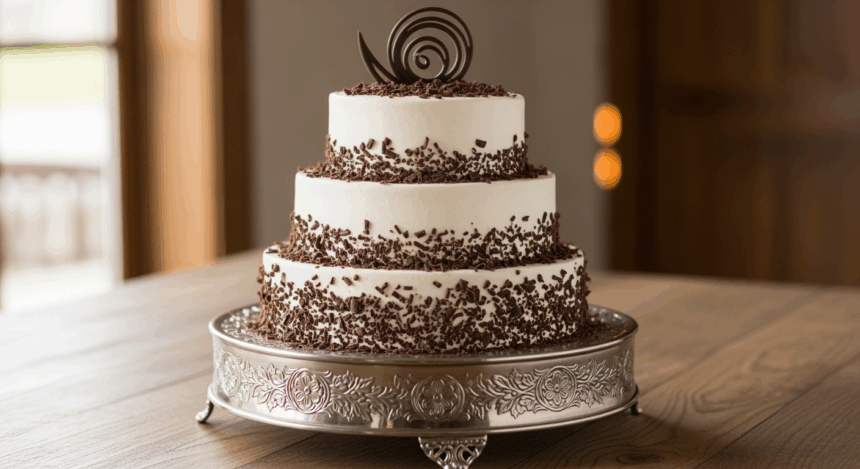
Let’s be real here—is there anything more classic than a white frosted cake with chocolate shavings? It’s like the little black dress of desserts, except you can actually eat it. And trust me, this one’s a showstopper that secretly requires minimal effort (but we’ll let your guests think you slaved away all day).
Why This Recipe is Awesome
Look, I could get all fancy with the culinary terminology, but here’s the straight talk: this cake is ridiculously good while being surprisingly simple. It’s basically foolproof—I once made it while simultaneously binge-watching an entire season of my favorite show and it still turned out Instagram-worthy.
The contrast between the silky white frosting and those elegant chocolate shavings just hits different. Plus, it’s versatile enough for everything from “I got a promotion” celebrations to “It’s Tuesday and I survived half the week” occasions.
Ingredients You’ll Need
For the Cake:
- 2 cups all-purpose flour (the regular stuff, nothing fancy)
- 1½ cups granulated sugar (you know, the white crystals that make life worth living)
- 3 tsp baking powder (the magic dust that makes everything rise)
- ½ tsp salt (just a pinch to make the sweet stuff taste better)
- ½ cup unsalted butter, softened (not melted into oblivion, just soft)
- 1 cup milk (cow, almond, oat—whatever floats your boat)
- 1 tsp vanilla extract (the real stuff if you’re feeling fancy)
- 3 large eggs (from happy chickens, ideally)
For the Frosting:
- 1 cup unsalted butter, softened (patience is key here)
- 4 cups powdered sugar (prepare for the inevitable sugar cloud in your kitchen)
- 2 tbsp heavy cream (diet food, this is not)
- 1 tsp vanilla extract (again with the real stuff, please)
- Pinch of salt (trust me on this one)
For the Chocolate Shavings:
- 4 oz semi-sweet chocolate bar (not chips—we’re not savages)
Step-by-Step Instructions
- Prep your battlefield. Preheat oven to 350°F (175°C) and grease two 9-inch round cake pans. Line the bottoms with parchment paper if you’re not in the mood for cake-removal drama.
- Mix the dry squad. In a large bowl, whisk together flour, sugar, baking powder, and salt. No sifting needed—this isn’t the Great British Bake Off, and no one’s judging your technique.
- Add the wet team. Throw in the softened butter and mix until the mixture looks like coarse sand. Then add milk, vanilla, and eggs. Beat at medium speed for about 2 minutes until smooth. If you find lumps, just beat them into submission.
- Bake it till you make it. Pour the batter evenly into your prepared pans and bake for 25-30 minutes. The cake is done when a toothpick inserted in the center comes out clean—or with a few moist crumbs, but definitely not wet batter unless you’re aiming for cake soup.
- Cool your jets. Let the cakes cool in the pans for 10 minutes before transferring to a wire rack to cool completely. Seriously, don’t rush this step unless you want a frosting avalanche later.
- Whip up that cloud-like frosting. Beat the butter until creamy, then gradually add powdered sugar, cream, vanilla, and salt. Keep beating until it’s fluffy enough to make a pillow jealous—about 3-4 minutes.
- Assemble the masterpiece. Place one cake layer on your serving plate, spread a generous layer of frosting on top, then crown it with the second cake. Cover the whole thing with the remaining frosting, getting as smooth or textured as your heart desires.
- Make it rain chocolate. Use a vegetable peeler to create chocolate shavings from your chocolate bar. Sprinkle these all over the top and press some onto the sides for that “I definitely went to pastry school” look.
Common Mistakes to Avoid
Overmixing the batter – You’re making cake, not cement. Once the ingredients are combined, stop! Unless arm workout is your goal.
Frosting a warm cake – Unless “melted snowman” is your aesthetic, wait until the cake is completely cool. I learned this the hard way so you don’t have to.
Using cold butter for frosting – Those lumpy frosting nightmares? All because someone (definitely not me…) was too impatient to let the butter soften properly.
Making chocolate shavings with a dull peeler – Talk about frustration! Make sure your peeler is sharp, or you’ll end up with chocolate dust and emotional damage.
Alternatives & Substitutions
Cake flour instead of all-purpose – For an even more tender crumb. FYI, your cake will basically melt in the mouth with this swap.
Cream cheese frosting – If you’re feeling rebellious, swap half the butter for cream cheese. It adds a tangy twist that’ll make people wonder what your secret is.
Dark chocolate shavings – For the sophisticated palates in your life. Or, ya know, just because you prefer it.
Almond extract – A quarter teaspoon added to the vanilla gives a subtle “what is that amazing flavor?” effect. It’s my secret weapon for making people think I’m fancier than I am.
FAQ (Frequently Asked Questions)
Can I make this cake ahead of time?
Absolutely! The cake layers can be baked a day in advance and wrapped in plastic wrap. The assembled cake will hold up beautifully in the fridge for 2-3 days—if it survives that long without being devoured.
Do I really need to use unsalted butter?
I mean, salted butter won’t summon cake demons or anything, but it makes controlling the salt level tricky. If salted is all you’ve got, just skip the added salt in the recipe.
Can I use a box mix instead?
Are you seriously asking me this? I’m not the cake police—use what you want! But IMO, this homemade version takes like 5 extra minutes and tastes approximately 500 times better.
How do I store leftovers?
“Leftovers”? What’s that? But seriously, cover and refrigerate for up to 5 days. Let it come to room temperature before serving for maximum deliciousness.
Why did my cake sink in the middle?
You either opened the oven door too early (patience, grasshopper) or your baking powder has been sitting in your pantry since the Stone Age. Time for a refresh!
Final Thoughts
There you have it—a cake that looks like it could be in a bakery window but is actually simple enough that you won’t need therapy afterward. The combination of that pillowy white frosting with the elegant chocolate shavings is guaranteed to make you look like a dessert wizard.
Remember, cake is supposed to be fun! If your frosting isn’t perfectly smooth or your chocolate shavings look more like chocolate crumbs, who cares? It’ll taste amazing, and that’s what matters. Now go forth and create that sweet masterpiece—your taste buds are waiting!
