So, you’ve baked a glorious cake, or maybe you just bought one from the store (no judgment here, we’re friends!). But now it’s looking a bit… plain? Kinda like me before my first coffee. You want to make it look like a Pinterest masterpiece without, you know, actually becoming a professional pastry chef? My friend, you’ve come to the right place. We’re diving into the ridiculously easy (and fun!) world of white chocolate cake decoration. Get ready to impress yourself!
Why This Decoration Method Is Awesome
Okay, let’s be real. We all want to look like we spent hours slaving away, but ideally, we spent those hours binge-watching our favorite show instead. This white chocolate decoration method is your secret weapon. It’s practically idiot-proof – even I, a master of culinary chaos, didn’t mess it up. It’s elegant, versatile, and makes any cake look instantly fancier without needing a diploma in piping. Plus, who doesn’t love white chocolate? It’s like the little black dress of cake decorations: always chic, minimal effort, and always a crowd-pleaser. Seriously, it’s a game-changer.
Ingredients You’ll Need
Keep it simple, buttercup! You don’t need a pantry full of obscure items for this. Just a few essentials:
- Good Quality White Chocolate: Around 8-12 oz (225-340g). Think bars, callets, or blocks. Skip the cheap stuff, your taste buds (and your sanity while melting) will thank you. Trust me, it makes a difference.
- Optional Food Coloring: Oil-based gel colors are your BFF here. Water-based ones can make your chocolate seize faster than you can say “oops.”
- Optional Sprinkles, Edible Glitter, or Gold Dust: For that extra “ta-da!” factor. Because sparkle makes everything better, right?
Step-by-Step Instructions
Ready? Let’s turn that humble cake into a showstopper!
- Chop It Up: If you’re using a bar or block, chop your white chocolate into small, uniform pieces. This helps it melt evenly and prevents accidental scorching. Nobody wants burnt chocolate; it’s a tragedy.
-
Melt with Care: You have two options, both require vigilance!
- Microwave Method: Place chopped chocolate in a microwave-safe bowl. Heat in 15-20 second bursts, stirring well after each burst. Seriously, stir, stir, stir! Chocolate holds its shape even when melted, so stirring is key to checking its true consistency. Stop heating when there are still a few small lumps; the residual heat will melt them as you stir.
- Double Boiler Method: Set a heatproof bowl over a saucepan with an inch or two of simmering water. Make sure the bowl doesn’t touch the water. Stir constantly until melted and smooth. This method is a bit gentler and reduces the risk of burning.
Pro Tip: Don’t let ANY water get into your chocolate! It’ll seize up faster than you can blink, turning into a grainy, unworkable mess.
- Color Me Impressed (Optional): If you want to add color, now’s the time! Add a tiny drop of oil-based gel food coloring to your melted white chocolate and stir until evenly combined. Remember, a little goes a long way.
-
Let’s Decorate! Choose Your Adventure:
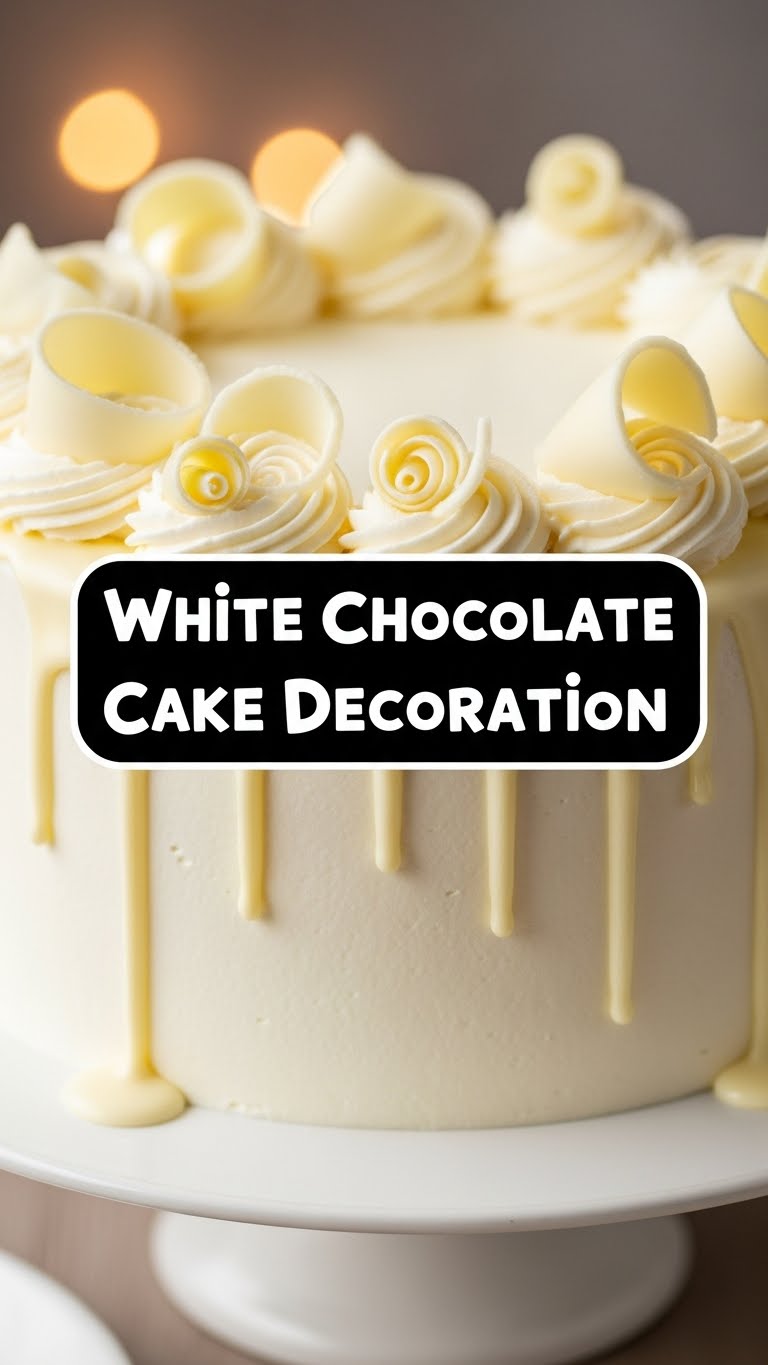
- Drizzle Dazzle: Spoon melted chocolate into a piping bag (or a ziplock bag with a tiny corner snipped off). Drizzle artfully over the top and sides of your cake. Get wild with zig-zags, straight lines, or abstract patterns.
- Chocolate Shards/Curtains: Spread a thin, even layer of melted white chocolate onto a piece of parchment paper or an acetate sheet. Let it set slightly (but not completely hard). Then, use a knife or a bench scraper to create shards or curl it around a rolling pin for elegant chocolate curtains. Pop it in the fridge for 10-15 minutes to fully harden before peeling off the parchment/acetate.
- Piped Shapes: If you’re feeling fancy, pipe small shapes (like stars, hearts, or swirls) onto parchment paper. Chill until firm, then carefully peel them off and arrange them on your cake.
- Final Touches: While the chocolate is still slightly tacky (if applicable), sprinkle on your edible glitter, sprinkles, or gold dust for that extra sparkle. Let everything fully set at room temperature or in the fridge before serving.
Common Mistakes to Avoid
We’ve all been there, making rookie mistakes. Learn from my chocolatey errors!
- Overheating the Chocolate: This is the number one culprit for grainy, seized, or burnt chocolate. Slow and steady wins the race! Low heat and constant stirring are your best friends.
- Getting Water in There: Seriously, avoid it like it’s the plague. Even a tiny drop can turn your beautiful, smooth chocolate into a lumpy, unusable mess. Dry bowls, dry spatulas, dry everything!
- Impatience is NOT a Virtue: Trying to rush the setting process or peeling off your decorations before they’re fully firm will lead to broken pieces and sadness. Give it time to chill.
- Using the Wrong Food Coloring: Regular liquid food coloring is water-based and a one-way ticket to Seizeville for your chocolate. Stick to oil-based gels.
Alternatives & Substitutions
Feeling adventurous or just out of white chocolate? No problem!
- Candy Melts: These are a great substitute, especially if you want vibrant colors without dealing with oil-based gels. They melt beautifully and set quickly. IMO, they’re a dream for beginners.
- Milk or Dark Chocolate: Obviously, you can use these too! The process is identical. Dark chocolate shards on a white cake? *Chef’s kiss!*
- Adding Flavor: Before decorating, you can stir in a few drops of food-grade extracts like peppermint, almond, or even a tiny bit of orange zest for extra flavor. Just make sure the extracts are oil-based or very concentrated alcohol-based to avoid seizing.
- Tools: No piping bag? No worries! A sturdy ziplock bag with a corner snipped off works perfectly. No fancy offset spatula? A butter knife or the back of a spoon will do the trick for spreading.
FAQ (Frequently Asked Questions)
Got questions? I’ve got (casual) answers!
- “Can I use chocolate chips instead of bars?” Well, technically yes, but why hurt your soul like that? Chocolate chips often contain stabilizers that make them harder to melt smoothly and can result in a thicker, less refined finish. For best results, use good quality baking chocolate.
- “My chocolate seized! Can I fix it?” Oh, the heartbreak! Sometimes, adding a tiny bit of vegetable oil or shortening (half a teaspoon at a time) and stirring vigorously can rescue it. But honestly, often it’s a lost cause. Better to start fresh and be extra careful next time!
- “How do I get really shiny chocolate decorations?” Ah, the magic of tempering! It’s a bit more advanced but essentially involves carefully heating and cooling chocolate to specific temperatures. For simple decorations, just melting slowly and not overheating usually gives a decent shine. For a deep dive, Google “chocolate tempering” but be warned, it’s a rabbit hole!
- “How long do these decorations last?” If stored in an airtight container at room temperature (or fridge, depending on your cake’s needs), solid white chocolate decorations can last for weeks! Just make sure they’re not getting humid or too warm, or they might bloom (get a grayish film) or melt.
- “Can I make these ahead of time?” Absolutely, FYI! That’s one of the best parts. Make your shards, curls, or piped shapes, let them set, then store them carefully in an airtight container at room temperature until you’re ready to assemble your cake. Makes party day so much less stressful!
Final Thoughts
See? That wasn’t so scary, was it? White chocolate cake decoration is all about having fun, getting a little messy, and making something beautiful without stressing yourself out. Your cake is going to look amazing, and no one needs to know how ridiculously easy it was. Now go impress someone – or yourself – with your new culinary skills. You’ve earned it!

