So, you’ve got that craving, right? That deep, persistent rumble in your belly for something sweet, comforting, and utterly delicious? But also, you’re *you*, and “complicated” isn’t exactly in your culinary vocabulary today. Good news, my friend! We’re about to make magic with minimal fuss. Get ready for a White Cake with Apple Pie Filling that’s so good, you’ll wonder why it’s not a national holiday. 😉
Why This Recipe is Awesome (and You’re About to Be Too)
Let’s be real, most fancy recipes look like they require a culinary degree and a small army of sous-chefs. Not this one. This white cake with apple pie filling concoction is practically **idiot-proof**. Seriously, if I can whip this up without setting off the smoke alarm (which is a minor miracle, IMO), you’re going to rock it. It’s comforting, it’s a showstopper, and it tastes like a warm hug from your favorite grandma who just *gets* you. Plus, it’s cake *and* pie in one – talk about efficiency!
Ingredients You’ll Need (The Fun Part, Obviously)
For the White Cake (AKA Your Canvas of Deliciousness):
- All-purpose flour: About 2 ½ cups. The backbone of your cake dreams.
- Granulated sugar: 1 ¾ cups. Sweetness!
- Baking powder: 1 tablespoon. For that glorious lift! Don’t skimp.
- Salt: ½ teaspoon. Balances everything out, like a tiny flavor referee.
- Unsalted butter: 1 cup (2 sticks), softened. The good stuff. **Room temperature is key**, don’t be a savage and use it cold.
- Large eggs: 4. Separate yolks from whites, because we’re fancy like that.
- Vanilla extract: 2 teaspoons. Liquid gold for flavor.
- Milk: 1 cup. Whole milk if you’re feeling decadent, but any milk will do.
For the Apple Pie Filling (The “Surprise, There’s Pie In Your Cake!” Part):
- Apples: 4-5 medium-sized, like Granny Smith or Honeycrisp. Peeled, cored, and diced into small, lovely pieces.
- Butter: 2 tablespoons. Again, the good stuff.
- Brown sugar: ¼ cup. For that caramel-y goodness.
- Cinnamon: 1 teaspoon. Because apples and cinnamon are soulmates.
- Nutmeg: ¼ teaspoon. Optional, but highly recommended for extra warmth.
- Lemon juice: 1 tablespoon. Brightens everything up and stops the apples from browning.
- Cornstarch: 1 tablespoon (mixed with 1 tbsp cold water to make a slurry). Our secret weapon for thickness.
Let’s Get Baking! Your Step-by-Step Mission Briefing
- Preheat Power: Get your oven cranked up to 350°F (175°C). Seriously, don’t skip this. Grease and flour two 8 or 9-inch round cake pans. Or use parchment circles for less drama.
- Dry Mix Magic: In a large bowl, whisk together your flour, sugar, baking powder, and salt. Give it a good whisk until everything is friends.
- Wet Mix Wonders (Part 1): In a separate, medium-sized bowl, cream your softened butter until it’s light and fluffy. This takes about 2-3 minutes with an electric mixer. Then, beat in your egg yolks, one at a time, until fully incorporated. Stir in the vanilla extract.
- Combine & Conquer: Gradually add your dry ingredients to the wet butter mixture, alternating with the milk. Start and end with the dry ingredients. Mix until **just combined** – don’t overmix, or your cake will be tough (and nobody wants a tough cake).
- Egg White Elevate: In a very clean, separate bowl, beat your egg whites until stiff peaks form. This is where the magic happens for that fluffy white cake texture. Gently fold these stiff whites into your cake batter in two additions. Be gentle! We want that airy fluffiness.
- Pan & Bake: Divide your glorious batter evenly between the two prepared cake pans. Pop them in the preheated oven for 25-30 minutes, or until a wooden skewer inserted into the center comes out clean.
- Cool Down: Let them cool in the pans for about 10 minutes, then invert them onto a wire rack to cool completely. Patience, young grasshopper.
Now, For That Glorious Apple Filling!
- Apple Sauté: While your cakes are cooling, melt 2 tablespoons of butter in a saucepan over medium heat. Add your diced apples, brown sugar, cinnamon, and nutmeg (if using). Stir it all together.
- Simmer & Soften: Cook for about 8-10 minutes, stirring occasionally, until the apples are tender but still hold their shape. Add the lemon juice.
- Thicken It Up: Pour in your cornstarch slurry (cornstarch mixed with cold water). Stir constantly and cook for another 1-2 minutes until the filling thickens. Remove from heat and let it **cool completely**.
The Grand Assembly!
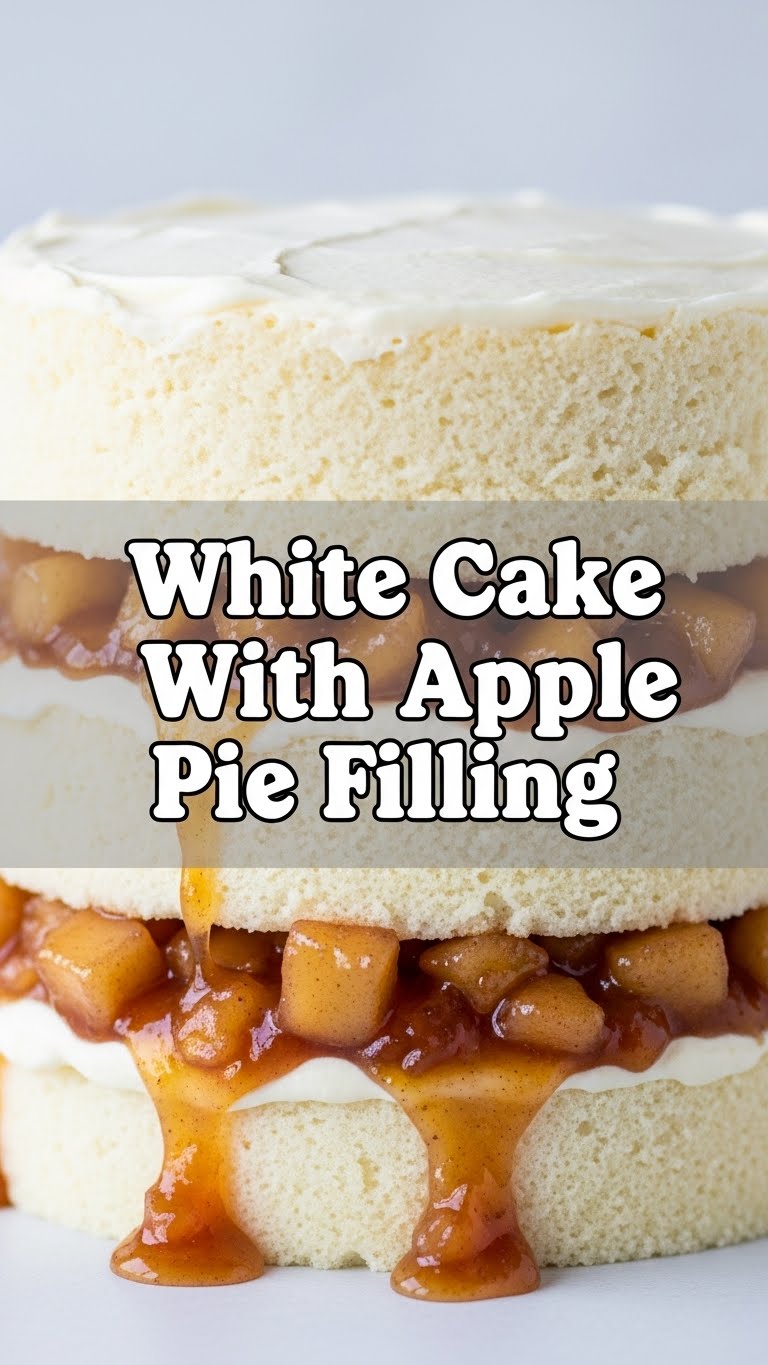
- Stack ‘Em Up: Once both cakes and filling are **completely cool**, place one cake layer on your serving plate. Pile that amazing apple pie filling generously on top, spreading it almost to the edges.
- Top & Admire: Gently place the second cake layer on top. If you’re feeling extra, dust with powdered sugar, or whip up a quick vanilla buttercream. Voila! You’re a pastry chef!
Common Mistakes to Avoid (Unless You Like Drama)
- Not Preheating the Oven: Rookie mistake! Your cake won’t rise properly, and it’ll be dense. Don’t do it.
- Overmixing the Batter: This is a big no-no. Overmixing develops the gluten, making your cake tough and chewy instead of light and fluffy. Mix *just* until combined.
- Using Cold Butter or Eggs: Seriously, **room temperature** for both is crucial for a smooth, emulsified batter. Plan ahead!
- Filling a Warm Cake: This is a one-way ticket to a soggy mess. The cake and filling must be completely cool before assembly. We’re building a masterpiece, not a swamp.
- Eyeballing Ingredients: Baking is a science, my friend. Use proper measuring cups and spoons, especially for flour and leavening agents. Your grandma might eyeball it, but she’s got decades of practice, FYI.
Alternatives & Substitutions (Because We’re Flexible Like That)
- Apples: Can’t find Granny Smiths? Any firm apple like Fuji or Gala works great. Or, if you’re in a pinch, a good quality **canned apple pie filling** can totally sub in. (Shhh, don’t tell anyone I said that.)
- Milk: Almond milk or oat milk can work in place of dairy milk, but whole milk really gives that rich texture.
- Vanilla Extract: Want to jazz it up? Try a splash of **bourbon vanilla** or even a tiny bit of almond extract for a different flavor profile.
- Cake Mix Shortcut: Feeling extra lazy? A good quality **white cake mix** can totally be your base. Just follow the box directions, then add our apple filling magic. Zero judgment here, only deliciousness.
- Spice It Up: Add a pinch of **allspice** or **cardamom** to your apple filling for an even warmer, more complex flavor.
FAQ (Because You Probably Have Questions, Smarty Pants)
- Can I make this dairy-free? You bet! Use a dairy-free butter substitute and your favorite plant-based milk. Easy peasy.
- How long does the cake last? Covered at room temperature, it’s good for 2-3 days. In the fridge, up to 5 days. Though, honestly, it rarely lasts that long!
- Can I use frozen apples? Technically yes, but thaw them completely and drain any excess liquid first. Fresh is always best, though.
- What if my egg whites won’t whip to stiff peaks? Make sure your bowl and beaters are **spotlessly clean** and grease-free. Even a tiny bit of fat can prevent them from whipping up properly. Also, fresh eggs help!
- Can I bake this in different sized pans? Absolutely! Adjust baking time accordingly. Cupcakes will take less time, a 9×13 pan will be a bit longer. Just keep an eye on it.
- Is it okay to use margarine instead of butter? Well, technically yes, but why hurt your soul (and your cake’s flavor) like that? Stick with real butter for the best results, trust me.
Final Thoughts (You Did It!)
And there you have it, my friend! A stunning, delicious white cake layered with glorious apple pie filling. Who knew you had such culinary superpowers hiding inside you? This cake is perfect for impressing guests, bribing co-workers, or just treating yourself because, let’s face it, you deserve it. Now go impress someone – or yourself – with your new culinary skills. You’ve earned it!


