Ever stared into your empty fridge at 10 PM, wondering if you can manifest a chocolate cake through sheer willpower? Well, stop staring and start baking! This vegan chocolate cake with buttercream frosting is about to become your new midnight obsession – no eggs or dairy needed, just pure chocolatey bliss that’ll make even your non-vegan friends suspicious that you’re hiding chickens somewhere in your apartment.
Why This Recipe is Awesome
Let’s be real for a second – vegan baking has a reputation for being either A) tasteless cardboard or B) requiring ingredients you need a science degree to pronounce. This recipe tells both stereotypes to take a hike. It’s ridiculously moist (sorry if you hate that word, but there’s just no better one), rich enough to make you do that involuntary happy food dance, and – my favorite part – basically foolproof. Seriously, unless you mistake salt for sugar, you’re golden.
Plus, this cake doesn’t scream “VEGAN” when you eat it. It just whispers “delicious” in a sultry chocolate voice. And that buttercream frosting? It’s so good you’ll be “cleaning” the bowl with your fingers when nobody’s looking.
Ingredients You’ll Need
For the Cake:
- 1½ cups all-purpose flour (the regular boring kind)
- 1 cup granulated sugar (the sweet stuff)
- ⅓ cup cocoa powder (not the hot chocolate mix, people!)
- 1 tsp baking soda (the magical riser, not baking powder’s cooler cousin)
- ½ tsp salt (just a pinch to make the sweet stuff sing)
- 1 cup warm water (from your tap, nothing fancy)
- 1 tsp vanilla extract (the real kind if you’re feeling fancy)
- ⅓ cup vegetable oil (or any neutral oil you have lying around)
- 1 tbsp apple cider vinegar (trust me on this weird one)
For the Vegan Buttercream:
- ½ cup vegan butter (slightly softened, not melty disaster status)
- 3 cups powdered sugar (yes, that much – don’t judge)
- ¼ cup cocoa powder (for chocolatey goodness)
- 1 tsp vanilla extract (again, the good stuff)
- 2-3 tbsp plant milk (almond, soy, oat – whatever floats your boat)
- Pinch of salt (secret weapon for depth of flavor)
Step-by-Step Instructions
- Prep your battlefield. Preheat your oven to a toasty 350°F (175°C) and grease an 8-inch round cake pan like your success depends on it. Because it does.
- Mix the dry squad. In a large bowl, whisk together flour, sugar, cocoa powder, baking soda, and salt until well combined. Make a little well in the center like you’re creating a chocolate volcano.
- Assemble the wet team. Pour warm water, vanilla, oil, and apple cider vinegar right into that volcano hole. The vinegar and baking soda will start having a little party – that’s good! Science is happening!
- Get mixing. Stir everything together until just combined. Don’t beat it to death – lumps are your enemy, but overmixing is the supervillain.
- Bake it good. Pour the batter into your prepared pan and pop it in the oven for 30-35 minutes. You’ll know it’s done when a toothpick comes out clean, or when you press the top gently and it springs back like it’s on a tiny trampoline.
- Cool your jets. Let the cake cool in the pan for 10 minutes, then carefully flip it onto a cooling rack. Let it cool COMPLETELY before frosting. I mean it. No cheating or you’ll have a frosting avalanche.
- Frosting time! Beat the vegan butter until it’s fluffy and looking proud of itself. Gradually add powdered sugar, cocoa powder, vanilla, salt, and just enough plant milk to make it smooth and spreadable. If it’s too thick, add milk a teaspoon at a time. Too thin? More powdered sugar.
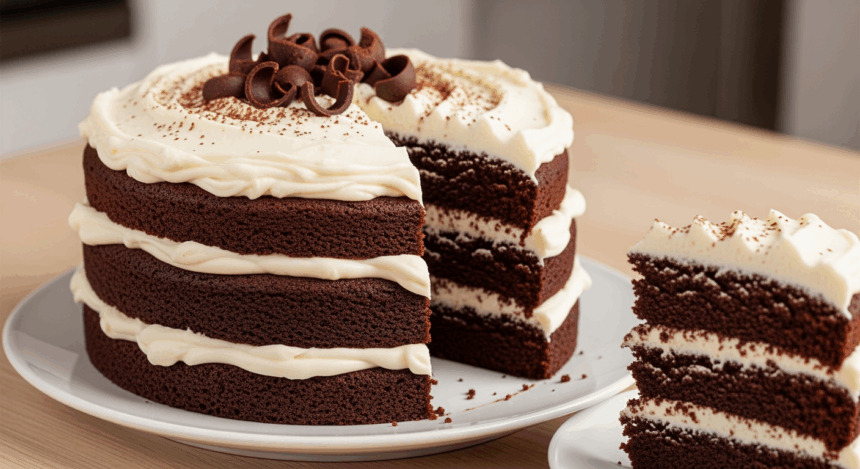
- Dress that cake. Once your cake is cooler than a cucumber, slather that frosting all over like you’re painting a masterpiece. Get creative with swirls, or just go for the “rustic” look (which is what I call it when I mess up).
Common Mistakes to Avoid
Rushing the cooling process – Unless your aesthetic is “melted snowman,” wait until your cake is 100% cool before frosting. I’ve learned this the hard way so you don’t have to.
Substituting ingredients willy-nilly – Baking is basically edible chemistry. That apple cider vinegar isn’t just there for funky flavor – it reacts with the baking soda to create lift. Don’t skip it!
Opening the oven door too early – I know you’re excited, but peeking before 25 minutes can make your cake sink faster than my motivation on Monday mornings.
Expecting perfection the first time – Even if your cake looks like it was frosted during an earthquake, it’ll still taste amazing. Remember: taste > appearance, always.
Alternatives & Substitutions
Gluten-free? Swap the all-purpose flour for a good quality 1:1 gluten-free flour blend. Just make sure it has xanthan gum in it, or add ¼ teaspoon yourself to avoid the dreaded “sand cake” texture.
No apple cider vinegar? White vinegar or lemon juice will work in a pinch. You just need something acidic to react with the baking soda. Chemistry, baby!
Oil options: Any neutral oil works here. Coconut oil will add a slight coconut vibe (duh), which actually pairs pretty nicely with chocolate, IMO.
Sugar alternatives: Coconut sugar works but will make your cake a bit less sweet and more caramel-like. Just don’t try to use liquid sweeteners – they’ll mess with the chemistry (see above about baking being science).
Feeling fancy? Add a teaspoon of espresso powder to the cake batter. It won’t make it taste like coffee, but it’ll make the chocolate flavor pop like it’s on stage at a talent show.
FAQ (Frequently Asked Questions)
Can I make this into cupcakes instead?
Absolutely! Fill cupcake liners about ⅔ full and bake for 18-22 minutes instead. This recipe should make about 12-15 cupcakes, depending on how much batter you “taste test” along the way.
Will this cake stand up to layering?
You bet your spatula it will! Double the recipe and divide between two pans for a show-stopping layer cake. Just make sure you have extra frosting to fill the middle – nobody likes a skimpy frosting situation.
How do I store leftovers? (As if there will be any…)
This cake stays fresh at room temperature for about 3 days in an airtight container. Want to extend its life? Refrigerate for up to a week, but let it come to room temp before serving or it’ll be as hard as your ex’s heart.
My frosting split and looks weird. What happened?
Sounds like your vegan butter was too warm or you added too much liquid too quickly. Pop it in the fridge for 15 minutes and try beating again, or start over if it’s truly a disaster. We’ve all been there.
Can I make this in advance for a party?
Definitely! The cake layers can be wrapped in plastic and kept at room temperature overnight or frozen for up to a month. The frosting can be refrigerated for up to a week – just let it come to room temperature and give it a good whip before using.
Final Thoughts
Look at you, about to embark on a vegan baking adventure that doesn’t involve spending half your paycheck on weird ingredients or crying over a failed experiment! This chocolate cake is proof that vegan baking doesn’t mean sacrificing flavor, texture, or your sanity.
Whether you’re a seasoned vegan or just dipping your toes into the plant-based pool, this recipe deserves a spot in your collection. It’s perfect for birthdays, Tuesday nights, breakups, job celebrations, or just because you need chocolate in your life right now (which is always a valid reason).
Now stop reading and start mixing! That chocolate craving isn’t going to satisfy itself. And when friends ask for your secret to making such an amazing vegan cake, feel free to be mysteriously silent – or just send them this recipe. Your call!
