So, you’ve decided your sweet tooth needs a serious upgrade, but your energy levels are currently stuck in “Netflix and Chill” mode, right? Same, friend, same. Good news! We’re about to whip up some vanilla ice cream that looks like it tumbled straight out of a fairy garden, all with minimal fuss. Think “effortlessly chic dessert,” but, you know, edible. You’re welcome.
Why This Recipe is Awesome
Okay, let’s be real: most recipes demand a commitment you just don’t have on a Tuesday night. But this one? It’s basically a culinary high-five. First off, it’s **no-churn**, which means no fancy ice cream maker gathering dust in the back of your cupboard is required. Unless you have one and want to flex, then by all means, show off! Secondly, it’s ridiculously easy. Seriously, if I can pull this off without setting off the smoke detector, you’re practically a pastry chef already. And the best part? We’re adding flowers! Edible ones, obviously, because we’re not aiming for a trip to the ER. It makes your ice cream look like a work of art, which, FYI, makes it taste even better (it’s science, probably).
Ingredients You’ll Need
Get ready for a super short shopping list. We’re keeping it simple and delicious, as all good things should be.
- **2 cups (about 475ml) Heavy Cream:** This is the MVP, the backbone of your creamy dreams. Don’t even *think* about skimping on the fat content here.
- **1 can (14oz/397g) Sweetened Condensed Milk:** Your sweet, magical shortcut. This is what makes it smooth and sweet without needing a sugar degree.
- **1-2 teaspoons Vanilla Extract:** The soul of vanilla ice cream. Go for a good quality one; it really makes a difference. Or, if you’re feeling fancy, a vanilla bean paste.
- **Pinch of Salt:** Just a tiny, tiny pinch. It balances the sweetness and makes all the other flavors sing.
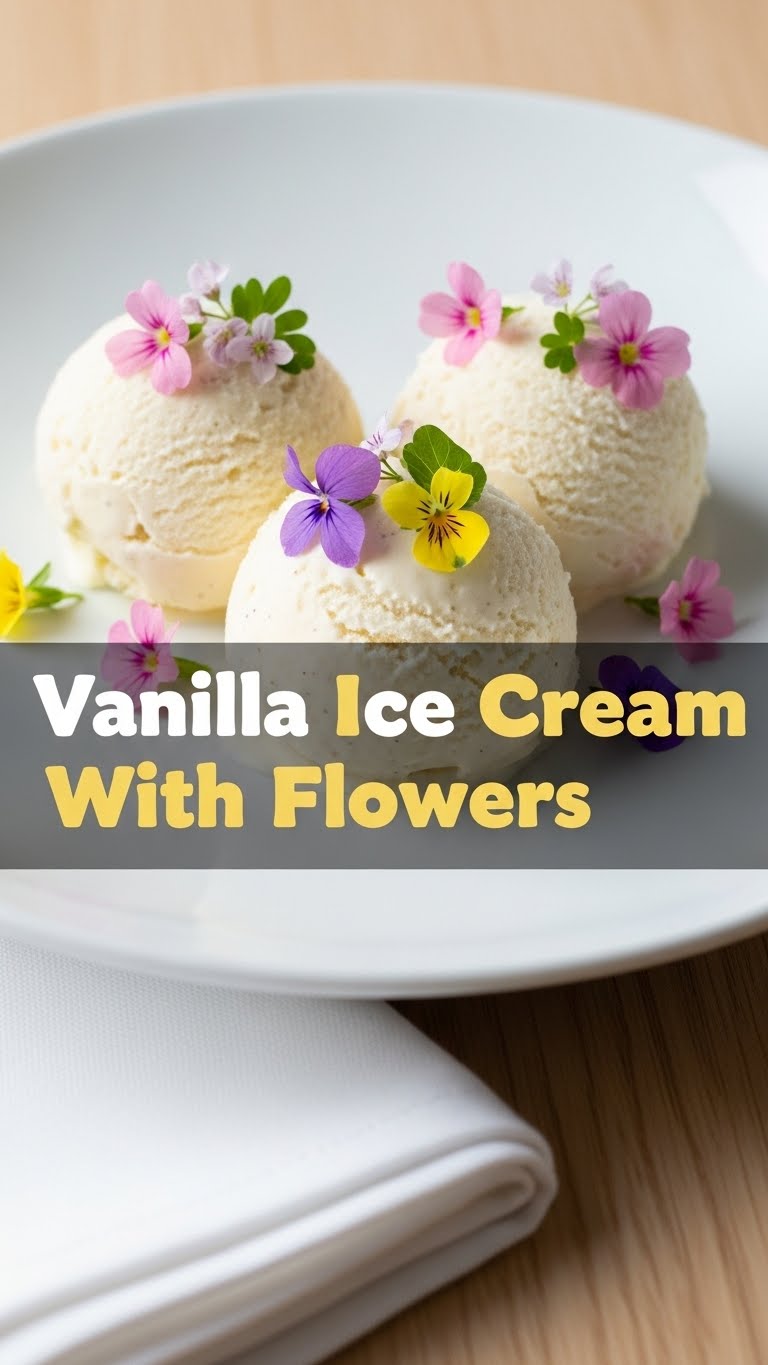
- **1/2 to 1 cup Edible Flowers:** This is where the magic happens! Think violas, pansies, calendula petals, or even tiny rose petals. **Crucially, ensure they are food-grade and pesticide-free!** Your local farmers’ market or specialty grocer is a good bet.
Step-by-Step Instructions
Time to get your chef’s hat on (or, let’s be honest, your messy bun and comfiest sweats). This is practically foolproof.
- **Chill Out:** Pop a large mixing bowl and your whisk attachment (if using an electric mixer) into the freezer for about 10-15 minutes. A cold bowl helps the cream whip up faster and fluffier. Trust me on this one.
- **Whip It Good:** Pour your super-cold heavy cream into the chilled bowl. Using an electric mixer (or some serious arm power with a hand whisk), beat the cream on medium-high speed until it forms soft peaks. You want it light and airy, but not stiff.
- **Sweet Surrender:** Gently fold in the sweetened condensed milk, vanilla extract, and that tiny pinch of salt. **Be gentle!** You don’t want to deflate all that lovely air you just whipped into the cream. Fold until just combined.
- **Flower Power:** Grab about half of your edible flowers and gently fold them into the ice cream mixture. It’s like adding sprinkles, but way prettier and more sophisticated.
- **Layer Up:** Pour half of your ice cream mixture into a freezer-safe container (a standard loaf pan works perfectly). Sprinkle a good portion of the remaining flowers over this layer. Pour in the rest of the ice cream mixture, and then decorate the top with your remaining flowers. You’re basically creating a floral masterpiece.
- **Freeze for Glory:** Cover the container tightly with plastic wrap or a lid. Pop it into the freezer for at least 6 hours, but ideally overnight. Patience, young grasshopper, good things come to those who wait for ice cream to freeze.
- **Scoop and Admire:** Once firm, scoop out generous portions and gaze lovingly at your creation. You just made art you can eat!
Common Mistakes to Avoid
Nobody’s perfect, but we can avoid the obvious facepalms, right?
- **Over-Whipping the Cream:** If you beat the cream too long, you’ll end up with butter. Delicious, but not what we’re going for here. Stop when it holds soft peaks, not when it looks like cottage cheese.
- **Using Non-Edible Flowers:** This is a biggie! **Do not, under any circumstances, just pick random flowers from your garden.** Some are toxic. Stick to food-grade, pesticide-free options. Your tummy will thank you.
- **Impatience:** Trying to scoop it before it’s fully frozen will result in a sad, soupy mess. Give it the full freezing time. You can do it!
- **Not Covering Properly:** If you don’t cover your ice cream tightly, ice crystals will form, making it less creamy and more… well, icy. Air is the enemy of smooth ice cream.
Alternatives & Substitutions
Feeling adventurous? Or maybe you just ran out of something vital. No worries, we’ve got options!
- **Vanilla Bean Paste vs. Extract:** If you want a more intense, visually stunning vanilla, swap the extract for an equal amount of vanilla bean paste. Those little black specks look super gourmet.
- **Different Extracts:** Not feeling vanilla? Try a dash of almond extract, peppermint, or even a tiny bit of lavender extract (if you’re really leaning into the floral vibe).
- **Other Mix-Ins:** While flowers are the star, you can totally add other goodies! Chocolate chips, a swirl of fruit compote, sprinkles (for extra fun), or chopped nuts would all be delicious. Just don’t overdo it or you’ll lose the delicate flower aesthetic.
- **No Flowers? No Problem:** If edible flowers aren’t your jam or you can’t find them, it’s still an absolutely fantastic vanilla ice cream. It just won’t be quite as “enchanted garden.” Still amazing, though!
FAQ (Frequently Asked Questions)
Got questions? I’ve got (mostly sarcastic) answers!
- **Can I use regular milk instead of heavy cream?**
Oh, bless your heart. No. Absolutely not. The high fat content in heavy cream is what gives this ice cream its luscious, creamy texture. Skim milk will give you… sad, icy milk. Don’t do it to yourself.
- **Do I really need an ice cream maker for this?**
Nope! That’s the beauty of “no-churn.” This recipe is designed to be super easy without any special equipment. If you *do* have one, though, you can certainly use it for an even silkier texture, but it’s totally optional.
- **Where do I find edible flowers?**
Your best bet is a specialty grocery store, a farmers’ market, or even online retailers. If you’re using them from your own garden, **please, please, please be 100% sure they’re a safe variety and have never been sprayed with pesticides.**
- **How long does this ice cream last in the freezer?**
Properly covered, it should last for a couple of weeks. But let’s be honest, it rarely makes it past a few days, does it? It’s too delicious to hoard.
- **My ice cream turned out icy, what went wrong?**
A few culprits here: you might not have whipped the cream enough (it needs that air for creaminess), or the container wasn’t covered tightly enough in the freezer, allowing pesky ice crystals to form. Make sure it’s airtight!
- **Can I make this vegan?**
You totally can! Swap the heavy cream for full-fat coconut cream (chilled, then scoop out the thick part) and use a dairy-free sweetened condensed milk. Just be aware it might have a subtle coconut flavor, which isn’t a bad thing, IMO!
Final Thoughts
There you have it! Your very own, absolutely gorgeous, unbelievably easy vanilla ice cream with a fancy floral touch. Go on, give yourself a massive pat on the back; you just transformed simple ingredients into a dessert that looks like it belongs on the cover of a magazine. Now go impress someone (or, more importantly, yourself!) with your new culinary skills. You’ve earned it!


