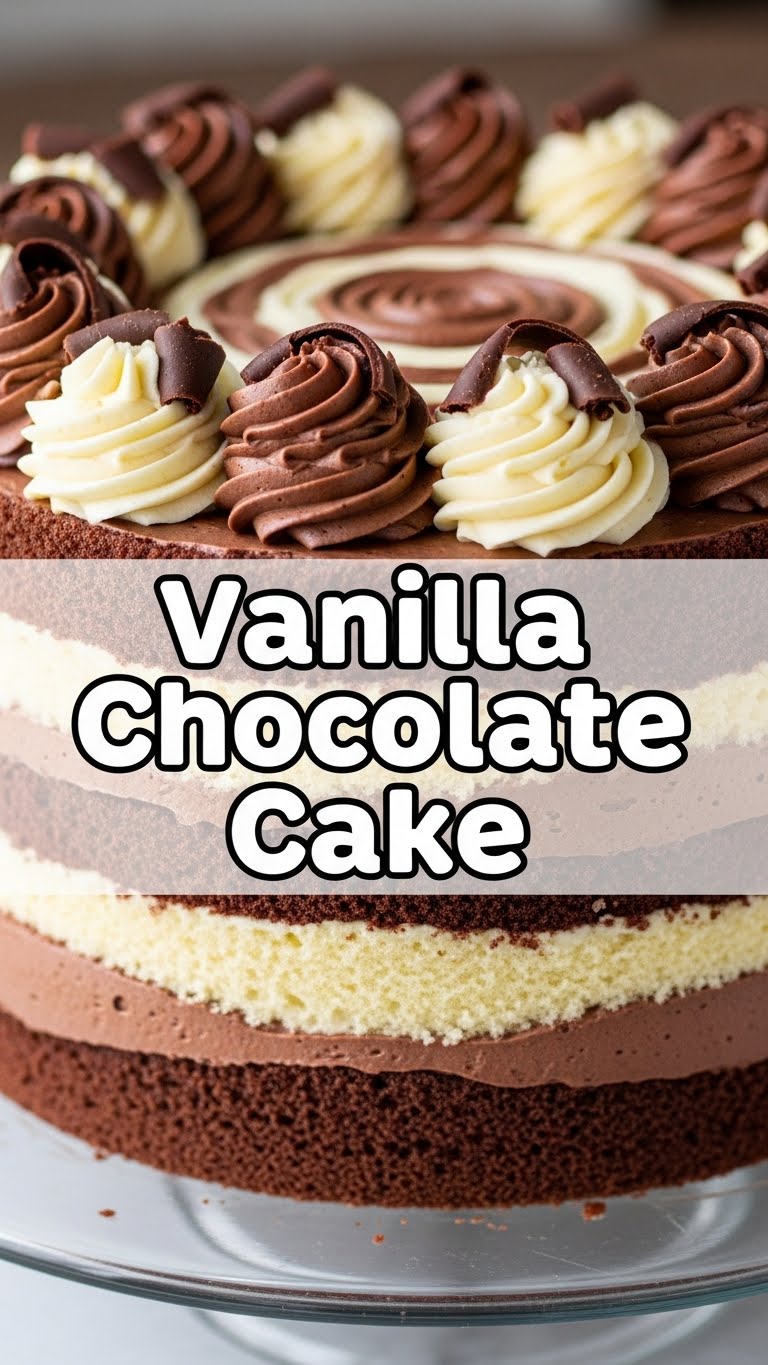
Ever have those days where you’re craving something utterly delicious, a little bit fancy, but also, like, can’t be bothered to spend an entire Saturday afternoon becoming a pastry chef? Yeah, me too. We’re talking about that sweet spot where pure bliss meets minimal effort. Good news, my friend, because today we’re diving headfirst into the world of Vanilla Chocolate Cake – a classic combo that’s pretty much the Beyoncé and Jay-Z of desserts. Get ready to bake something awesome without breaking a sweat (or a mental state).
Why This Recipe is Awesome
Okay, so why this particular Vanilla Chocolate Cake recipe and not, say, the super-complicated one that requires three different types of flour and a stand mixer named ‘Bartholomew’? Simple. This recipe is your culinary best friend. It’s **idiot-proof** (trust me, I’ve tested this theory extensively). It’s incredibly forgiving, seriously moist, and has that perfect balance of vanilla cake goodness with a rich chocolate frosting that will make you question all your life choices (in a good way). Plus, it uses ingredients you probably already have lurking in your pantry. No obscure, once-a-year purchases here! It’s the kind of cake that makes people think you’ve been secretly attending baking classes, when really, you just followed these super simple steps. Prepare for compliments, you kitchen wizard, you!
Ingredients You’ll Need
Time to gather your culinary arsenal! Don’t worry, it’s not a lot. Think of these as your baking squad.
For the Vanilla Cake:
- All-purpose flour: About 1 ¾ cups. The backbone of your cake dreams.
- Granulated sugar: 1 ½ cups. Sweetness without being cloyingly sweet.
- Baking powder: 1 ½ teaspoons. Our little magic puff agent.
- Baking soda: ½ teaspoon. More puff magic!
- Salt: ½ teaspoon. Don’t skip this! It enhances all the other flavors.
- Unsalted butter: ½ cup (1 stick), softened. The real MVP for tenderness and flavor.
- Large eggs: 2, at room temperature. Happy eggs make happy cakes.
- Vanilla extract: 2 teaspoons. Go for the good stuff, it makes a difference!
- Buttermilk: 1 cup, at room temperature. The secret to a super moist crumb.
For the Chocolate Frosting:
- Unsalted butter: ½ cup (1 stick), softened. Again, quality butter = quality frosting.
- Powdered sugar: 2 cups. The fine stuff for a smooth, dreamy frosting.
- Unsweetened cocoa powder: ½ cup. For that deep, chocolatey goodness.
- Milk: 2-4 tablespoons. Whole milk works best, adds creaminess.
- Vanilla extract: 1 teaspoon. Because vanilla makes everything better, even chocolate.
- Pinch of salt: Just a tiny bit to balance the sweetness.
Step-by-Step Instructions
Alright, apron up! Let’s get this delicious show on the road.
- Preheat & Prep: First things first, preheat your oven to 350°F (175°C). Grease and flour two 8-inch round cake pans. Or, if you’re like me and hate floury messes, line the bottoms with parchment paper. Smart move!
- Whisk Dry Ingredients: In a medium bowl, whisk together your flour, sugar, baking powder, baking soda, and salt. Give it a good whisk to make sure everything is evenly distributed.
- Cream Butter & Sugar: In a large bowl, using an electric mixer, beat the softened butter until creamy (about 1 minute). Gradually add the granulated sugar and beat on medium-high for 2-3 minutes until light and fluffy. This is where the magic really starts!
- Add Eggs & Vanilla: Beat in the eggs one at a time, mixing well after each addition. Scrape down the sides of the bowl as needed. Then, stir in the vanilla extract. It should smell amazing already!
- Alternate Wet & Dry: With the mixer on low speed, add about one-third of the dry ingredients to the butter mixture, mixing just until combined. Then, add half of the buttermilk and mix until just incorporated. Repeat with another third of the dry ingredients, the remaining buttermilk, and finally the last of the dry ingredients. **Be careful not to overmix!** Overmixing leads to tough cakes. Stop as soon as everything is just combined.
- Bake It Up: Divide the batter evenly between your two prepared cake pans. Bake for 25-30 minutes, or until a wooden skewer inserted into the center comes out clean.
- Cool Down: Let the cakes cool in the pans for about 10-15 minutes before inverting them onto a wire rack to cool completely. Patience is a virtue here; trying to frost a warm cake is a recipe for a melted mess.
- Make the Frosting: While the cakes are cooling, beat the softened butter in a large bowl with an electric mixer until creamy. Add the powdered sugar, cocoa powder, vanilla extract, and salt. Start with 2 tablespoons of milk and beat on low speed until combined, then increase to high and beat until light and fluffy. Add more milk, a tablespoon at a time, until you reach your desired consistency. You want it spreadable, but not runny.
- Assemble & Devour: Once the cakes are completely cool, place one layer on your serving plate. Spread about one-third of the frosting on top. Place the second cake layer on top and frost the top and sides of the entire cake with the remaining frosting. Slice, serve, and bask in the glory!
Common Mistakes to Avoid
Nobody’s perfect, especially in the kitchen, but a little heads-up can save you from a cake catastrophe. Consider these friendly warnings!
- Not preheating the oven: Rookies! A properly preheated oven ensures even baking. Stick that bad boy in cold, and your cake won’t rise properly.
- Overmixing the batter: This is a biggie. Once you add the flour, mix *just* until combined. Too much mixing develops the gluten, leading to a dense, rubbery cake instead of a light, fluffy one. Unless you’re aiming for a cake that doubles as a hockey puck, stop mixing!
- Ignoring room temperature ingredients: Yes, it matters! Room temperature butter and eggs cream together better, creating a smoother emulsion and a more uniform, tender crumb. Plan ahead, peeps!
- Frosting a warm cake: Seriously, just don’t. You’ll end up with frosting soup and a very sad-looking cake. **Patience, young grasshopper!**
- Eyeballing ingredients: Baking is science, not abstract art (mostly). Use proper measuring cups and spoons, especially for flour. Too much flour is a common culprit for dry cakes.
Alternatives & Substitutions
Life happens, and sometimes you don’t have exactly what the recipe calls for. Fear not, creative baker!
- No buttermilk? No problem! Add 1 tablespoon of white vinegar or lemon juice to a 1-cup measuring cup, then fill the rest with regular milk (whole milk works best). Let it sit for 5 minutes. Boom, DIY buttermilk!
- Unsalted butter vs. salted: If all you have is salted butter, reduce the added salt in the recipe by half a teaspoon. Easy peasy.
- Vanilla extract: While pure vanilla extract is always preferred for the best flavor, imitation will work in a pinch. Just know the taste might be a little less vibrant.
- Cake Flour: If you’re feeling fancy and want an even finer crumb, you can swap out the all-purpose flour for cake flour. Just use 1 ¾ cups of cake flour plus 2 tablespoons, or 1 ½ cups plus 2 tablespoons. I usually stick to all-purpose because, IMO, it’s easier and still delicious.
- Chocolate chips: Want more chocolate? Fold in ½ cup of mini chocolate chips into the cake batter before baking for extra bursts of chocolatey goodness.
FAQ (Frequently Asked Questions)
Got questions? I’ve got (casual) answers!
- Can I use oil instead of butter in the cake? You *can*, but for that rich, buttery flavor and tender crumb, butter is superior. Oil tends to make cakes super moist but can lack that depth of flavor. If you must, use ¾ cup vegetable oil for the cake.
- My cake sank in the middle! What happened? Oh no! This often happens if the oven door was opened too early, if the oven temperature was too low, or if you overmixed the batter. Make sure your oven thermometer is accurate!
- Can I make this into cupcakes? Absolutely! Divide the batter into 18-24 cupcake liners and bake for about 18-22 minutes, or until a skewer comes out clean. Frost once cooled.
- How long does this cake last? Covered tightly at room temperature, it’ll be good for 3-4 days. In the fridge, it can stretch to about a week. But honestly, it rarely lasts that long!
- Can I freeze the cake? Yes! You can freeze unfrosted cake layers wrapped tightly in plastic wrap for up to 2 months. Thaw at room temperature before frosting. You can also freeze slices of frosted cake for a quick treat later!
- My frosting is too thin/thick. Help! Too thin? Add more powdered sugar, a tablespoon at a time. Too thick? Add more milk, a teaspoon at a time. You’re the boss of that frosting!
Final Thoughts
So there you have it, folks! A vanilla chocolate cake recipe that’s ridiculously easy, incredibly tasty, and pretty much guaranteed to make you feel like a baking superstar. Whether you’re whipping this up for a special occasion, a random Tuesday craving, or just to impress someone (or yourself, which is arguably more important), you’ve got this. Now go forth and bake glorious cake, my friend! You’ve earned it!
