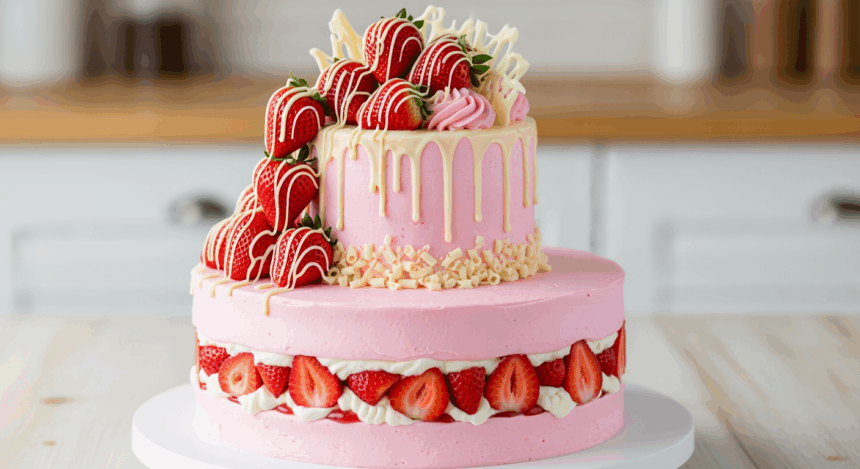
Ever had one of those days when you’re scrolling through Instagram and suddenly feel personally victimized by all the gorgeous desserts you could never make? Well, pull up a chair, friend. This two-tier strawberry cake with white chocolate is about to change your “I can’t bake” narrative. It’s basically the dessert equivalent of that friend who’s both stunning AND nice—seemingly unfair but too delicious to hold a grudge against.
Why This Recipe is Awesome
Let me count the ways! First off, this cake looks like something from a fancy bakery window, but requires approximately zero professional skills. The strawberry-white chocolate combo is basically a celebrity power couple of flavors—they make each other better. And despite looking like you spent all day on it, the actual hands-on time is pretty reasonable. Perfect for when you want people to think you’re Martha Stewart but you’ve got the attention span of a golden retriever.
Plus, this cake has layers both literally and figuratively. The strawberry flavor isn’t just some artificial nonsense—we’re using real berries, people! And the white chocolate doesn’t just hang out in the frosting; it’s swirled throughout the experience like that friend who somehow knows everyone at the party.
Ingredients You’ll Need
For the Cake:
- 3 cups all-purpose flour (the regular stuff, nothing fancy)
- 2½ cups granulated sugar (yes, that much—this isn’t a health food)
- 1 tablespoon baking powder (not teaspoon, TABLESPOON—reading is fundamental)
- 1 teaspoon salt (preferably not the road salt from your driveway)
- 1½ cups unsalted butter, room temperature (forget to take it out early? Welcome to the club)
- 4 large eggs (chicken eggs, not dinosaur or whatever)
- 1 cup milk (cow juice, not almond or oat for this one, trust me)
- 2 teaspoons vanilla extract (the real stuff, not that imitation nonsense)
- 2 cups fresh strawberries, hulled and chopped (plus extra pretty ones for decoration)
- 6 oz white chocolate, chopped (use the good stuff, not those “white chips” that are basically wax)
For the Frosting:
- 16 oz cream cheese, room temperature (full-fat because we’re not monsters)
- 1 cup unsalted butter, room temperature
- 4 cups powdered sugar (yes, your kitchen will look like a cocaine bust went down)
- 8 oz white chocolate, melted and cooled slightly
- 1 teaspoon vanilla extract
- ¼ cup strawberry puree (just blend up some berries, easy peasy)
- Pinch of salt (to make the sweetness less aggressive)
Step-by-Step Instructions
- Prep your battle station. Preheat oven to 350°F (175°C). Grease and line two 8-inch cake pans AND two 6-inch cake pans with parchment paper. Yes, four pans total. This is where the “two-tier” magic happens.
- Mix the dry ingredients. In a large bowl, whisk together flour, baking powder, and salt. Set aside while you do the fun stuff.
- Cream it up. In your stand mixer (or with a hand mixer if you’re building those arm muscles), beat butter and sugar until fluffy—about 3-4 minutes. Don’t skimp on this time; we’re not just mixing, we’re creating a texture masterpiece.
- Add eggs one at a time. Seriously, one at a time, mixing well after each. Add vanilla. Your mixture might look a bit curdled, but don’t panic—that’s normal, unlike that haircut you got in 2003.
- Alternate adding dry ingredients and milk. Start and end with the dry ingredients (dry-milk-dry-milk-dry). Mix just until combined. Over-mixing is the death of tender cake, so channel your inner zen.
- Add the stars of the show. Gently fold in the chopped strawberries and 4 oz of white chocolate chunks. The remaining 2 oz of white chocolate? That’s for snacking while you bake. I see you.
- Divide and conquer. Pour batter into your prepared pans—more in the 8-inch pans, less in the 6-inch pans. They should each be about half full.
- Bake until done. About 25-30 minutes for the 8-inch cakes and 20-25 minutes for the 6-inch cakes. The toothpick test never lies: insert, check for crumbs, decide fate.
- Cool your jets. Let cakes cool in pans for 10 minutes, then transfer to wire racks to cool completely. Patience, grasshopper.
- Make that frosting. Beat cream cheese and butter until smooth. Add melted white chocolate and mix. Gradually add powdered sugar, then vanilla, salt, and strawberry puree. Beat until fluffy and try not to eat it all with a spoon.
- Level up. Once cakes are cool, level the tops with a serrated knife if they’ve domed. Eat the scraps—baker’s privilege.
- Begin assembly. Place one 8-inch cake on your serving plate. Spread a layer of frosting, top with the second 8-inch cake. Frost the top and sides. This is your base tier.
- Create tier two. Do the same with your 6-inch cakes on a separate cardboard cake round.
- Stack ’em. Insert dowels into the center of your bottom tier (for support), then carefully place the 6-inch tier on top.
- Decorate like you mean it. Use remaining frosting to touch up any bare spots. Arrange fresh strawberries and white chocolate curls on top and around the tiers. Make it Instagram-worthy—we didn’t come this far to be basic.
Common Mistakes to Avoid
Let’s not turn your dream cake into a nightmare, shall we?
- Skipping the room temperature ingredients. Cold butter and cream cheese lead to lumpy batter and frosting. Unless you’re specifically trying to recreate the texture of cottage cheese, patience is key.
- Using strawberries that are too wet. If your berries are super juicy, pat them dry after chopping. Too much moisture and your cake might end up with the density of a black hole.
- Rushing the cooling process. Frosting a warm cake is like putting makeup on during a sauna session—a slippery mess that ends in tears.
- Forgetting the support dowels. Unless you want your cake to perform an interpretive dance called “The Collapse,” don’t skip this step for a two-tier cake.
- Overbeating the batter after adding flour. This activates gluten and gives you a tough cake. We’re going for tender, not bodybuilder.
Alternatives & Substitutions
Because sometimes you need to improvise, here’s how to riff on this recipe without causing a dessert disaster:
Berries: Not strawberry season? Raspberries work beautifully here. You could even go wild with blueberries or blackberries, though be prepared for a different color profile. Just know that if you use blackberries, your cake will look slightly haunted.
White Chocolate: Not a fan? First, who hurt you? Second, you could substitute with milk chocolate, though it will change the flavor profile dramatically. For a non-chocolate option, try a vanilla bean frosting instead—just add the seeds from 2 vanilla pods to your frosting.
Gluten-Free Version: Replace all-purpose flour with a 1:1 gluten-free baking mix. Just be aware that the texture might be slightly different—more like your rich aunt who’s had “work done”—recognizable but a bit altered.
Dairy-Free Needs: Substitute butter with a high-quality plant-based butter (not margarine, FYI). For the milk, almond milk works, but it slightly changes the flavor. For the frosting… honestly, just find a different recipe because dairy-free cream cheese frosting is its own science experiment.
FAQ (Frequently Asked Questions)
Can I make this cake ahead of time?
Absolutely! The cake layers can be baked up to 2 days ahead and stored (well-wrapped) at room temperature. The frosting can be made 1 day ahead and refrigerated. Just let it come back to room temp and give it a quick whip before using. Assembled, the cake is best within 24 hours but will hold up for 3 days refrigerated.
Do I really need FOUR cake pans?
Nope! You can bake in batches if you don’t have a pan collection that would make a pastry chef jealous. Just keep the unused batter at room temperature while you wait.
Can I use frozen strawberries?
In the cake, yes—just thaw and drain them really well first. For decoration? Unless you’re going for a sad, weeping look (no judgment, sometimes that matches my mood too), stick with fresh.
What if I don’t want to make a two-tier cake?
Who are you and what have you done with my ambitious friend? Just kidding. You can make this as a single-tier layer cake using two 9-inch pans instead. It’ll be less dramatic but equally delicious.
My white chocolate seized up when melting. Am I doomed?
Nah, white chocolate is just temperamental, like a cat or a reality TV star. Next time, use a double boiler or melt in 15-second bursts in the microwave, stirring between each. For now, start over with new chocolate—sadly, seized chocolate is a goner.
How do I transport this masterpiece?
Very carefully, preferably in a cake carrier with the AC blasting. If you’re driving over potholes, maybe consider delivering the tiers separately and doing final assembly on site. Or just make people come to you—you’re the one with cake, after all.
Final Thoughts
Congratulations! You’ve just created a cake that’s both a visual stunner and a flavor bomb. Sure, your kitchen probably looks like a crime scene, and you may have stress-eaten half the white chocolate before it made it into the recipe, but that’s part of the journey.
Remember, even if your cake doesn’t look exactly like it came from a professional bakery (spoiler: it probably won’t), it’ll still taste amazing. The whole point is to create something delicious that brings joy—both in the making and the eating.
Now go slice up that beauty, take that obligatory social media photo (we all do it), and enjoy watching people’s eyes roll back in their heads when they taste it. You’ve earned every calorie and compliment coming your way. And hey, if anyone asks for the recipe, send them here—or tell them it’s a family secret and watch them squirm. Your call!
