Let me guess—you need to impress someone ASAP and nothing says “I totally have my life together” like a two-tier chocolate cake? Or maybe you’re just having a Tuesday chocolate emergency. Either way, I’ve got you covered with this showstopper that looks like you spent all day in the kitchen (spoiler alert: you didn’t).
Why This Recipe is Awesome
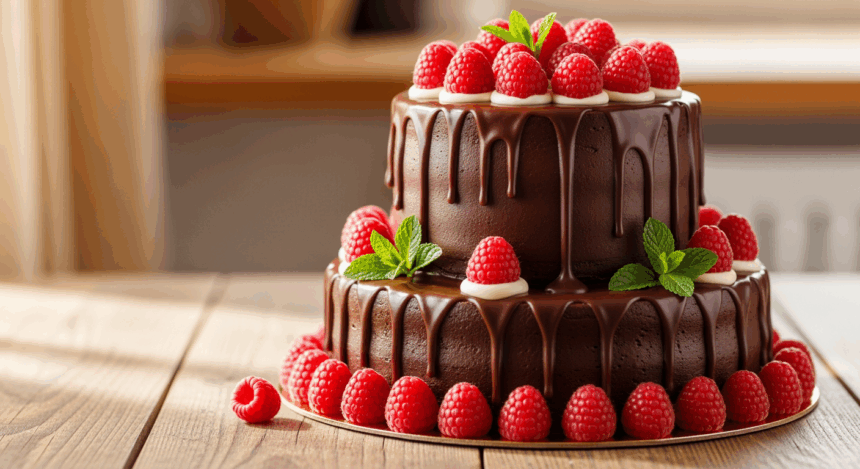
First off, this isn’t just any chocolate cake. This is the “make your friends think you’ve been secretly taking pastry classes” chocolate cake. It’s two-tiered (fancy!), raspberry-studded (fruity!), and chocolate-drenched (obviously!). The beauty is that it looks complicated but actually isn’t. Plus, the raspberries make it practically a health food. That’s how nutrition works, right?
Ingredients You’ll Need
For the cake:
- 2 cups all-purpose flour (the regular stuff, nothing fancy)
- 2 cups granulated sugar (the sweet stuff that makes life worth living)
- 3/4 cup unsweetened cocoa powder (the darker the better, like my soul in the morning before coffee)
- 2 teaspoons baking soda (the magic powder that makes things rise)
- 1 teaspoon salt (trust me, chocolate needs it)
- 2 large eggs (from happy chickens if possible, sad chickens make sad cakes)
- 1 cup buttermilk (or regular milk with a splash of vinegar if you’re not the buttermilk-keeping type)
- 1/2 cup vegetable oil (keeps things moist—sorry if you hate that word)
- 2 teaspoons vanilla extract (the real stuff, not the fake stuff that tastes like chemicals)
- 1 cup hot coffee (adds depth, won’t make your cake taste like a latte)
For the frosting:
- 1 cup unsalted butter, softened (patience, grasshopper—truly softened, not just slightly less cold)
- 4 cups powdered sugar (yes, that much)
- 1/2 cup unsweetened cocoa powder (more chocolate, because duh)
- 1/4 cup heavy cream (makes it fluffy and dreamy)
- 2 teaspoons vanilla extract (again, the real deal)
- Pinch of salt (balances sweetness, trust the process)
For decoration:
- 2 pints fresh raspberries (about 4 cups—pick the pretty ones, life’s too short)
- Chocolate shavings (optional, but who are we kidding, it’s not really optional)
Step-by-Step Instructions
- Prep your battle station. Preheat oven to 350°F (175°C). Grease and flour two 8-inch round cake pans AND one 6-inch round cake pan. Yes, three pans total. This is a two-tier situation, people.
- Mix the dry ingredients. In a large bowl, whisk together flour, sugar, cocoa, baking soda, and salt. Make a little well in the center like you’re creating a chocolate volcano.
- Add the wet team. Pour in eggs, buttermilk, oil, and vanilla. Mix until just combined. It’ll look like a chocolatey mess, which is exactly what we want.
- Coffee time. Stir in the hot coffee. The batter will be thin. Don’t panic—this is correct. Your cake isn’t broken.
- Divide and conquer. Pour about 2/3 of the batter evenly between the two 8-inch pans, and the remaining 1/3 into the 6-inch pan. This creates your two tiers!
- Bake ’em. Slide those bad boys into the oven. The 6-inch will take about 25-30 minutes; the 8-inch ones need 30-35 minutes. They’re done when a toothpick comes out with a few moist crumbs (not wet batter).
- Cool your jets. Let cakes cool in pans for 10 minutes, then flip onto wire racks to cool completely. If they dome too much, slice off the tops to make them flat. Eat the scraps—chef’s privilege.
- Frosting magic time. Beat that softened butter until creamy. Gradually add powdered sugar, cocoa, cream, vanilla, and salt. Beat until fluffy and spreadable. If it’s too thick, add more cream. Too thin? More powdered sugar.
- Assembly time! Place one 8-inch cake on your serving plate. Spread a layer of frosting, then arrange a layer of raspberries. Top with second 8-inch cake. Frost the top and sides.
- Stack attack. Center the 6-inch cake on top of your frosted bottom tier. Frost the top and sides. For stability, you can insert 3-4 wooden skewers through both tiers (just remember to warn people before eating).
- The grand finale. Decorate with remaining raspberries and chocolate shavings. Be as fancy or as messy as your personality dictates.
Common Mistakes to Avoid
Let’s keep you from sabotaging yourself, shall we?
- Impatience with butter softening. Microwaving it until it’s a sad puddle. Just take it out 30 minutes before, for crying out loud.
- Opening the oven every 5 minutes to check on your cakes. They’re fine. They’re not going anywhere. Your helicopter parenting is just letting heat escape.
- Frosting warm cakes. Unless you want a frosting avalanche, wait until they’re completely cool. Completely. As in, not even slightly warm.
- Forgetting the skewers for stability. Nothing ruins a party like a cake landslide. Those tiers need structural support!
- Washing raspberries too far in advance. They get soggy and sad. Wash them just before using.
Alternatives & Substitutions
Because we all know you’re going to check the cupboard after reading this recipe and realize you’re missing half the stuff:
- No buttermilk? Add 1 tablespoon of white vinegar or lemon juice to regular milk and let it sit for 5 minutes. Boom—fake buttermilk.
- Don’t do coffee? Hot water works fine, but you’ll miss that extra depth. Or try hot chai tea for an interesting twist.
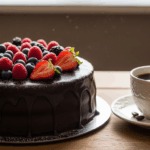
- Raspberry alternatives: Strawberries, blackberries, or even cherries work beautifully. Just avoid super juicy fruits like pineapple unless you want a swamp cake.
- Gluten issues? A good quality 1:1 gluten-free flour blend usually works, but the texture might be slightly different. FYI, gluten-free cakes tend to be a bit more delicate, so handle with care.
- Vegan needs? Replace eggs with flax eggs (1 Tbsp ground flaxseed + 3 Tbsp water per egg), use plant milk with a splash of vinegar instead of buttermilk, and vegan butter for frosting. It’ll be different but still delicious.
FAQ (Frequently Asked Questions)
Can I make this cake ahead of time?
You bet! The unfrosted cake layers can be wrapped in plastic and stored at room temp for a day, refrigerated for 3 days, or frozen for up to 2 months. Just thaw before frosting. The fully assembled cake is best eaten within 2 days.
Do I really need THREE cake pans?
Technically no. You could bake the batter in batches using the same pans. But who wants to wait that long when chocolate cake is on the line?
Is this cake sturdy enough for transportation?
With the skewers, yes, but I’d still treat it like it’s carrying your firstborn child. And for the love of all things holy, don’t slam on your brakes.
What if my frosting looks grainy?
Your butter wasn’t soft enough. No worries—just keep beating it, and maybe warm the bowl slightly by cupping your hands around it. Patience pays off.
Can I use frozen raspberries?
Inside the cake, sure. On top? Not unless you want what looks like a crime scene. Frozen berries get super juicy when thawed.
Do I have to make two tiers? Can’t I just make one big cake?
What are you, a fun-hater? Just kidding. Yes, you can make this as a single-tier cake using just the two 8-inch pans. But then it’s just a… cake. Not a CAKE, if you know what I mean.
Final Thoughts
There you have it—a chocolate raspberry cake that makes you look like you know what you’re doing in the kitchen. Is it a bit extra? Yes. Will it make people ooh and aah? Also yes. Will they ask you to make it for every birthday from now until eternity? Unfortunately, also yes.
The beauty of this cake is that it works for practically any occasion—birthdays, anniversaries, Tuesdays, breakups, job promotions, or just because you managed to put on real pants today. Whatever you’re celebrating, this cake says, “I’m adulting so hard right now.”
Now go forth and create your chocolate masterpiece. And if anyone asks for your secret, just smile mysteriously and change the subject. Bakers’ code.
