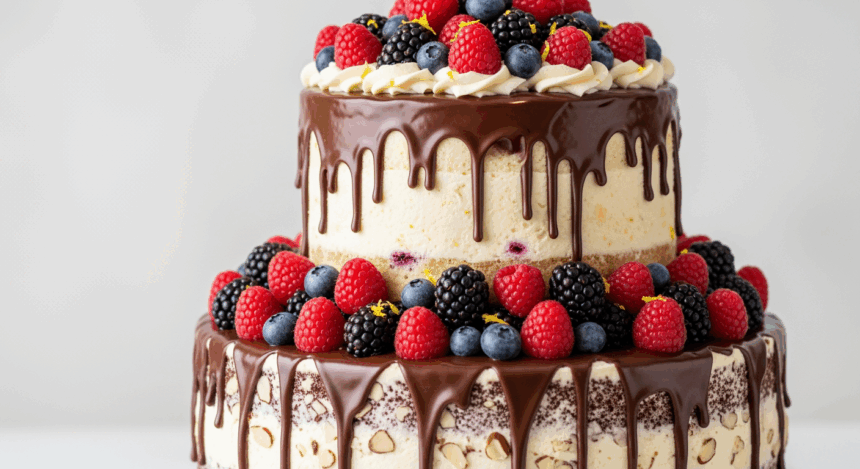
Ever had one of those days when you need to impress someone but your baking skills are more “disaster chef” than “master chef”? Well, grab your apron and prepare to fake it till you make it! This Two-Tier Berry Cake with Chocolate Drizzle looks like you spent hours in a professional kitchen, but between us, it’s ridiculously simple. Think of it as the ultimate “look how fancy I am” dessert without the fancy effort!
Why This Recipe is Awesome
Let me count the ways this cake is about to become your new BFF. First, it’s basically fool-proof. I once made this while simultaneously binge-watching Netflix AND texting my mom, and it still turned out Instagram-worthy. Second, those berries on top? They hide any and all decorating mistakes. Cake looking lopsided? Throw more berries at it! Problem solved.
The chocolate drizzle adds that “I totally know what I’m doing” vibe, when really you’re just having fun drizzling chocolate everywhere (including, inevitably, on your countertop). Best part? People think you slaved away all day when this actually comes together faster than your Amazon deliveries.
Ingredients You’ll Need
For the Cake:
- 2 boxes vanilla cake mix (yes, boxes – we’re not martyrs here)
- 6 eggs (the chicken kind, not the Easter chocolate ones)
- 1 cup vegetable oil (or whatever oil is hiding in your pantry)
- 2 cups water (from the tap, nothing fancy)
- 1 teaspoon vanilla extract (the real stuff if you’re feeling fancy)
For the Frosting:
- 4 cups (2 lbs) powdered sugar (aka the stuff that will definitely end up all over your clothes)
- 1 cup unsalted butter, softened (meaning: left on the counter while you decide if you actually want to bake today)
- 4 tablespoons milk (cow, almond, oat – whatever floats your boat)
- 2 teaspoons vanilla extract
For the Toppings:
- 2 cups mixed berries (strawberries, blueberries, raspberries – whatever looks pretty at the store)
- 1 cup chocolate chips (semi-sweet, because we’re semi-adults)
- 3 tablespoons heavy cream (the good stuff)
Step-by-Step Instructions
- Prep your battlestation. Preheat oven to 350°F (or 325°F if your oven runs hot like mine and burns everything). Grease and line four 8-inch round cake pans. If you only have two pans, you’ll just have to bake in batches like a peasant (kidding!).
- Make the cake batter. Dump the cake mixes, eggs, oil, water, and vanilla into a large bowl. Beat with an electric mixer until smooth, about 2 minutes. If you get batter on the ceiling, you’re doing it right.
- Bake those babies. Divide the batter evenly between your pans and bake for 25-30 minutes, or until a toothpick comes out clean when poked in the center. Let them cool in the pans for 10 minutes, then flip them out onto cooling racks. Pray to the cake gods they don’t break (but if they do, that’s what frosting is for).
- Make that silky frosting. Beat the butter until it’s fluffy and looking delicious. Gradually add powdered sugar, milk, and vanilla. Keep mixing until it’s smooth and you’ve resisted eating half of it straight from the bowl.
- Assemble the first tier. Once cakes are completely cool (patience, grasshopper), place one layer on your cake stand. Slather about 1/2 cup of frosting on top, spreading it to the edges. Place the second layer on top and frost the whole tier, sides and all.
- Create the second tier. Repeat the process with the remaining two cake layers, making a smaller cake on top of your workspace. Once frosted, carefully transfer this smaller cake on top of the first tier. Pro tip: Use a spatula or cake lifter for this part unless you enjoy picking cake up off the floor.
- Make the chocolate drizzle. Microwave chocolate chips and heavy cream in 30-second bursts, stirring between each until smooth and glossy. Let it cool slightly so it’s not lava-hot but still pourable.
- The grand finale. Arrange your beautiful berries on top of both tiers however your artistic heart desires. Drizzle chocolate over the top, letting it cascade down the sides dramatically. The messier, the more “artistic” it looks!
Common Mistakes to Avoid
Let’s talk about the ways you might accidentally sabotage yourself (been there, done that):
- Frosting warm cakes. Unless your aesthetic goal is “melted snowman,” wait until those cakes are COMPLETELY cool. I’m talking room temperature, not just “kinda cool but I’m impatient.”
- Skipping the parchment paper in the pans. Unless you enjoy cake that refuses to leave the pan (and a 20-minute scrubbing session afterward).
- Making your chocolate drizzle too hot. Hot chocolate + buttercream = sad melty mess. Let it cool to lukewarm before drizzling.
- Getting too fancy with the stacking. This isn’t the Leaning Tower of Pisa competition. Use dowels or straws in the bottom tier if you’re worried about collapse-age.
Alternatives & Substitutions
Not feeling some of these ingredients? No problem! Here are some swaps that won’t make your cake sad:
For the cake mix: Use chocolate cake instead of vanilla if you’re in a chocolatey mood (or one of each for a marbled effect that looks way more complicated than it is).
Berry options: Any berries work! Blackberries, cherries, even sliced kiwi if you’re feeling tropical. FYI, frozen berries work too – just thaw and drain them first unless you want your frosting to look tie-dyed.
No heavy cream? Use 2 tablespoons of butter in your chocolate drizzle instead. The result is a bit more like a ganache, which is just a fancy way of saying “even more delicious.”
Dietary restrictions? Gluten-free cake mix works perfectly here. For dairy-free, use plant-based butter and milk alternatives in the frosting. The cake will never know the difference.
FAQ (Frequently Asked Questions)
Can I make this cake ahead of time?
Absolutely! The cake layers can be baked up to 2 days ahead and wrapped tightly in plastic wrap. Just keep them at room temperature. The fully assembled cake is best within 24 hours, though, unless you want those berries to start looking like they’re melting into the abyss.
Do I really need two tiers? Can’t I just make one big cake?
I mean, you COULD make a single-tier cake, but then what would you post on social media? The two tiers are what make people think you have secret pastry chef skills. But yes, a single 9×13 cake works too if you’re baking for people who already know your true abilities.
My frosting looks lumpy. Am I doomed?
Nope! Either your butter wasn’t soft enough or your powdered sugar was clumpy. Beat it longer or add an extra splash of milk. Worst case scenario: more berries and chocolate drizzle to hide the evidence.
The cake broke when I was stacking it! Help!
Welcome to the “frosting glue” method! Press those pieces back together, frost generously, and nobody will ever know. Some of history’s greatest cakes were actually disasters in disguise.
Can I use whipped cream instead of buttercream?
You brave, brave soul. You can, but it won’t hold up as well, especially for stacking. If you go this route, you’ll need to keep the cake refrigerated and serve it ASAP before gravity does its thing.
Final Thoughts
There you have it—a cake that makes people think you’ve got your life together when maybe you just wanted an excuse to eat chocolate and berries in the same bite. Don’t stress if it doesn’t look exactly like a bakery creation—those people do this for a living, and you’re just doing it for the glory (and the sugar rush).
Remember, the true beauty of homemade desserts is in their imperfections. That slightly crooked layer? Character. Those fingerprints in the frosting? Rustic charm. That bite missing before serving? Quality control (wink).
Now go forth and impress someone with your two-tier masterpiece—or just eat it alone while watching reality TV. Either way, you’ve earned every delicious bite!
