Okay, so you’ve conquered the majestic Triple Chocolate Cake. High five! Now comes the moment of truth: making it look as drop-dead gorgeous as it tastes, without, you know, needing a pastry degree. Because who has time for perfectly piped anything when there’s cake to be eaten? This guide is all about making your chocolate masterpiece look professionally done with minimal effort and maximum chocolatey flair. Let’s get decorating!
Why This Decoration Method is Awesome
This isn’t about perfectly symmetrical rosettes or mind-numbingly intricate designs, friends. This is about making your triple chocolate cake look like it just stepped out of a high-end bakery, but with an approachable, “I totally did this myself” vibe. It’s the equivalent of putting on your favorite cozy sweatpants but making them look chic. It’s idiot-proof, even I didn’t mess it up (and I’ve had some kitchen disasters, let me tell you). Plus, it involves adding *more* chocolate. Duh.
Ingredients You’ll Need
Get ready for a chocolate fiesta! Here’s what you’ll want to gather for your decorating escapade:
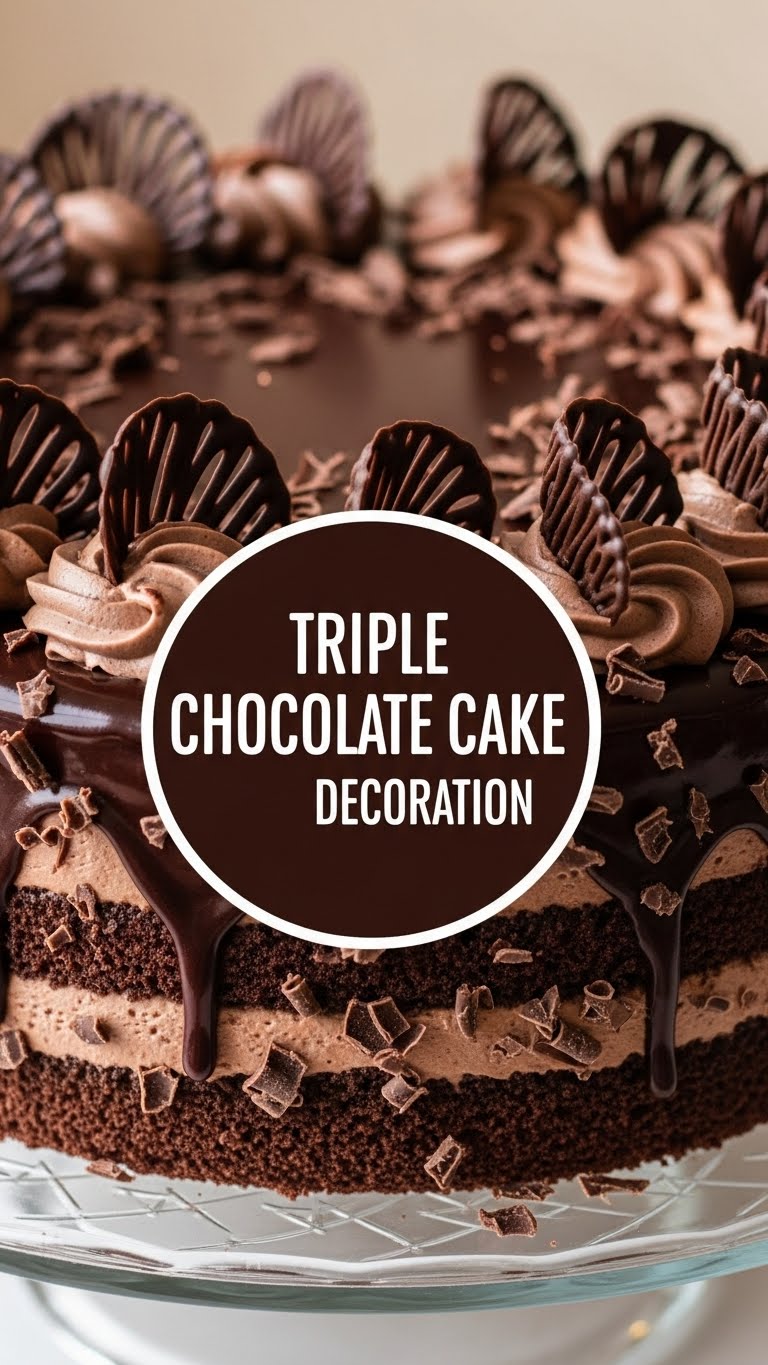
- Chocolate Ganache (homemade or good quality store-bought): Because what’s a triple chocolate cake without a generous waterfall of even *more* chocolate? Don’t be shy here.
- Chocolate Shavings or Curls: Grab a nice bar of chocolate and a vegetable peeler, or just buy them. We’re not judging your shortcuts, only admiring your results.
- Assorted Chocolate Sprinkles: Jimmie, nonpareils, maybe some cute little chocolate chips? The more variety, the merrier. These add texture and fun!
- Unsweetened Cocoa Powder: For that sophisticated, “I’m a pro” dusting finish.
- Optional: Fresh Berries (Raspberries or Strawberries): To cut through the glorious chocolate richness and add a pop of color. Makes it look like you considered health. Kidding!
Step-by-Step Instructions
Get your game face on, but keep it relaxed. We’re going for effortless elegance here!
- Cool Your Cake, Seriously: Your cake needs to be completely, utterly, absolutely cool. Like, fridge-cold cool. If it’s even slightly warm, your beautiful ganache will melt and slide right off. Impatience is the enemy of a perfectly decorated cake.
- Prep Your Ganache: If you’re making ganache from scratch, whip it up until it’s smooth and glossy. If you’re using store-bought, gently warm it until it’s pourable but still has a bit of body. We’re aiming for a luscious, slightly thick consistency – not watery, not gloopy.
- The Drip Effect (It’s Easier Than You Think!): Place your cooled cake on a wire rack with a baking sheet underneath (this catches drips and saves you cleanup, trust me). Spoon some ganache onto the top center of the cake, then use an offset spatula or the back of a spoon to gently push it towards the edges. Let some of it gracefully cascade down the sides. Don’t stress about perfect drips; the ‘rustic’ look is totally in.
- Cover the Top: Once you’re happy with your drippy sides, pour the remaining ganache over the entire top surface of the cake. Smooth it out with your spatula until it’s a beautiful, even chocolate canvas.
- Sprinkle Time! (Before it Sets): While the ganache is still a little wet and sticky (this is important!), unleash your inner sprinkle monster. Pile those chocolate shavings, curls, and assorted sprinkles generously in the center of the cake. Don’t be shy; this is a triple chocolate cake, after all!
- Dust for Drama (Optional but Recommended): For an extra touch of “I know what I’m doing,” lightly dust the outer edges of the cake top (or even along the ganache-covered sides) with cocoa powder using a fine-mesh sieve. Instant bakery upgrade!
- Berry Beautiful (Optional Flourish): If using fresh berries, artfully arrange them around the top edge or nestled among the chocolate decorations. They add a vibrant pop of color and a touch of fresh elegance. *Chef’s kiss!*
Common Mistakes to Avoid
Let’s save you some heartache and chocolate-covered tears, shall we?
- Decorating a Warm Cake: This is a cardinal sin. Your ganache will melt, slide, and turn into a soupy disaster. Cool that cake completely!
- Impatience with Ganache Consistency: Pouring ganache that’s too hot or too thin will make it run right off the cake like a waterfall during monsoon season. Wait for that perfect, slightly thickened, pourable consistency.
- Trying Too Hard to Be Perfect: This isn’t a competition. Embrace the slight imperfections! Uneven drips and natural-looking piles of chocolate are part of the charm. Don’t spend an hour trying to get every sprinkle in its place.
- Skimping on Chocolate Decorations: This is a TRIPLE chocolate cake! It needs to look like a chocolate explosion. Don’t be afraid to load up those sprinkles and curls. More is more in this case.
Alternatives & Substitutions
Got a craving but missing an ingredient? No stress, we’ve got you covered!
- Ganache: No time for homemade? Grab a good quality store-bought fudge icing and thin it slightly with a touch of heavy cream or milk until it’s pourable. *Pshhh*, your secret’s safe with me.
- Chocolate Shavings: Can’t be bothered to make curls? Roughly chop a bar of your favorite chocolate or just use chocolate chips. They still add a fantastic texture and a rich chocolatey punch.
- Sprinkles: Any sprinkles will work! While chocolate on chocolate is my go-to, if you want a fun pop of color, go for it! Just ensure they complement the chocolate vibe. IMO, you can’t go wrong with more chocolate ones.
- Berries: Not a berry fan? Orange zest for a citrusy kick, candied ginger, or even a few edible flowers can add a beautiful touch.
FAQ (Frequently Asked Questions)
- “My ganache is too thick! What do I do?” Gently warm it over a double boiler or in the microwave in very short bursts (5-10 seconds), stirring frequently, until it reaches the desired pourable consistency. Patience, young Jedi.
- “My drips aren’t even. Is that okay?” Absolutely! The beauty of this decoration method is its rustic, homemade charm. Uneven drips give it character and make it look lovingly made. Embrace the imperfection!
- “How do I make chocolate curls?” Take a bar of chocolate (it works best at room temperature, not straight from the fridge) and use a vegetable peeler or the edge of a sharp knife to scrape along its long edge. Voila! Instant fancy curls.
- “Can I decorate this cake a day ahead?” You bet! The ganache will set beautifully. Just remember to add any fresh berries or fragile garnishes right before serving to keep them looking their best. Store the decorated cake in the fridge.
- “What kind of chocolate should I use for the ganache?” A good quality bittersweet or semi-sweet chocolate works best. Avoid milk chocolate for ganache, as it can be too sweet and sometimes tricky to get the right consistency.
- “Can I add nuts to the decoration?” Heck yes! Toasted chopped pecans, walnuts, or even hazelnuts would be divine, especially if you love a bit of crunch. Just scatter them along with the chocolate sprinkles!
Final Thoughts
See? You’re a cake decorating wizard, and you barely broke a sweat! You’ve taken a delicious cake and made it a stunning centerpiece with just a few simple steps and a whole lot of chocolate love. Now go forth, share your magnificent creation (or, let’s be real, hoard it all for yourself—FYI, I fully support that decision). You’ve earned that slice of triple chocolate heaven. Happy indulging!


