So, you’ve got that chocolate craving hitting you like a freight train, but the thought of a complicated recipe makes you want to curl up in a fetal position? Been there, my friend, been there. But what if I told you there’s a way to get your hands on a seriously decadent, triple-chocolate masterpiece without spending your entire weekend slaving away? Yes, it’s possible! We’re talking about a Triple Chocolate Cake that’s so easy, it’s practically magic. Get ready to impress everyone (including your inner chocoholic) with minimal effort and maximum deliciousness.
Why This Recipe is Awesome
Let’s be real, most triple chocolate cakes sound like a culinary Everest. But this one? It’s more like a leisurely stroll through a field of cocoa beans. It’s practically idiot-proof – even I, who once mistook salt for sugar (don’t ask), manage to nail this every single time. It’s moist, it’s rich, it’s got three glorious layers of chocolatey goodness, and it comes together faster than you can say “I need more chocolate.” Plus, the “secret ingredient” ensures it’s unbelievably tender, making you look like a baking guru without breaking a sweat. It’s the kind of cake that makes people gasp, “You *made* this?!” Yes, yes you did. And you barely lifted a finger. 😉
Ingredients You’ll Need
Gather your chocolatey arsenal! Most of these are probably chilling in your pantry already, ready for their moment in the spotlight.
- All-Purpose Flour: About 2 cups. The base of our delicious operation.
- Granulated Sugar: 2 cups. For that sweet, sweet bliss.
- Unsweetened Cocoa Powder: ¾ cup. Go for good quality; it makes a difference! This is where the first layer of chocolate magic happens.
- Baking Soda: 2 teaspoons. Our lift-off specialist.
- Baking Powder: 1 teaspoon. More lift! We want fluffy, not flat.
- Salt: 1 teaspoon. Just a pinch, to make everything pop and balance the sweetness.
- Large Eggs: 2, at room temperature. The binders of deliciousness.
- Milk: 1 cup (dairy or plant-based, your call!).
- Vegetable Oil: ½ cup. For that incredible moisture. Don’t even *think* about skimping on this.
- Vanilla Extract: 2 teaspoons. Don’t skip it; it enhances the chocolate!
- Hot Water or Hot Brewed Coffee: 1 cup. This is your secret weapon, folks! It deepens the chocolate flavor like nobody’s business.
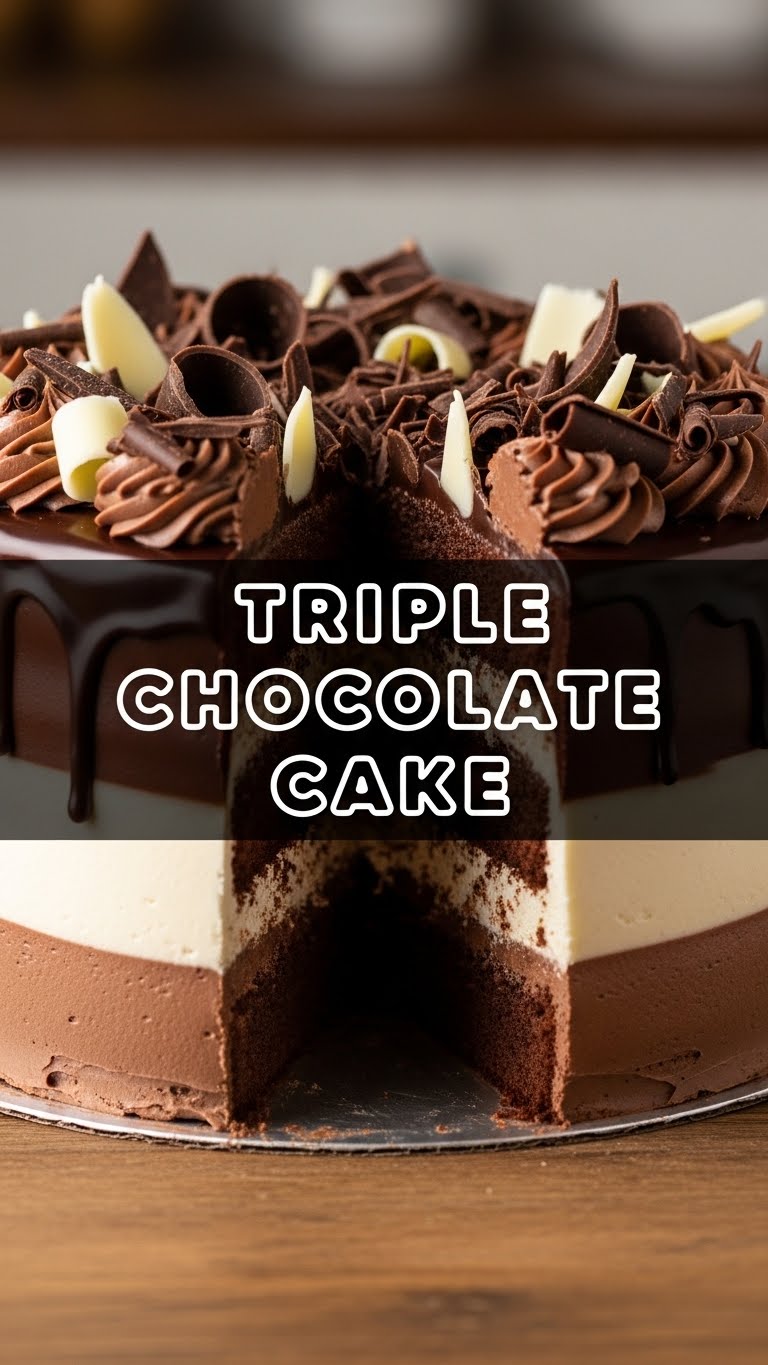
- Mixed Chocolate Chips: 1 cup (think ½ cup dark chocolate, ¼ cup milk chocolate, ¼ cup white chocolate). For the glorious triple-threat topping and texture!
For the Chocolate Buttercream Frosting:
- Unsalted Butter: 1 cup (2 sticks), softened. The foundation of dreamy frosting.
- Powdered Sugar (Confectioners’ Sugar): 3-4 cups, sifted. For that silky smooth texture.
- Unsweetened Cocoa Powder: ½ cup. Hello, second layer of chocolate!
- Milk or Cream: ¼ cup. Adjust as needed for consistency.
- Vanilla Extract: 1 teaspoon.
Step-by-Step Instructions
- Prep Your Stage: Preheat your oven to 350°F (175°C). Grease and flour two 9-inch round cake pans. Or, if you’re smart like me, use parchment paper circles at the bottom. Less sticking, more winning.
- Whisk the Dry Squad: In a large bowl, whisk together the flour, sugar, cocoa powder, baking soda, baking powder, and salt. Make sure there are no lumpy bits. We’re aiming for smooth sailing here.
- Bring in the Wet Crew (Almost All): Add the eggs, milk, vegetable oil, and vanilla extract to the dry ingredients. Beat with an electric mixer on medium speed for about 2 minutes. Scrape down the sides of the bowl.
- Unleash the Secret Weapon: Carefully pour in the hot water or hot coffee. The batter will be thin – don’t panic! This is exactly what we want. Stir until just combined. Don’t overmix!
- Bake It Up: Divide the batter evenly between your prepared cake pans. Bake for 30-35 minutes, or until a wooden skewer inserted into the center comes out clean.
- Cool Down: Let the cakes cool in the pans for about 10-15 minutes before inverting them onto a wire rack to cool completely. This is crucial! A warm cake plus frosting equals a melted, sliding disaster. Trust me.
- Whip Up the Frosting: While the cakes are chilling, make the frosting! In a large bowl, beat the softened butter with an electric mixer until light and fluffy. Gradually add the sifted powdered sugar and cocoa powder, alternating with the milk/cream and vanilla. Beat until smooth and creamy. If it’s too thick, add a tiny bit more milk; too thin, add more powdered sugar.
- Assemble Your Masterpiece: Once the cakes are completely cool, place one layer on your serving plate. Spread about a third of the frosting evenly over the top. Carefully place the second cake layer on top. Frost the top and sides of the entire cake.
- Triple the Chocolate Fun: Sprinkle those mixed chocolate chips generously over the top of the cake. This is your third layer of chocolate, making it truly TRIPLE chocolate!
- Devour: Slice, serve, and bask in the glory of your baking prowess!
Common Mistakes to Avoid
Even the pros make mistakes, but we can learn from them, right? Here’s what *not* to do:
- Overmixing the Batter: Once you add the wet ingredients, mix only until just combined. Overmixing develops the gluten too much, leading to a tough, dense cake. We want light and fluffy, not a brick!
- Not Cooling Cakes Completely: I know, the smell is intoxicating and you just want to frost it NOW. But seriously, resist the urge. A warm cake will melt your beautiful buttercream into a gooey mess, and you’ll be sad.
- Ignoring the Hot Water/Coffee: This isn’t just for thinning the batter. It blooms the cocoa, making the chocolate flavor incredibly deep and rich. Don’t skip this step or substitute with cold water. It’s a game-changer!
- Eyeballing Ingredients (Especially Baking Soda/Powder): Baking is a science, my friend. Too much or too little of these leavening agents can spell disaster for your cake’s texture. Use proper measuring spoons.
Alternatives & Substitutions
Feeling a little adventurous or have specific dietary needs? No worries, we’ve got options!
- Dairy-Free Delight: You can totally make this cake dairy-free! Use your favorite plant-based milk (almond, soy, oat work great) and a good quality vegan butter for the frosting.
- Gluten-Free: Swap out the all-purpose flour for a 1:1 gluten-free baking blend. Just make sure it contains xanthan gum, or add ½ teaspoon yourself.
- Coffee Haters Unite: If you’re not a fan of coffee, just use hot water for the “secret ingredient” step. The coffee enhances the chocolate but doesn’t make the cake taste like coffee, FYI. But if you’re truly anti-coffee, hot water works perfectly fine.
- Chocolate Chip Swap: Not feeling the mix of chips? Use all dark, all milk, or even throw in some chopped candy bars (Snickers, anyone?) for an extra layer of decadence.
FAQ (Frequently Asked Questions)
Got questions? I’ve got (casual and hopefully helpful) answers!
Can I use margarine instead of butter for the frosting? Well, technically yes, but why hurt your soul like that? Butter is king for a reason – it provides the best flavor and texture. Margarine can make the frosting taste a bit off or greasy. Stick with butter if you can!
My cake is dry, what went wrong? Bummer! Usually, a dry cake means it was overbaked. Ovens vary, so start checking earlier than the recipe states. Also, ensure you used the oil and the hot liquid as specified; they contribute majorly to moisture!
Can I make cupcakes instead of a layer cake? Absolutely! Pour the batter into cupcake liners, filling them about two-thirds full. Bake for approximately 18-22 minutes, or until a skewer comes out clean. Same deliciousness, mini version!
How long does this cake keep? Covered tightly at room temperature, it’s usually good for 3-4 days. In the fridge, it can last up to a week. But honestly, it rarely lasts that long in my house, LOL.
Can I freeze the cake? You bet! Unfrosted cake layers can be wrapped tightly in plastic wrap and then foil, and frozen for up to 2-3 months. Thaw them at room temperature before frosting. You can also freeze individual slices, properly wrapped.
What if I only have unsweetened chocolate for the cake and frosting? You *could* melt it and use it, but cocoa powder is much easier and gives a better texture for this specific recipe. If you only have unsweetened chocolate, look up recipes specifically designed for that. Don’t just swap it out directly for the cocoa powder here!
Final Thoughts
See? That wasn’t so scary, was it? You just whipped up a Triple Chocolate Cake that looks like it came straight from a fancy bakery, and you did it with ease. Now go impress someone – or yourself! – with your new culinary skills. You’ve earned that slice (or two). Enjoy every chocolatey, moist, delicious bite, my friend!


