So you’re craving something tasty but too lazy to spend forever in the kitchen, huh? Same. 🙂
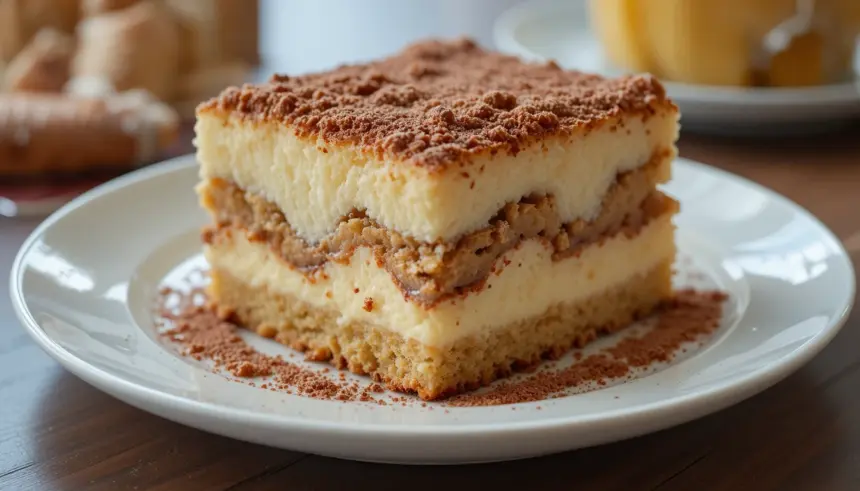
Let’s be real, sometimes the craving for something decadent hits, but the thought of a multi-step, hours-long baking marathon is… well, it’s a mood killer. Enter my Tiramisu-ish creation, featuring the unsung hero of shortcuts: pound cake! Forget the delicate ladyfingers; we’re going full-on comfort food with this one. It’s like Tiramisu decided to take a vacation to its cozy, buttery cousin’s house, and guess what? They threw an epic party, and you’re invited.
Why This Recipe is Awesome
Okay, let’s talk bragging rights. This isn’t just “good,” it’s *genius*. Why? Because we’re leveraging the pre-baked goodness of pound cake. That’s right, your heavy lifting is already done. This recipe is pretty much idiot-proof, and trust me, I’ve been there. It’s the perfect blend of rich, creamy, coffee-kissed indulgence without the existential dread of mastering egg whites. Plus, it looks fancy enough to fool your most discerning foodie friends, even if you whipped it up in under an hour.
Ingredients You’ll Need
- 1 store-bought pound cake (the good stuff, the dense kind!): Think of it as your sturdy foundation.
- 2 cups strong brewed coffee (cooled, not lukewarm!): Gotta have that coffee kick. Espresso works wonders if you’re feeling fancy.
- 1/4 cup coffee liqueur (like Kahlua or Tia Maria) OR a splash of vanilla extract: For that grown-up flavour boost. Optional, but highly recommended.
- 8 oz mascarpone cheese (room temp, please!): This is the silky smooth magic.
- 1/2 cup powdered sugar (sifted, to avoid lumps that mock you): Sweetness without the grittiness.
- 1 tsp vanilla extract: Because vanilla makes everything better.
- 1 cup heavy whipping cream: For that airy, cloud-like texture.
- Unsweetened cocoa powder, for dusting: The “tiramisu” signature. Don’t skimp!
Step-by-Step Instructions
- Cut your pound cake into 1-inch thick slices. Think of them as little edible platforms ready for a delicious soaking.
- In a shallow dish, mix your cooled coffee with the coffee liqueur (or vanilla). This is where the flavor party starts.
- Quickly dip each pound cake slice into the coffee mixture. **Don’t let them get soggy!** We want them moist, not mushy. A quick dunk is all you need.
- Line the bottom of a serving dish (a square or rectangular one works best) with the soaked pound cake slices. No gaps, okay? Like a puzzle, but way tastier.
- In a separate bowl, beat the mascarpone cheese, powdered sugar, and vanilla extract until smooth and creamy. This is your luxurious filling.
- In another clean bowl, whip the heavy cream until stiff peaks form. This is your airy delight. Gently fold this whipped cream into the mascarpone mixture. Be gentle, like you’re tucking in a baby.
- Spread half of this creamy goodness evenly over the pound cake layer.
- Add another layer of soaked pound cake slices on top of the cream.
- Top with the remaining mascarpone mixture, spreading it smoothly to cover everything.
- Cover the dish tightly with plastic wrap. **Chill for at least 4 hours, but overnight is heavenly.** This is the *most important* step for flavors to meld.
- Just before serving, dust generously with unsweetened cocoa powder. Use a fine-mesh sieve for a professional, powdery finish. Ta-da!
Common Mistakes to Avoid
- Soaking the pound cake for too long: Seriously, it’s a quick dip. Over-soaking turns your delicious dessert into a soggy mess. Nobody wants that.
- Not chilling it long enough: Patience, grasshopper! This isn’t a race. The chilling time is crucial for the flavors to get acquainted and for the whole thing to set properly.
- Using lukewarm coffee: Cold coffee prevents the pound cake from getting weirdly hot and weirdly mushy. Plus, it’s a better flavor.
- Skipping the cocoa dusting: It’s the finishing touch! It adds that signature bitterness and looks pretty. Don’t be that person who forgets the sprinkles.
Alternatives & Substitutions
Feeling a bit adventurous? Or perhaps you’re missing an ingredient? No worries!
- No pound cake? A dense, sturdy sponge cake or even some good quality brioche (though less traditional) could work in a pinch. Just watch the soaking time!
- No coffee liqueur? A tablespoon of instant coffee dissolved in a little hot water, plus a touch more vanilla, can get you close. Or just lean into the straight coffee flavor!
- Don’t have mascarpone? Cream cheese can be a substitute, but it will be tangier and denser. Beat it really well with some extra powdered sugar to get it as smooth as possible. IMO, mascarpone is worth the hunt.
- Want it boozier? Add a touch more liqueur, or even a splash of rum or brandy to the coffee soak. Just don’t go overboard unless you’re making this for a bachelorette party. 😉
FAQ (Frequently Asked Questions)
Can I make this ahead of time? Absolutely! In fact, I highly recommend it. The longer it chills, the better it tastes. It’s like fine wine, but you can eat it with a spoon.
Why is my mascarpone lumpy? Make sure it’s at room temperature and that you’re mixing it with powdered sugar. Cold mascarpone is a beast to work with.
Can I use regular milk instead of heavy cream? Nope, honey. Regular milk won’t whip up. You need that fat content for glorious fluffiness. Stick to the heavy cream for the best result.
What kind of coffee should I use? Strong brewed coffee is best. Espresso is even better if you have it! The flavor really shines through.
Can I make this dairy-free? This is a tough one for Tiramisu, as dairy is pretty key. You might be able to experiment with a dairy-free pound cake and a coconut cream/cashew cream base, but it’s uncharted territory for this recipe. Let me know if you try it!
How do I get that perfect cocoa dusting? Use a fine-mesh sieve! It ensures an even, beautiful layer of cocoa powder without any clumpy surprises.
Final Thoughts
And there you have it! A surprisingly simple, incredibly satisfying dessert that tastes like you slaved away for hours. It’s perfect for a weeknight treat, a casual get-together, or just to prove to yourself that you *can* make something amazing without breaking a sweat. Now go impress someone—or yourself—with your new culinary skills. You’ve earned it! Happy baking (or, you know, assembling)!

