So you’ve decided to make your own wedding cake? Either you’re a baking enthusiast with nerves of steel or you’ve completely lost your mind. Either way, I’m here for it! Creating a three-tier chocolate drip wedding cake is like the Olympics of home baking – ambitious, slightly terrifying, but oh-so-satisfying when you pull it off. Grab your apron and let’s dive into this delicious madness together!
Why This Recipe is Awesome
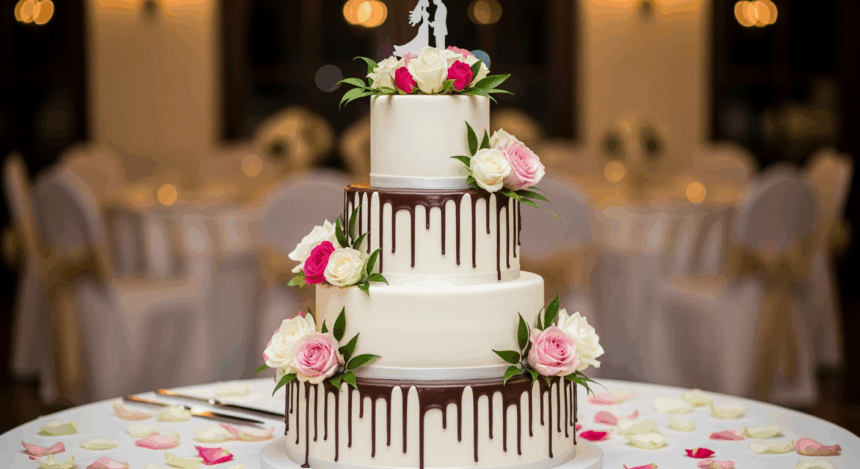
Let’s be real – making your own wedding cake is a power move. This three-tier chocolate drip masterpiece isn’t just any cake; it’s the “I-can’t-believe-you-made-this-yourself” conversation starter of your reception. The combination of elegant tiers with that Instagram-worthy chocolate drip gives you the perfect balance of sophistication and fun. It’s like wearing a designer gown with your favorite comfy sneakers hidden underneath – classy with a wink.
Plus, you get to sample “test cakes” for weeks beforehand. If that’s not a win, I don’t know what is.
Ingredients You’ll Need
For the Cake (per tier):
- 3 cups all-purpose flour (the regular stuff, nothing fancy)
- 2 cups granulated sugar (because it’s a celebration, not a diet plan)
- 1 cup unsalted butter, softened (the real deal, please)
- 4 large eggs (room temperature – yes, it matters)
- 1 cup buttermilk (or regular milk with a splash of vinegar if you forgot to buy buttermilk, we’ve all been there)
- 1 tablespoon vanilla extract (the good stuff, not the imitation nonsense)
- 1 tablespoon baking powder (the magical powder that makes everything rise)
- ½ teaspoon salt (to balance all that sweetness)
For the Buttercream:
- 2 lbs unsalted butter (your arteries are crying, but your taste buds are doing a happy dance)
- 8 cups powdered sugar (approximately half a bag, or enough to make your kitchen look like a winter wonderland)
- 2 tablespoons vanilla extract
- 4-6 tablespoons heavy cream (or more, who’s counting?)
- Pinch of salt (trust me on this one)
For the Chocolate Drip:
- 2 cups semi-sweet chocolate chips (or fancy chocolate bars if you’re feeling bougie)
- 1 cup heavy cream
- 2 tablespoons corn syrup (for that glossy magazine finish)
Additional Supplies:
- Three cake pans: 6-inch, 8-inch, and 10-inch
- Cake boards in corresponding sizes
- Dowel rods or cake supports (unless you enjoy cake avalanches)
- Piping bags and tips for decoration
- A ridiculous amount of patience
- Wine (for the baker, not the cake)
Step-by-Step Instructions
Phase 1: Baking the Cakes
- Preheat your oven to 350°F (175°C). Do not skip this step unless you enjoy raw cake batter (no judgment).
- Prep your cake pans by greasing and flouring them, then lining the bottoms with parchment paper. This triple-threat approach ensures your cakes won’t become permanent residents of the pan.
- For each tier, cream together butter and sugar until fluffy and lighter in color. Think cloud-like texture, not just mixed.
- Add eggs one at a time, mixing well after each. If the mixture looks curdled, don’t panic – it’ll come together in the end (much like life).
- Mix in vanilla extract because vanilla makes everything better.
- In a separate bowl, whisk together flour, baking powder, and salt.
- Gradually add dry ingredients to the butter mixture, alternating with buttermilk. Start and end with dry ingredients (it’s like a flour sandwich).
- Pour batter into prepared pans. For the 6-inch tier, you’ll need about 3 cups of batter. For the 8-inch, about 5 cups. For the 10-inch, about 8 cups. Or just eyeball it and fill each pan about 2/3 full.
- Bake until a toothpick inserted comes out clean. Approximately 25-30 minutes for 6-inch, 35-40 minutes for 8-inch, and 45-50 minutes for 10-inch. Your kitchen will smell like heaven.
- Let cakes cool in pans for 10 minutes, then transfer to wire racks to cool completely. Resist the urge to frost warm cakes unless you’re going for the “melted snowman” aesthetic.
Phase 2: Making the Buttercream
- Beat butter until creamy and pale. This is your arm workout for the day – you’re welcome.
- Gradually add powdered sugar, 1 cup at a time, mixing well between additions. Your kitchen will look like a cocaine deal gone wrong, but it’s worth it.
- Add vanilla extract and salt. Mix until incorporated.
- Add heavy cream, 1 tablespoon at a time, until you reach desired consistency. You want it firm enough to hold its shape but soft enough to spread easily – like the perfect memory foam mattress.
- Beat the frosting on high speed for 3-5 minutes until light and fluffy. This incorporates air and makes it easier to spread.
Phase 3: Assembling the Cake
- Level all cake layers with a serrated knife or cake leveler. Eat the scraps – baker’s privilege.
- Place the first 10-inch cake layer on its corresponding cake board.
- Add a generous layer of buttercream, spreading evenly with an offset spatula.
- Repeat with remaining 10-inch layers.
- Crumb coat the entire tier with a thin layer of buttercream, then refrigerate for 30 minutes.
- Repeat the process for the 8-inch and 6-inch tiers on their respective cake boards.
- After crumb coats are chilled, apply the final coat of buttercream to each tier. For a smooth finish, dip your spatula in hot water and wipe dry before smoothing the frosting.
- Refrigerate all tiers for at least 1 hour to set the buttercream. This is non-negotiable unless you want the cake equivalent of a landslide.
Phase 4: Stacking and Support
- Insert dowel rods or cake supports into the 10-inch tier. These should be cut level with the top of the frosting.
- Center the 8-inch tier (on its board) on top of the 10-inch tier.
- Insert dowel rods into the 8-inch tier.
- Center the 6-inch tier (on its board) on top of the 8-inch tier.
- Refrigerate the stacked cake for 30 minutes to ensure stability. This is a good time to have that glass of wine you’ve been eyeing.
Phase 5: The Chocolate Drip Finale
- Place chocolate chips in a heatproof bowl.
- Heat heavy cream until just beginning to simmer (not boil – we’re not making hot chocolate here).
- Pour hot cream over chocolate chips and let sit for 2-3 minutes.
- Add corn syrup and stir until smooth and glossy.
- Allow ganache to cool until it’s thick but still pourable – about 10-15 minutes. Test it on the inside of your wrist; it should feel warm but not hot.
- Transfer ganache to a squeeze bottle or piping bag.
- Working one tier at a time, squeeze ganache around the edges, allowing it to drip down the sides. Start with the top tier and work your way down.
- Fill in the top of each tier with ganache, smoothing gently with an offset spatula.
- Let the drips set for about 15 minutes before adding any additional decorations.
- Add your final touches – fresh flowers, piped designs, or edible gold leaf if you’re feeling extra.
Common Mistakes to Avoid
Rushing the process. This isn’t a 30-minute meal, Gordon Ramsay isn’t yelling at you, and Rome wasn’t built in a day. Spread this project over 2-3 days to maintain your sanity.
Skipping the supports. Unless you want your wedding cake to resemble the Leaning Tower of Pisa, use proper supports between tiers. Physics is real, even on special occasions.
Making the chocolate drip too hot. If your ganache is too warm, you’ll end up with chocolate puddles instead of elegant drips. Nobody wants a cake that looks like it’s melting in horror movie fashion.
Frosting warm cakes. This is the express route to Slidesville, population: your buttercream. Patience, grasshopper.
Forgetting to level your cakes. Uneven layers lead to wobbling tiers. Wobbling tiers lead to stress. Stress leads to the dark side. Or something like that.
Alternatives & Substitutions
Flavor variations: Not a vanilla fan? Substitute some of the flour for cocoa powder (about 1/2 cup per tier) for chocolate cake layers. Or add lemon zest and a tablespoon of lemon juice for a citrus kick.
Buttercream alternatives: Swiss meringue buttercream is more stable in warmer weather, though more technical to make. Cream cheese frosting works beautifully if you’re doing a red velvet or carrot cake version.
Drip options: White chocolate drip with food coloring can match your wedding colors. Caramel drip is another decadent option, though it sets softer than chocolate.
Dairy-free version: Use plant-based butter and coconut cream instead of heavy cream. Just be aware that some non-dairy products don’t behave exactly the same way, so do a test run first.
Time-saving hack: If you’re on the verge of a pre-wedding meltdown, use high-quality box mixes enhanced with extra vanilla and an extra egg. I won’t tell if you don’t.
FAQ (Frequently Asked Questions)
How far in advance can I make this cake?
You can bake the cakes up to a month ahead and freeze them wrapped in plastic wrap and foil. The assembled cake with buttercream can be made 2-3 days ahead and refrigerated. Add the chocolate drip no more than 24 hours before serving for the best appearance.
Do I really need special cake pans for each tier?
Unless you want a wedding cake that looks like three identical cakes stacked on top of each other (hey, no judgment), yes, you need different sized pans. Consider it an investment in your baking future or borrow from that friend who has everything.
What if my chocolate drip hardens before I finish the cake?
Gently reheat it by placing the container in warm (not hot) water and stirring until it reaches the right consistency again. It’s like giving your ganache a nice warm bath – everyone deserves a spa moment.
How do I transport this monstrosity to my venue?
First, pray. Second, consider assembling the tiers at the venue if possible. If not, transport the cake in a box with a non-slip mat, driving like you have a newborn baby in the car. Better yet, bribe a steady-handed friend to be your designated cake driver.
Can I use margarine instead of butter?
Technically yes, but why start your marriage with such a compromise? Butter brings flavor and stability that margarine just can’t match. Save the shortcuts for thank-you notes, not your cake.
Help! My cake layers are domed/sunk/cracked!
For doming, use cake strips around your pans or lower the oven temperature by 25°F. For sinking, your leavening might be old or you opened the oven door too soon. For cracks, your oven was probably too hot. But remember: buttercream hides a multitude of sins. That’s why it was invented.
How many people will this cake feed?
A three-tier cake (6″, 8″, and 10″) typically serves about 75-100 wedding-sized portions. If your guests cut their own slices, expect it to feed significantly fewer people, as everyone suddenly becomes a cake enthusiast with remarkable spatial awareness issues.
Final Thoughts
Making your own wedding cake is both an act of courage and potential masochism – but when you see that beautiful three-tier creation with its perfect chocolate drips catching the light, you’ll feel like the baking champion you truly are. Just remember, even professional bakers have disasters, so keep your sense of humor intact throughout this process.
If all else fails, remember that cake is still cake, even if it’s not perfect. Your guests will be impressed by your ambition alone, and after a few glasses of champagne, they won’t notice if your drips aren’t Instagram-worthy. The best part? You’ll start your marriage having already overcome a challenge together – because let’s be honest, your partner is getting roped into this adventure whether they signed up for it or not.
Now go forth and create your edible wedding masterpiece! And maybe schedule a relaxing massage for the day after – you’ve earned it.
