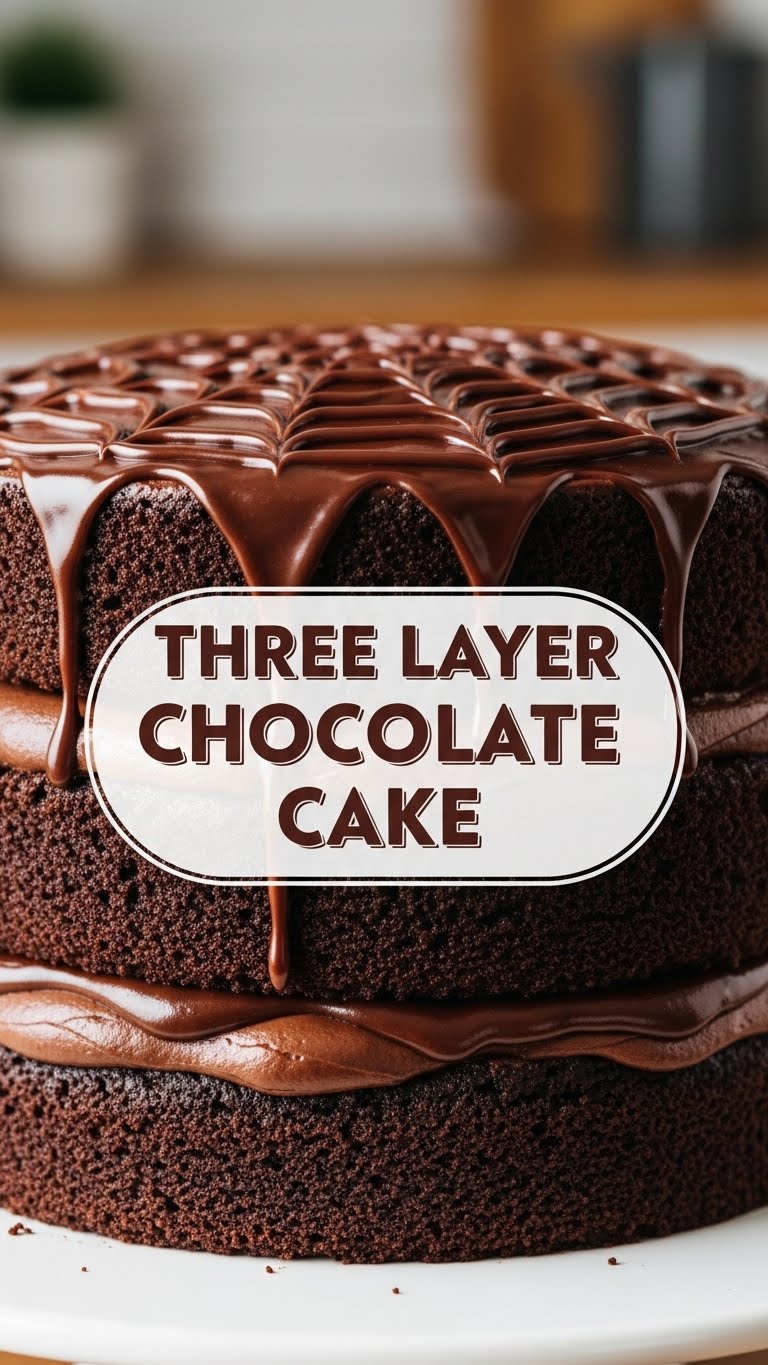
Ever just stare into the fridge, hoping a gourmet chocolate cake will magically materialize? Me too. Spoiler alert: it won’t. But this recipe is the next best thing, minus the magic wand and the hefty bakery price tag. So you’re craving something ridiculously tasty but too lazy to spend forever in the kitchen, huh? Same, friend, *same*. Get ready to whip up a show-stopping (and surprisingly simple) Three-Layer Chocolate Cake that’ll make you feel like a pastry chef without all the existential dread.
Why This Recipe is Awesome
Okay, let’s be real. We all want to impress, or at least not burn the house down. This recipe? It’s basically **idiot-proof**. I’ve made it, and if I didn’t mess it up, you’re golden. It’s got that perfect balance of moist, rich chocolate cake and dreamy, fudgy frosting that screams “I love you” (or “I love chocolate, leave me alone”). Plus, it comes together quicker than you’d think, meaning less time slaving over a hot oven and more time eating cake. Your friends will fawn, your family will cheer, and you? You’ll be the undisputed dessert champion. And honestly, it’s so good, your significant other might actually do the dishes this time. (No guarantees, but a girl can dream!)
Ingredients You’ll Need
Time to gather your edible treasures! Nothing too fancy here, just the good stuff.
- For the Cake:
- 2 cups (250g) All-Purpose Flour – The base of our masterpiece.
- 2 cups (400g) Granulated Sugar – Because life is sweet, and so should your cake be.
- ¾ cup (90g) Unsweetened Cocoa Powder (Dutch-processed for extra darkness!) – For that deep, dark soul-satisfying chocolate hue.
- 2 teaspoons Baking Soda – Our little lift-off specialist.
- 1 teaspoon Baking Powder – Its trusty sidekick, ensuring maximum fluff.
- 1 teaspoon Salt – Don’t skip it, it brings out all the chocolatey goodness.
- 1 cup (240ml) Buttermilk – Our secret weapon for moistness. If you don’t have it, milk + 1 tbsp vinegar/lemon juice, let sit 5 mins.
- ½ cup (120ml) Vegetable Oil – Keeps things tender.
- 2 large Eggs – The binders of our cakey dreams.
- 1 teaspoon Vanilla Extract – Pure bliss in a bottle.
- 1 cup (240ml) Boiling Water – Yes, boiling! It’s magic, trust me.
- For the Fudgy Chocolate Buttercream:
- 1 cup (226g) Unsalted Butter, softened – The good stuff, no sad substitutes here.
- 4 cups (480g) Powdered Sugar (Confectioners’ Sugar) – Sifted, to avoid lumps of despair.
- ¾ cup (90g) Unsweetened Cocoa Powder – More chocolate, why not?
- ½ cup (120ml) Heavy Cream (or whole milk) – For that creamy, dreamy texture.
- 1 teaspoon Vanilla Extract – Because it’s essential.
- Pinch of Salt – Balances the sweetness beautifully.
Step-by-Step Instructions
Alright, apron on, game face ready! Let’s do this.
- Get Your Oven Ready: Preheat your oven to 350°F (175°C). Grease and flour three 8-inch round cake pans. Or, line them with parchment paper for zero-stick confidence. You’ll thank me later.
- Whisk the Dry Squad: In a large bowl, whisk together the flour, sugar, cocoa powder, baking soda, baking powder, and salt. Make sure there are no lumpy surprises!
- Mix the Wet Crew (Almost All of Them): In a separate medium bowl, combine the buttermilk, oil, eggs, and vanilla extract. Whisk them until they’re nicely blended.
- Combine Forces: Pour the wet ingredients into the dry ingredients. Mix on low speed with an electric mixer (or by hand with a whisk) until just combined. Don’t overmix, or your cake will be tough!
- Add the Hot Stuff: Carefully pour in the boiling water. The batter will be thin, and that’s okay! Mix until just combined. This hot water magic makes the cake super moist.
- Divide and Conquer: Divide the batter evenly among your three prepared cake pans.
- Bake ‘Em Up: Bake for 25-30 minutes, or until a wooden skewer inserted into the center comes out clean. Ovens vary, so keep an eye on them.
- Cool Down: Let the cakes cool in the pans for about 10-15 minutes before inverting them onto a wire rack to cool completely. Patience is a virtue, especially when cake is involved.
- Whip Up the Frosting: While the cakes cool, beat the softened butter in a large bowl with an electric mixer until light and fluffy. Gradually add the powdered sugar and cocoa powder, alternating with the heavy cream, beating until smooth and creamy. Stir in the vanilla extract and salt. If it’s too thick, add a tiny bit more cream; too thin, add more powdered sugar.
- Stack ‘Em High: Once the cakes are completely cool (this is crucial, FYI!), place one layer on your serving plate. Spread about a third of the frosting evenly. Repeat with the second and third layers. Frost the top and sides of the entire cake. Get creative, or just make it smooth – it’ll taste amazing either way!
- Serve and Devour: Slice, serve, and bask in the glory of your chocolatey creation.
Common Mistakes to Avoid
We’ve all been there. Here’s how to avoid rookie errors and bake like a boss!
- Not Preheating Your Oven: Thinking you don’t need to preheat the oven? **Rookie mistake.** Your oven needs to be at the correct temperature *before* the cake goes in for even baking.
- Overmixing the Batter: Once you add the wet to the dry, mix until just combined. Overmixing develops the gluten, leading to a tough, dry cake. Nobody wants that.
- Not Cooling Cakes Completely: Frosting a warm cake is a one-way ticket to a melted, sliding mess. **Patience, my friend, patience!** Let those layers chill out completely.
- Eyeballing Measurements: This ain’t abstract art, pal, it’s baking. Precision matters, even if just a little. Use those measuring cups and spoons!
- Forgetting the Salt: Salt in a sweet recipe? Absolutely! It enhances all the other flavors. Skipping it makes your cake taste… flat.
Alternatives & Substitutions
Life’s about choices, right? Here are a few ways to mix things up:
- Dairy-Free Fun: You can totally swap the buttermilk for a dairy-free alternative (like almond or soy milk with a splash of vinegar). For the frosting, use a good quality dairy-free butter stick and a plant-based cream. It won’t be exactly the same, but still delicious!
- Coffee Boost: Want to make the chocolate flavor *pop* even more? Replace the boiling water in the cake with **hot brewed coffee**. Trust me on this one; it’s a game-changer.
- Add-Ins: Feel free to fold in a handful of chocolate chips or chopped nuts into the batter for extra texture and flavor. Go wild!
- Different Frosting: Not feeling the buttercream? A simple chocolate ganache (equal parts hot cream and chopped chocolate, stirred until smooth) would be amazing, too. Or, hey, a good old cream cheese frosting? Heavenly.
FAQ (Frequently Asked Questions)
- Can I use margarine instead of butter? Well, technically yes, but why hurt your soul like that? Butter tastes infinitely better and gives a superior texture. For the best result, stick to good quality butter.
- My cake looks dry! What did I do wrong? Likely overbaked. Keep a closer eye on the timer next time, and rely on the skewer test. Also, make sure you’re not overmixing your batter.
- Can I make this cake ahead of time? Absolutely! The unfrosted cake layers can be wrapped tightly in plastic wrap and stored at room temperature for up to 2 days, or frozen for up to a month. The frosted cake can hang out in the fridge for 3-4 days.
- Why is boiling water used in the recipe? Great question! The boiling water “blooms” the cocoa powder, intensifying the chocolate flavor, and helps create a super moist, tender crumb. It’s a little baking magic!
- Can I make cupcakes with this recipe? Yep! Just divide the batter among cupcake liners and bake for about 18-22 minutes. Keep an eye on them, as baking times will be shorter.
- My frosting is too thin/thick. Help! Don’t panic! If it’s too thin, gradually add more sifted powdered sugar. If it’s too thick, add a tablespoon of heavy cream (or milk) at a time until it reaches your desired consistency. You got this!
Final Thoughts
So there you have it, your very own blueprint for a jaw-dropping, ridiculously delicious Three-Layer Chocolate Cake. It’s not just a recipe; it’s a journey to chocolate nirvana, and you, my friend, are the fearless explorer. Don’t stress too much about perfection; the best baking often comes with a few happy accidents. Now go impress someone—or yourself—with your new culinary skills. You’ve earned it!

