So you’re craving something luscious, chocolatey, and utterly decadent but the thought of spending hours in the kitchen makes you want to crawl back into bed? Same, friend, same. That’s exactly where this super moist marble cake recipe swoops in like a delicious, superhero cape-wearing dessert. It’s here to save your taste buds and your precious Netflix-binging time!
Why This Recipe is Awesome
Okay, let’s be real. There are a million cake recipes out there. But this one? This is the one you keep in your back pocket for when you need to impress someone (or just yourself, no judgment here) without actually breaking a sweat. It’s so absurdly moist, it practically melts in your mouth – no dry, crumbly cake disasters allowed on our watch. Plus, it looks fancy AF with its beautiful swirls, but it’s actually idiot-proof. Seriously, if I can do it without accidentally setting off the smoke detector, you totally can too.
It strikes that perfect balance: rich butteriness meets deep chocolate, all swirled into a fluffy, tender crumb. It’s like a party in your mouth where everyone’s invited, and nobody gets left out. And bonus points: the prep is pretty straightforward, so you won’t feel like you need a culinary degree just to get started. Win-win-win!
Ingredients You’ll Need
Get ready to gather your delicious arsenal! Most of these are probably chilling in your pantry already, FYI.
- All-Purpose Flour: 2 ½ cups. The backbone of our cake. Don’t go fancy with cake flour unless you’re feeling adventurous.
- Granulated Sugar: 1 ½ cups. Because life is sweet, and so should be our cake.
- Unsalted Butter: 1 cup (2 sticks), room temperature. Yes, room temp is crucial. Don’t skip this, unless you enjoy lumpy batter (you don’t).
- Large Eggs: 3, also room temperature. They help with structure and moisture, our little ovate heroes.
- Buttermilk: 1 cup, room temperature. The secret weapon for insane moisture and tenderness. If you don’t have it, see the substitutions section!
- Vanilla Extract: 2 teaspoons. Good quality stuff, please. It makes a difference.
- Baking Powder: 2 ½ teaspoons. Our lift-off agent!
- Salt: ½ teaspoon. Balances the sweetness and enhances flavor. Don’t forget it!
- Unsweetened Cocoa Powder: ¼ cup. For the chocolate half of our marble masterpiece.
- Hot Water: ¼ cup. For blooming that cocoa and making it extra chocolatey.
Step-by-Step Instructions
- Preheat & Prep: Set your oven to 350°F (175°C). Grease and flour a 9×13 inch baking pan (or two 9-inch round pans) like it’s going to a fancy ball. Or line with parchment. Whatever floats your boat!
- Whisk Dry Ingredients: In a medium bowl, whisk together the flour, baking powder, and salt. Set aside.
- Bloom the Cocoa: In a small bowl, whisk the cocoa powder with the hot water until smooth. This makes it super dark and flavorful. Set aside to cool slightly.
- Cream Butter & Sugar: In a large bowl (or stand mixer), beat the softened butter and granulated sugar together until light and fluffy. This usually takes 3-5 minutes. Don’t rush it!
- Add Eggs: Beat in the eggs one at a time, mixing well after each addition. Scrape down the sides of the bowl to make sure everything gets incorporated.
- Alternate Wet & Dry: With the mixer on low, gradually add the dry ingredients to the butter mixture in three additions, alternating with the buttermilk in two additions. Begin and end with the dry ingredients. Mix just until combined; do not overmix!
- Divide the Batter: Divide the batter roughly in half into two separate bowls. Into one bowl, gently fold in the cooled cocoa mixture. Now you have a vanilla batter and a chocolate batter. Yay!
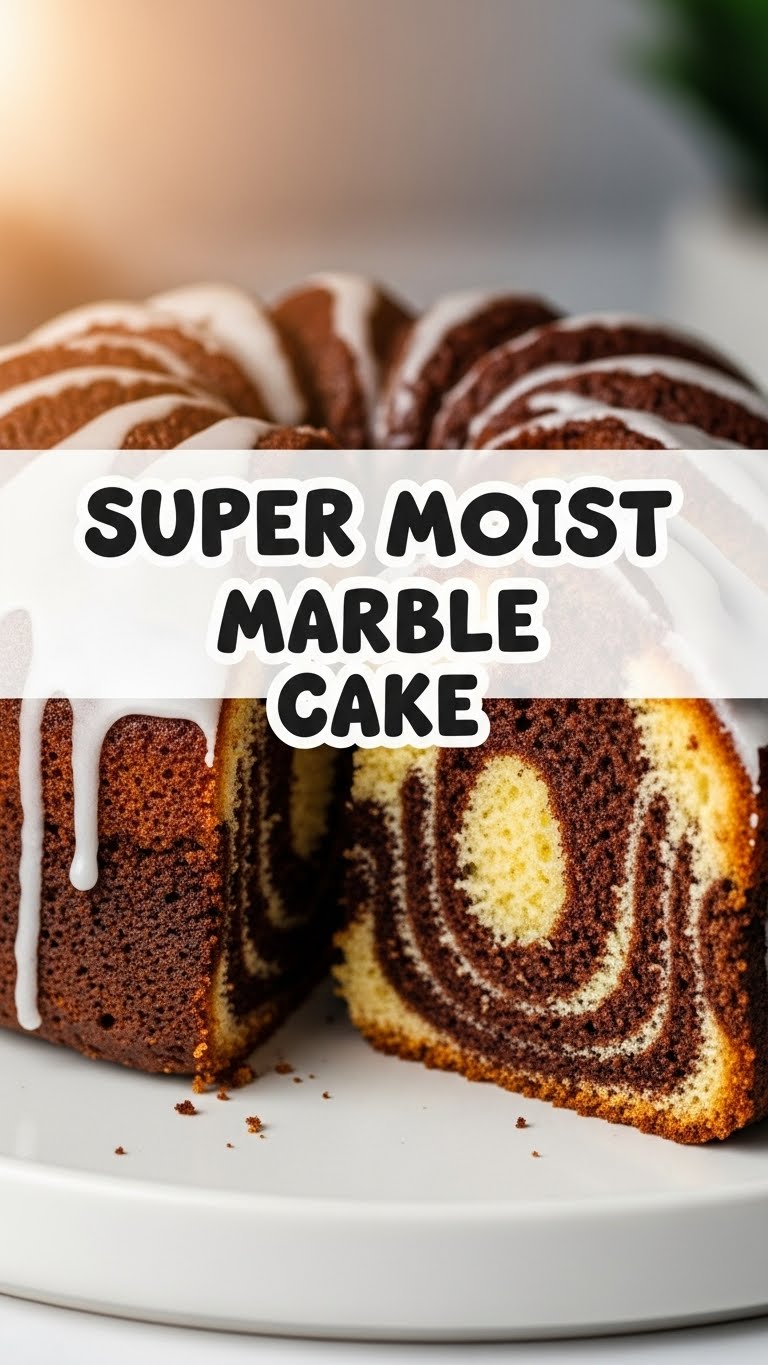
- Layer & Swirl: Spoon alternating dollops of chocolate and vanilla batter into your prepared baking pan. Once all the batter is in, take a knife or skewer and gently swirl through the batters a few times. Don’t overdo it, or you’ll lose the marble effect and end up with sad brown cake.
- Bake It Off: Pop the pan into your preheated oven. Bake for 30-35 minutes for rounds, or 35-40 minutes for a 9×13 pan, or until a wooden skewer inserted into the center comes out clean.
- Cool Down: Let the cake cool in the pan on a wire rack for about 10-15 minutes before inverting it onto the rack to cool completely. Patience, young Jedi!
Common Mistakes to Avoid
- Cold Ingredients: Using butter and eggs straight from the fridge is a one-way ticket to a dense, sad cake. Room temperature is non-negotiable!
- Overmixing: Once you add the flour, mix just until combined. Overmixing develops gluten, leading to a tough, dry cake. Nobody wants that.
- Not Preheating: Thinking you don’t need to preheat the oven? Rookie mistake. Your cake needs that consistent heat from the get-go to rise properly.
- Ignoring the Cocoa Bloom: Just throwing in dry cocoa powder won’t give you that deep, rich chocolate flavor. Blooming it in hot water is like magic for cocoa.
- Over-Swirling: You’re making marble cake, not a muddy pond. A few gentle swirls are all you need for that beautiful pattern.
Alternatives & Substitutions
Got a dietary restriction or missing an ingredient? No stress, we can totally improvise!
- No Buttermilk? No Problem! Measure 1 cup of regular milk, then stir in 1 tablespoon of white vinegar or lemon juice. Let it sit for 5-10 minutes until it looks slightly curdled. Voila! Instant buttermilk substitute.
- Oil Instead of Butter? You *can* use vegetable oil for butter, cup for cup, for an incredibly moist (almost greasy, IMO) cake. It won’t have the same rich, buttery flavor profile, but it works in a pinch.
- Different Extracts: Want to get fancy? Swap some vanilla for almond extract, or even a dash of coffee extract in the chocolate batter to really amp up that mocha flavor.
- Gluten-Free Flour: You can often swap in a 1:1 gluten-free baking blend for the all-purpose flour. Just make sure it contains xanthan gum.
FAQ (Frequently Asked Questions)
Got questions? I’ve got answers (and maybe a little sass).
Q: Can I use margarine instead of butter?
A: Well, technically yes, but why hurt your soul like that? Butter provides a richer flavor and better texture. Margarine will work, but it’s not the same glorious experience.
Q: How do I know when the cake is done?
A: A wooden skewer or toothpick inserted into the center should come out clean, without any wet batter. If it’s got a few moist crumbs, that’s fine, but no liquid batter!
Q: My cake turned out dry, what happened?
A: Ah, a common tragedy! Usually, this means one of two things: you overmixed the batter, or you overbaked it. Remember, gentle mixing and taking it out as soon as the skewer is clean is key!
Q: Can I add coffee to the chocolate batter?
A: Absolutely! Coffee enhances chocolate flavor beautifully. You could add a teaspoon of instant espresso powder dissolved in the hot water with the cocoa for an amazing mocha marble cake.
Q: How should I store this super moist goodness?
A: At room temperature, covered tightly, this cake will stay fresh and moist for 3-4 days. If you’ve frosted it with a cream cheese or whipped cream frosting, it’s best to keep it in the fridge.
Q: What kind of frosting should I use?
A: A simple vanilla or chocolate buttercream is classic and delicious. A chocolate ganache drizzle would also be divine. Or, honestly, just a dusting of powdered sugar is elegant enough for this beauty.
Final Thoughts
So there you have it, folks! Your new favorite super moist marble cake recipe, ready to rock your world without adding extra stress to your already busy life. It’s proof that sometimes, the simplest things are the most satisfying.
Now go forth, bake this beauty, and enjoy every single delightful, moist, swirly bite. You’ve earned it! And don’t forget to send me a slice (or at least a pic!) 😉 Happy baking!


