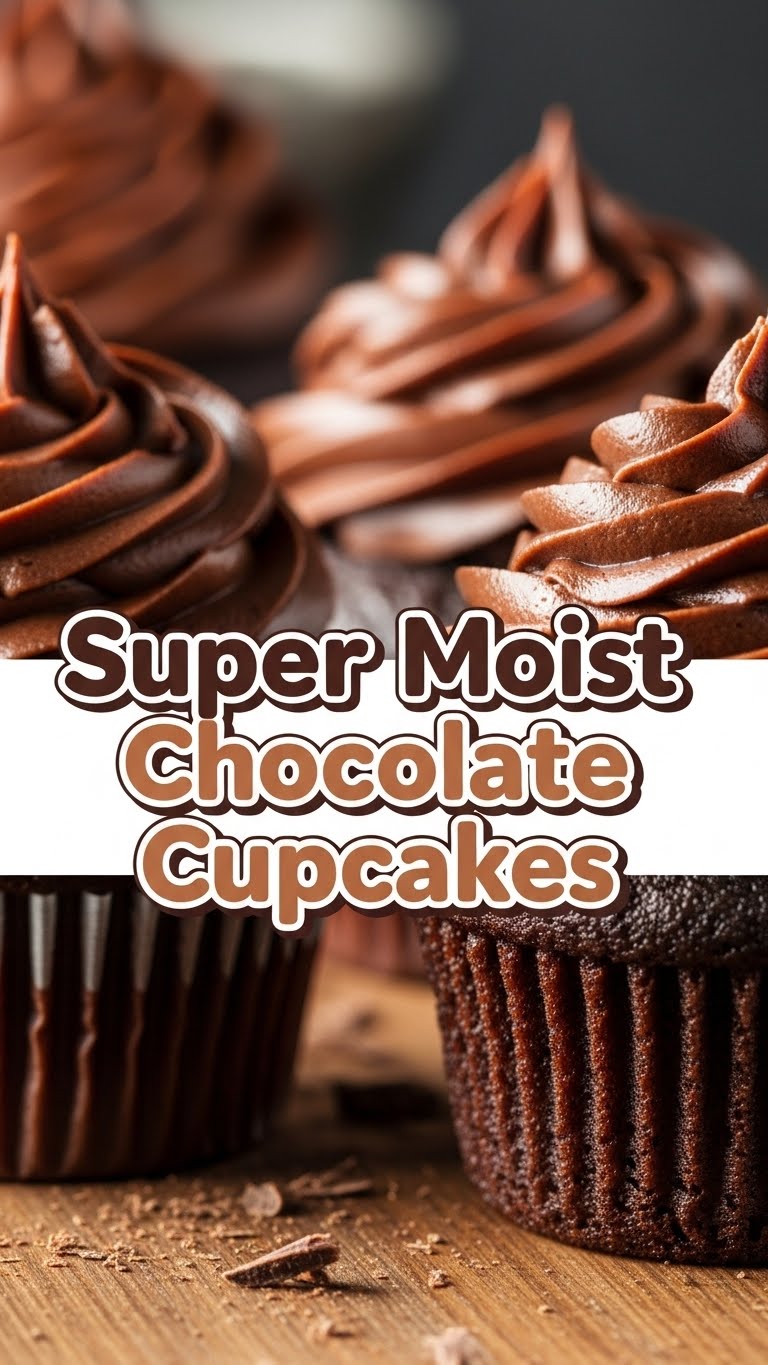
So, you’ve got that chocolate craving hitting hard, but the thought of a complicated recipe makes you wanna just lie down, huh? Been there, done that, bought the T-shirt. Good news: I’ve got your back with a recipe for the most ridiculously **super moist chocolate cupcakes** that are so easy, you’ll wonder if you cheated. No judgment here!
Why This Recipe is Awesome
Let’s be real, who needs a dry, crumbly cupcake that tastes like sadness? Not us, friend! This recipe delivers on all fronts: it’s incredibly moist (like, seriously, moist-moist), packed with deep chocolate flavor, and surprisingly simple to whip up. It’s practically **idiot-proof** – even I managed not to mess it up, and my kitchen can sometimes be a disaster zone. Plus, it’s quick enough that you can satisfy that sudden chocolate urge without committing to an all-day baking marathon. Think of it as your secret weapon against bad days and bland desserts.
Ingredients You’ll Need
Gather ’round, fellow bakers (and aspiring bakers who mostly just want to eat batter). Here’s your shopping list for cupcake glory:
- 1 ½ cups (190g) All-Purpose Flour: The backbone of your cupcake. Nothing fancy needed here, unless you’re feeling extra bougie.
- 1 ½ cups (300g) Granulated Sugar: Because sugar makes the world go ’round, especially the cupcake world.
- ¾ cup (65g) Unsweetened Cocoa Powder: The deeper the color, the better the chocolatey punch! Use good quality stuff if you can.
- 1 ½ tsp Baking Soda: Our main lift-off agent. Makes things airy and fluffy.
- ¾ tsp Baking Powder: Back-up lift-off agent, because teamwork makes the dream work.
- ¾ tsp Salt: Just a pinch to balance all that sweetness and make the chocolate sing.
- 2 Large Eggs: Room temperature, please! They emulsify better and give you a smoother batter.
- ¾ cup (180ml) Buttermilk: This is a game-changer for moisture. If you don’t have it, see the “Alternatives” section!
- ¼ cup (60ml) Vegetable Oil: Or any neutral oil. This is the secret to insane moistness. Seriously.
- 1 tsp Vanilla Extract: Don’t skimp! Good vanilla elevates everything.
- ¾ cup (180ml) Hot Water or Hot Coffee: Your ultimate secret weapon for deepening that chocolate flavor. Coffee doesn’t make it taste like coffee, it just boosts the chocolate – trust me!
Step-by-Step Instructions
Alright, apron on, spatula ready! Let’s make some magic happen.
- Get Prepped: Preheat your oven to 350°F (175°C). Line a 12-cup muffin tin with paper liners. Don’t skip this, nobody wants stuck cupcakes!
- Whisk the Dry Crew: In a large bowl, whisk together the flour, sugar, cocoa powder, baking soda, baking powder, and salt. Make sure there are no lumps of cocoa powder lurking.
- Mix the Wet Squad: In a separate medium bowl, lightly whisk the eggs, buttermilk, vegetable oil, and vanilla extract until just combined.
- Combine & Conquer: Pour the wet ingredients into the dry ingredients. Stir with a whisk or spatula until just barely combined. **Do not overmix!** A few lumps are totally fine. Overmixing leads to tough cupcakes, and we’re aiming for tender love.
- The Secret Weapon: Carefully pour in the hot water (or coffee) and gently stir until the batter is smooth. It will be quite thin – don’t panic, this is normal and contributes to the moistness.
- Fill ‘Em Up: Divide the batter evenly among the 12 prepared muffin cups. Fill them about two-thirds full.
- Bake Time: Pop them in your preheated oven and bake for 18-22 minutes, or until a toothpick inserted into the center comes out with moist crumbs (not wet batter).
- Cool Down: Let the cupcakes cool in the muffin tin for about 5 minutes, then transfer them to a wire rack to cool completely. Frost ’em up once they’re fully chilled, then devour!
Common Mistakes to Avoid
Nobody’s perfect, but we can avoid some classic cupcake blunders. Learn from my mistakes, people!
- Overmixing the Batter: This is the cardinal sin! Seriously, tough, dense cupcakes are the result. Mix until just combined, a few lumps are your friends.
- Not Preheating Your Oven: Patience, young grasshopper. Your oven needs to be at the correct temperature from the start for even baking and proper rise.
- Overfilling the Cupcake Liners: If you fill them to the brim, you’ll end up with giant mushroom tops that spill over. Aim for two-thirds full for perfect domes.
- Baking Them Too Long: Dry cupcakes are a tragedy. Keep an eye on them and trust the toothpick test. When it comes out with moist crumbs, they’re done!
- Frosting Warm Cupcakes: Unless you enjoy melted, sliding frosting, wait until your cupcakes are completely cool. IMO, patience is a virtue here.
Alternatives & Substitutions
Life’s too short not to adapt! Here are some swaps if you’re missing an ingredient or just feeling experimental:
- No Buttermilk? No Problem! Measure ¾ cup regular milk, then stir in 1 tablespoon of white vinegar or lemon juice. Let it sit for 5-10 minutes until it looks slightly curdled. Voila, homemade buttermilk!
- Oil vs. Butter: While oil gives maximum moistness, you can swap it for an equal amount of melted unsalted butter if you prefer that buttery flavor. Just know they might be slightly less moist.
- Coffee Haters Unite? If you’re really adverse to coffee (even though it just enhances chocolate, I swear!), simply use hot water instead. No biggie.
- Gluten-Free: You can often swap in a 1:1 gluten-free flour blend for the all-purpose flour. Just make sure it contains xanthan gum.
- Dairy-Free: Use a non-dairy milk (like almond or soy) for the buttermilk (with the vinegar trick) and ensure your cocoa powder is dairy-free.
FAQ (Frequently Asked Questions)
Got questions? I’ve got (casual) answers!
- Can I use regular milk instead of buttermilk? Well, technically yes, but why hurt your soul like that? Buttermilk truly makes them super moist. If you absolutely must, see the “No Buttermilk?” tip above for a quick hack.
- Why hot water/coffee? Does it make them taste like coffee? Great question! The hot liquid helps to “bloom” the cocoa powder, bringing out a deeper, more intense chocolate flavor. And no, hot coffee won’t make your cupcakes taste like a mocha. It just acts as a chocolate flavor enhancer – it’s pure magic, FYI.
- How long do these super moist cupcakes stay fresh? If they last that long (doubtful!), they’re best enjoyed within 2-3 days at room temperature in an airtight container.
- Can I freeze these cupcakes? Absolutely! Freeze unfrosted cupcakes in an airtight container for up to 2-3 months. Thaw at room temperature and then frost.
- What kind of cocoa powder is best? Dutch-processed or natural? For this recipe, natural unsweetened cocoa powder is generally preferred as it reacts with the baking soda to help the cupcakes rise. Dutch-processed cocoa is alkalized and less acidic, so it behaves differently. Stick to natural for best results here.
- Can I turn this into a chocolate cake? You bet! This recipe scales well. You’d likely need to double it for a standard 9×13 inch pan or two 8-inch round pans. Baking times will vary, so keep an eye on it!
- My cupcakes came out dry! What went wrong? The most common culprits are overmixing the batter (develops too much gluten) or overbaking them. Next time, mix just until combined and pull them out as soon as the toothpick test is passed.
Final Thoughts
And there you have it! Your new go-to recipe for super moist chocolate cupcakes that’ll make you feel like a baking wizard, even if your previous culinary achievements mostly involved ordering takeout. These are perfect for parties, a pick-me-up, or just an excuse to eat chocolate. Now go impress someone – or yourself – with your new culinary skills. You’ve earned it! Happy baking, friend!

