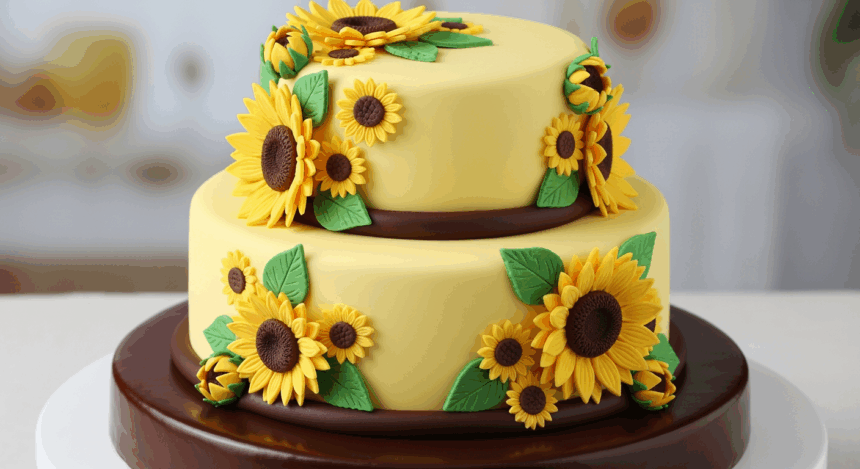
Ever had one of those moments where you want to bake something that screams “I put effort into this” without actually sweating for hours in the kitchen? Well, friend, let me introduce you to this gorgeous Sunflower-Themed Cake with a Chocolate Border that’ll have everyone thinking you’ve got secret pastry chef credentials. It’s basically summer on a plate—but available year-round for those of us who need a little sunshine in February!
Why This Recipe is Awesome
First off, this cake is a serious crowd-pleaser. The bright yellow sunflower design makes people think you spent all day on it, when between us, it’s mostly just strategic frosting placement. It’s basically the fake-it-till-you-make-it of fancy cakes. Plus, the chocolate border adds that touch of sophistication that says, “Yes, I know what I’m doing” (even if you totally don’t). The best part? It’s actually forgiving enough for baking newbies but impressive enough for the ‘gram. Win-win!
Ingredients You’ll Need
For the cake:
- 2 boxes yellow cake mix (because life’s too short to measure flour)
- 6 eggs (the chicken’s contribution to your masterpiece)
- 1 cup vegetable oil (or canola oil if you’re feeling fancy)
- 2 cups water (tap is fine, no need for that bottled nonsense)
For the frosting and decoration:
- 2 cups unsalted butter, softened (patience, grasshopper—truly soft butter matters)
- 6 cups powdered sugar (yes, that much—it’s a party cake, not a diet plan)
- 2 tsp vanilla extract (the real stuff, not that imitation garbage)
- Yellow food coloring (go for gel—it won’t make your frosting all weird and runny)
- 1 cup chocolate chips, melted (for the border and center of the sunflower)
- ¼ cup black or dark brown frosting (store-bought is fine, I won’t judge)
Step-by-Step Instructions
- Preheat your oven to 350°F (180°C). Skip this step at your own peril—cold ovens are where good cakes go to die.
- Grab two 9-inch round cake pans and give them a generous coating of cooking spray. Line the bottoms with parchment paper if you’re paranoid about sticking (smart move, actually).
- In a large bowl, combine the cake mixes, eggs, oil, and water. Beat with an electric mixer for about 2 minutes until smooth. The batter should be lump-free and rather beautiful, if I do say so myself.
- Divide the batter evenly between your prepared pans. Give each pan a gentle tap on the counter to release any air bubbles. Those little air pockets can ruin your perfectly flat cake layers!
- Bake for 25-30 minutes, or until a toothpick inserted in the center comes out clean. If you see batter, keep baking. If you see moist crumbs, you’re golden (literally).
- Let the cakes cool in the pans for 10 minutes, then flip them onto wire racks to cool completely. Patience is key here—frosting a warm cake is like trying to put makeup on during a sauna session.
- For the frosting, beat the softened butter until creamy. Gradually add the powdered sugar, vanilla extract, and a few drops of yellow food coloring. Mix until smooth and vibrant.
- Once your cakes are completely cool, place one layer on your serving plate. Spread a generous layer of yellow frosting on top, then carefully position the second cake layer.
- Cover the entire cake with a thin layer of yellow frosting (this is your crumb coat). Refrigerate for 15 minutes to set.
- Apply a thicker, final coat of yellow frosting. Use a piping bag with a petal tip to create sunflower petals around the top edge of the cake. Work your way around, overlapping slightly for that realistic sunflower look.
- Melt your chocolate chips in the microwave (30-second bursts, stirring in between). Once smooth, pour into a piping bag and create a chocolate border around the bottom of the cake.
- Use the black/dark brown frosting to create the center of your sunflower on top of the cake. Add a few chocolate drips for texture, and voilà—sunflower perfection!
Common Mistakes to Avoid
Let’s be real, there are some pitfalls on the road to sunflower cake glory:
- Rushing the cooling process – Unless you want a frosting avalanche, make sure those cake layers are completely cool. I’m talking room temperature, no hints of warmth whatsoever.
- Skipping the crumb coat – Yes, it’s an extra step, but unless you enjoy frosting speckled with yellow cake crumbs, don’t skip it. It’s like primer before paint—invisible but essential.
- Going overboard with food coloring – We want “cheerful sunflower,” not “radioactive waste.” Start with a few drops and add more gradually.
- Melting chocolate in a rush – Overheated chocolate becomes a grainy, unusable mess. Slow and steady with those microwave bursts, friend.
- Trying to transport this masterpiece in a hot car – Unless you enjoy abstract expressionism, keep this cake cool until showtime.
Alternatives & Substitutions
Not everyone has the same ingredients or preferences, so here are some easy swaps:
- For the cake base: Any light-colored cake works here—vanilla, white, or even lemon if you’re feeling zesty. Heck, use a marble cake if you want to live dangerously.
- Butter alternatives: If you’re out of butter (the horror!), you can use plant-based butters for the frosting, but be aware they sometimes have a higher water content, so your frosting might be a bit softer.
- Food coloring options: No yellow food coloring? A pinch of turmeric gives a natural yellow tint, or mix red and green food coloring for a DIY yellow (though honestly, just buy the yellow if you can).
- Chocolate alternatives: Dark, milk, or semi-sweet chocolate all work for the border. Choose based on your sweetness preference. IMO, darker chocolate creates a more dramatic contrast with the yellow.
- Make it mini: Turn this into cupcakes by using the same recipe but decorating individual cakes as mini sunflowers. Perfect for potlucks where cake-cutting logistics get messy!
FAQ (Frequently Asked Questions)
Can I make this cake ahead of time?
Absolutely! The cake layers can be baked and frozen for up to a month (wrap them well). The assembled cake will keep in the fridge for 3-4 days, but the decoration looks best within the first 48 hours. After that, the colors might start having their own midlife crisis.
Does this cake need to be refrigerated?
With all that butter in the frosting? Yes, especially if your kitchen runs warm. But let it sit at room temperature for about 30 minutes before serving for the best flavor and texture. Cold cake is sad cake.
Can I use store-bought frosting instead?
I mean, technically yes, in the same way you can wear socks with sandals. Will it work? Sure. Is it the best choice? Debatable. If you do go this route, whip the canned frosting with a mixer before using—it’ll improve the texture dramatically.
Help! My petals are melting! What did I do wrong?
Your kitchen is probably too warm or your butter was too soft to begin with. Pop the whole cake in the fridge for 15 minutes, then continue decorating. And maybe crank up the AC next time (or turn down the heat, you tropical creature).
Do I really need special piping tips for this?
For the most realistic sunflower effect, a petal tip (like Wilton #104) works best. But if you’re in a pinch, you can use a ziplock bag with the corner snipped off and just make triangular petals. It’ll be more “kid’s drawing of a sunflower” than “Van Gogh,” but still cute!
Final Thoughts
There you have it—a sunflower cake that’s equal parts impressive and doable. Whether you’re making this for a summer picnic, a birthday, or just because Monday needs brightening, this cake delivers serious wow factor without requiring pastry school credentials.
Remember, baking is supposed to be fun! If your sunflower ends up looking more like a daisy or even an abstract sun explosion, who cares? It’ll still taste amazing, and you can always claim you were going for an “interpretive” botanical design. The best part about homemade cakes is they come with built-in bragging rights—even the imperfect ones.
Now go forth and create your edible sunshine! And when everyone asks where you got the recipe, feel free to be mysteriously vague. Some baking secrets are worth keeping… or at least pretending they’re family heirlooms passed down for generations. Your secret’s safe with me!
