Ever found yourself staring into the abyss of your fridge, wanting something sweet, celebratory, but also, like, *effortlessly* amazing? Yeah, me too. And let’s be real, who has time for a multi-tiered cake when you just want a little slice of joy with a sparkler on top? Enter: the easiest, most delightful Strawberry Shortcake with Candles, because every day deserves a little birthday vibe. Get ready to impress everyone (especially yourself) with minimal effort!
Why This Recipe is Awesome
Okay, so why this shortcake? Because it’s basically a hug in dessert form, dressed up for a party. It looks fancy, but it’s deceptively simple. I’m talking 20 minutes of prep, tops, and it smells like pure happiness while it bakes. Plus, it’s customizable, shareable (or not, no judgment here), and the candles? Pure genius. It instantly elevates “dessert” to “celebration.” Seriously, if *I* can make this without setting off the smoke alarm, you’re golden. It’s practically idiot-proof!
Ingredients You’ll Need
For the Shortcakes (aka the fluffy clouds):
- 2 cups all-purpose flour: The backbone of your deliciousness.
- 1/4 cup granulated sugar: Just enough sweetness for the biscuits.
- 1 tablespoon baking powder: The magic dust that makes them puff up. Don’t skip it!
- 1/2 teaspoon salt: Balances everything out. Trust me.
- 1/2 cup (1 stick) unsalted butter, cold and cubed: This is **key for flaky layers**. No soft butter allowed!
- 3/4 cup heavy cream (plus a little extra for brushing): Adds richness and helps bind it all together.
For the Strawberry Star Power:
- 1 lb fresh strawberries: Washed, hulled, and sliced. The prettier, the better!
- 2-3 tablespoons granulated sugar: Adjust to your sweetness preference, sprinkled on the berries to bring out their juicy goodness.
- 1 teaspoon fresh lemon juice (optional, but highly recommended): Brightens everything up and makes the berries pop!
For the Whipped Dream Cloud:
- 1 ½ cups heavy cream, very cold: Essential for whipping into glorious peaks.
- 2-3 tablespoons powdered sugar (aka confectioners’ sugar): For that silky, sweet finish.
- 1 teaspoon vanilla extract: Makes everything taste better.
And the Grand Finale:
- Birthday candles! Because why not? Sparklers, if you’re feeling extra.
Step-by-Step Instructions
- **Prep Your Berries (First Things First):** Wash, hull, and slice your strawberries. Toss them gently in a bowl with 2-3 tablespoons of sugar and the lemon juice (if using). Give them a little stir and set them aside. They’ll macerate and get all juicy while you make the shortcakes.
- **Preheat & Prep (Don’t Be a Rookie):** Preheat your oven to 400°F (200°C). Line a baking sheet with parchment paper. This prevents sticking and makes cleanup a breeze.
- **Mix Dry Ingredients (The Foundation):** In a large bowl, whisk together the flour, sugar, baking powder, and salt. Make sure it’s all combined.
- **Add the Butter (The Secret to Flakiness):** Cut the cold, cubed butter into the dry ingredients. You can use a pastry blender, two forks, or your fingertips. Work quickly until the mixture resembles coarse crumbs with some pea-sized pieces of butter remaining. **Don’t overmix!**
- **Pour in the Cream (Bringing It Together):** Gradually add 3/4 cup of heavy cream to the flour mixture, stirring with a fork until just combined. The dough will be shaggy; that’s what you want.
- **Shape Your Shortcakes (Get Your Hands Dirty):** Turn the dough out onto a lightly floured surface. Gently knead it a few times (seriously, just a few) to bring it together. Press or roll the dough to about 3/4-inch thickness. Use a 2.5-3 inch round cutter (or a knife for squares/triangles) to cut out shortcakes. You should get about 6-8. Re-roll scraps once if needed.
- **Bake ‘Em Up (Smells So Good):** Place the shortcakes on your prepared baking sheet. Brush the tops with a little extra heavy cream for a golden crust. Bake for 12-15 minutes, or until golden brown and puffed. Let them cool slightly on a wire rack.
- **Whip the Cream (The Cloud of Joy):** While the shortcakes cool, pour your very cold heavy cream, powdered sugar, and vanilla extract into a cold bowl. Beat with an electric mixer on medium-high speed until stiff peaks form. **Don’t over-beat!** Unless you want butter, which, while delicious, isn’t what we’re going for here.
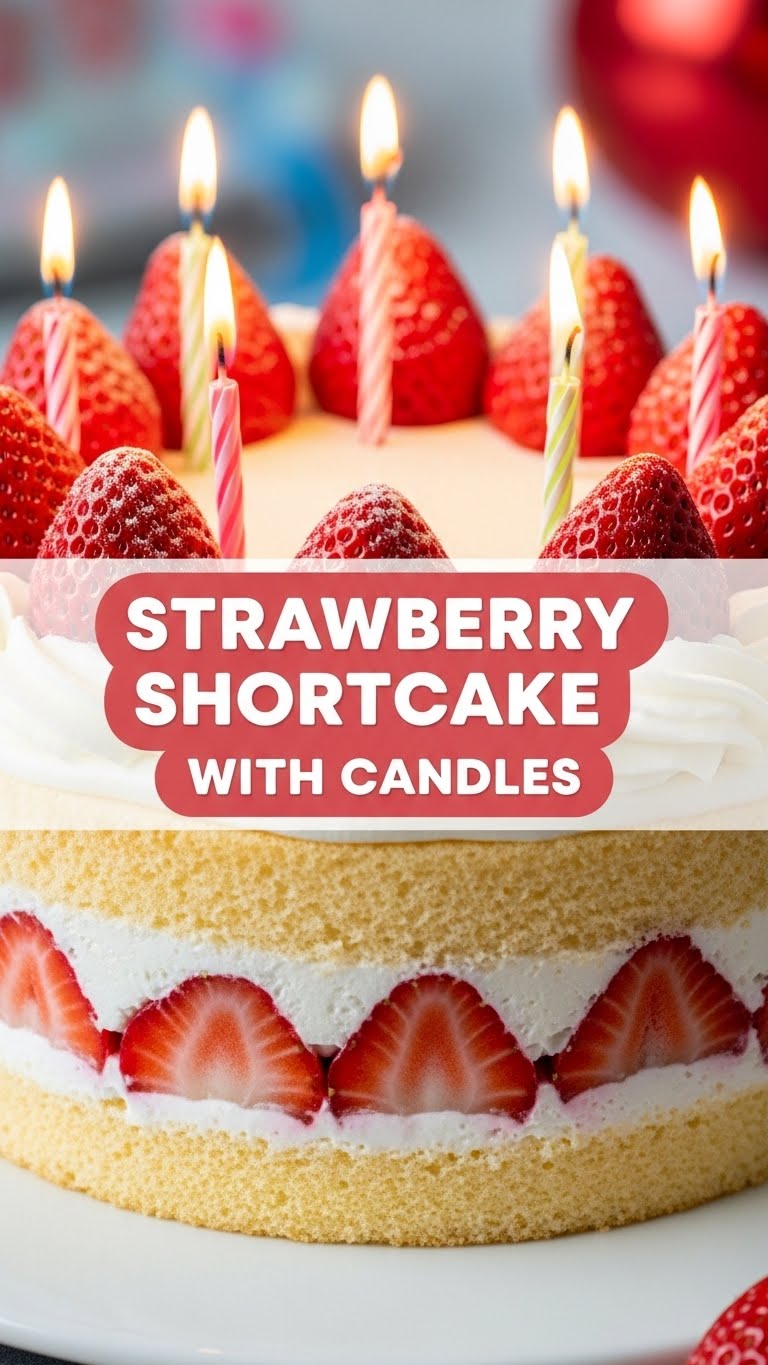
- **Assemble Your Masterpiece (The Grand Finale):** Slice each cooled shortcake horizontally. Spoon a generous dollop of whipped cream on the bottom half, pile on some juicy strawberries, then top with the other shortcake half. Add more whipped cream and strawberries on top.
- **Add the Candles (Party Time!):** Stick a few birthday candles into each shortcake. Light ’em up, make a wish, and dig in!
Common Mistakes to Avoid
- **Warm Butter:** This isn’t a cookie dough, friend. Warm butter melts too fast and makes your shortcakes dense, not flaky. Keep it chilly!
- **Overworking the Dough:** Seriously, just a few kneads. The more you mess with it, the tougher your shortcakes will be. You want tender, not tire-like.
- **Not Chilling Your Cream/Bowl for Whipped Cream:** This is **paramount** for stable, fluffy whipped cream. Lukewarm cream just won’t cut it.
- **Under-sweetening Your Berries (or Over-sweetening):** Taste them first! Strawberries vary. Adjust sugar as needed. And that lemon juice? It’s a game-changer; don’t skip it if your berries are a bit bland.
- **Skipping the Preheating:** Rookie mistake! Your shortcakes need that initial blast of heat to rise properly.
Alternatives & Substitutions
- **No Fresh Strawberries?** Frozen work in a pinch! Thaw them and drain off excess liquid, then proceed as usual. Or try other berries: blueberries, raspberries, mixed berries – all fabulous. Peaches also make a killer shortcake!
- **Dairy-Free?** You can find dairy-free heavy cream alternatives for whipping and for the shortcake dough. Use a good vegan butter stick. Results might vary slightly, but it’ll still be delicious.
- **Short on Time for Shortcakes?** Store-bought biscuits (the flaky kind, not the dense ones) can work, or even angel food cake slices. **IMO**, homemade is infinitely better, but sometimes you gotta do what you gotta do.
- **Powdered Sugar for the Berries?** If you want a smoother berry sauce, a little powdered sugar dissolves faster, but granulated sugar gives a nice texture.
FAQ (Frequently Asked Questions)
- **”Can I make the shortcakes ahead of time?”** Absolutely! Bake them, let them cool completely, and store them in an airtight container at room temperature for up to 2 days. Reheat briefly in the oven for a “just baked” feel, if you want.
- **”My whipped cream isn’t getting stiff, help!”** Is your cream cold enough? Is your bowl cold? Are you using heavy cream (at least 36% fat)? If yes to all, keep beating! Sometimes it just takes an extra minute. If it’s still soupy, it might be too warm or not enough fat.
- **”Can I use self-rising flour?”** You could, but then you’d omit the baking powder and salt from the recipe. **FYI**, I find all-purpose with separate leavening gives you more control over the rise.
- **”What if I don’t have a round cutter?”** No worries! Just use a sharp knife to cut the dough into squares or triangles. They’ll taste just as good, even if they’re a little rustic-looking.
- **”Why do my shortcakes taste dry?”** You probably overmixed the dough or didn’t use cold enough butter. Remember, light touch, cold butter!
- **”Can I use regular sugar in the whipped cream?”** Yes, but powdered sugar is preferred as it dissolves more easily and makes for a smoother, more stable whipped cream. Granulated sugar can make it a bit gritty.
Final Thoughts
See? I told you it was easy! You just whipped up a dessert that screams “celebration” without breaking a sweat. So go on, light those candles, make a ridiculous wish, and enjoy every single bite of your homemade Strawberry Shortcake. You’ve earned this little moment of delicious, sugary joy. Now go impress someone—or yourself—with your new culinary skills. You’ve earned it!


