So, you’ve stared at one too many perfect ‘Strawberry Shortcake PNG Free’ images online, haven’t you? And now you’re thinking, “I need that in my life, like, yesterday, but also… easy, please?” You’ve come to the right place, my friend. We’re about to make the kind of strawberry shortcake that makes you wanna high-five yourself, without actually breaking a sweat or needing a culinary degree. Let’s get baking!
Why This Recipe is Awesome
Listen, I get it. Some recipes look like they were written by a robot with 17 specialized kitchen gadgets. Not this one. This strawberry shortcake recipe is so ridiculously simple, it’s practically idiot-proof. Seriously, even I didn’t mess it up, and my kitchen adventures often involve smoke alarms and questionable tasting results. It’s quick, uses basic stuff you probably already have, and tastes about a million times better than anything you’d grab from a sad grocery store bakery. Plus, it’s ridiculously impressive for minimal effort. Win-win-win!
Ingredients You’ll Need
Gather ’round, fellow snack enthusiasts. Here’s what you’ll need to transform into a dessert wizard:
- **For the Shortcakes:**
- 1 ½ cups all-purpose flour (The basic stuff, not the fancy almond flour your yoga instructor uses.)
- 2 tablespoons granulated sugar (For a touch of sweetness in the biscuit.)
- 1 tablespoon baking powder (The magic fluff-maker!)
- ¼ teaspoon salt (Just a pinch, because balance.)
- ½ cup (1 stick) **cold unsalted butter, cubed** (Crucial! Cold butter = flaky shortcakes. No margarine shenanigans, please.)
- ½ cup whole milk or heavy cream (For moistness and richness. Whole milk is great, cream is better, IMO.)
- **For the Strawberries:**
- 1 pound fresh strawberries (About 3 cups, hulled and sliced. Fresh is non-negotiable here. Frozen is a crime.)
- 2 tablespoons granulated sugar (Or more, if your berries are shy on sweetness. You do you.)
- **For the Whipped Cream:**
- 1 cup cold heavy cream (Skip the canned stuff, you deserve real fluffy clouds!)
- 2 tablespoons powdered sugar (Also called confectioners’ sugar. Helps stabilize and sweeten.)
- ½ teaspoon vanilla extract (Adds a hug to your whipped cream.)
Step-by-Step Instructions
- **Prep the Strawberries:** Hull and slice your beautiful fresh strawberries. Toss them gently with 2 tablespoons of sugar in a medium bowl. Give them a little stir and let them hang out on the counter. They’ll get all juicy and delicious while you work on the shortcakes.
- **Preheat Your Oven & Prep Your Pan:** Preheat that oven to **400°F (200°C)**. Line a baking sheet with parchment paper or a silicone mat. Don’t skip this; it makes cleanup a breeze!
- **Mix the Dry Ingredients:** In a large bowl, whisk together the flour, 2 tablespoons granulated sugar, baking powder, and salt. Make sure it’s all nicely combined.
- **Cut in the Butter:** Now for the fun part! Add your **cold, cubed butter** to the dry ingredients. Use a pastry blender, two knives, or (my favorite) your fingertips to cut the butter into the flour mixture. You’re aiming for pea-sized crumbs. **Don’t overwork it!** Big chunks are okay.
- **Add the Liquid:** Pour in the milk or cream. Stir with a spoon or your hands until the dough just comes together. It should be shaggy and a bit sticky. **Seriously, do NOT overmix!** Overmixing is the enemy of tender shortcakes.
- **Shape ‘Em Up:** Turn the dough out onto a lightly floured surface. Gently pat it into a rough rectangle, about ¾-inch thick. You can use a 2-3 inch round cutter to cut out shortcakes (you might get 6-8). Or, if you’re like me and love rustic charm (read: lazy), just use a knife to cut the rectangle into 6-8 squares or triangles. Don’t re-roll scraps too much, as it makes them tough.
- **Bake Those Beauties:** Transfer your shortcakes to the prepared baking sheet. Bake for **12-15 minutes**, or until they’re golden brown on top and cooked through. They should sound hollow when tapped on the bottom. Let them cool slightly on a wire rack.
- **Whip the Cream:** While the shortcakes are cooling, make your whipped cream! In a separate, chilled bowl (a cold bowl helps!), combine the cold heavy cream, powdered sugar, and vanilla extract. Beat with an electric mixer (or a whisk, if you’re feeling ambitious) until **stiff peaks form**. Don’t walk away from it, it goes from perfect to over-whipped in a flash!
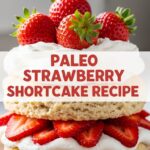
- **Assemble Your Masterpiece:** Slice each shortcake horizontally. Spoon a generous amount of juicy strawberries onto the bottom half, then dollop on a big cloud of whipped cream. Pop the top half on, add a little more whipped cream and a few extra berries for garnish, and serve immediately. Dig in!
Common Mistakes to Avoid
- **Warm Butter Syndrome:** Using butter that isn’t super cold. This leads to flat, sad shortcakes because the butter melts before it can create those lovely pockets of steam that make them flaky. Rookie mistake, don’t do it.
- **The Overmix Menace:** Mixing your dough too much. This develops the gluten, making your shortcakes tough and chewy instead of tender and crumbly. Think of it like a gentle massage, not a wrestling match.
- **Skimping on Chill Time for Berries:** Not letting the strawberries macerate (sit with sugar). This step draws out their juices and makes them extra flavorful and syrupy. Patience, young grasshopper.
- **Canned Whipped Cream:** I’m not even going to sugarcoat this. Just don’t. You’ve come this far, make the real stuff. Your taste buds will thank you.
- **Forgetting to Preheat the Oven:** Baking in a cold oven means your shortcakes won’t rise properly. Get that oven piping hot!
Alternatives & Substitutions
Feeling a little rebellious? I like your style! Here are a few ways to mix things up:
- **Berry Bonanza:** Not feeling strawberries? **Any fresh berry works here!** Raspberries, blueberries, blackberries, or a mix of all three are fantastic. Just adjust sugar if they’re particularly tart.
- **Dairy-Free Dream:** For the shortcakes, you can use a plant-based milk (like unsweetened almond or oat milk) and a plant-based butter substitute (like Miyoko’s Kitchen or Earth Balance sticks). For the whipped cream, well-chilled full-fat canned coconut cream can be whipped up, but it has a distinct flavor.
- **Flavor Boost for Shortcakes:** Add a teaspoon of vanilla extract or a tablespoon of lemon zest to your shortcake dough for an extra layer of yum. **Lemon zest with strawberries? Chef’s kiss!**
- **Sweetener Swap:** If you’re out of granulated sugar for the berries, a drizzle of maple syrup or honey can work too. Just be aware it might add a different flavor profile.
FAQ (Frequently Asked Questions)
- **Can I use frozen strawberries?** Well, technically yes, but why hurt your soul with all that extra water? Fresh berries are truly superior here. If you MUST use frozen, thaw them, drain *all* the liquid, and then proceed.
- **Can I make the shortcakes ahead of time?** Absolutely! Bake, cool completely, and store in an airtight container at room temperature for a day or two, or freeze for up to a month. Reheat briefly in the oven before serving for that “freshly baked” feel.
- **What if I don’t have heavy cream for the whipped cream?** You *could* try full-fat coconut milk (chilled overnight, scoop out the thick cream), but it won’t be quite the same fluffy magic. Or, get some heavy cream, it’s worth it!
- **My shortcakes are tough! What gives?** You probably overmixed the dough. Remember, gentle hands, my friend, gentle hands! Just mix until barely combined.
- **How long do leftovers last?** Ha! Leftovers? Good luck with that! But if you somehow manage, it’s best to store the components separately in the fridge. Assembled shortcakes can get soggy after a few hours, but if you’re desperate, maybe a day.
- **Can I use self-rising flour?** Sure, you rebel! If you’re using self-rising flour, skip the baking powder and salt in the dry mix. That’s it!
- **Can I make this gluten-free?** You bet! Use a 1:1 gluten-free baking flour blend (one that contains xanthan gum). The results might be slightly different in texture, but still delicious!
Final Thoughts
See? Told you it was easy! Now you’ve got a homemade strawberry shortcake that looks like it walked right out of one of those perfect PNG images you were scrolling through, but tastes a million times better because *you* made it. Go ahead, take a picture, then devour it. You’ve earned it! Now go impress someone—or yourself—with your new culinary skills. Just sayin’.

