So you’re craving something tasty but too lazy to spend forever in the kitchen, huh? Same. And maybe you also have a secret desire to bake something that sounds adorable enough to be a cartoon character? Enter our ‘Strawberry Shortcake Oven Mitts’ – no actual mitts required, just pure, unadulterated, strawberry-and-cream joy! Get ready to make a dessert that feels like a warm hug, perfect for those days when you need a little sweet sunshine.
Why This Recipe is Awesome
Okay, first off, it’s basically summer in a bowl, even if it’s snowing outside. Second, it’s so ridiculously easy, you might question your previous life choices that involved more complicated desserts. Seriously, it’s idiot-proof; even I didn’t mess it up, and my track record with delicate pastries is… let’s just say “colorful.” Plus, it looks super cute and tastes divine, perfect for pretending you spent hours slaving away when it actually took you like, 30 minutes. High five!
Ingredients You’ll Need
- 2 cups all-purpose flour: The foundational magic dust. All-purpose, obvi.
- 1/4 cup granulated sugar (for shortcakes): Because life needs sweetness, and so does this shortcake.
- 1 tablespoon baking powder: The lift-off agent! Don’t skimp, unless you want flat cakes of sadness.
- 1/2 teaspoon salt: Just a pinch, to make all the other flavors *pop*. Science, people!
- 1/2 cup (1 stick) unsalted butter: Key word: COLD. This is your secret weapon for flaky perfection. Cut it into tiny cubes like you’re prepping for a heist.
- 3/4 cup milk or buttermilk: The binder. Buttermilk adds a little extra tang, if you’re feeling fancy.
- 1 pound fresh strawberries: The star of the show! Hull ’em and slice ’em, baby.
- 1/4 cup granulated sugar (for strawberries): To sweeten and macerate those gorgeous berries.
- 1 1/2 cups heavy cream: For the whipped cream. Don’t even think about the canned stuff. Just don’t.
- 2 tablespoons powdered sugar: For that perfectly sweet, fluffy cloud.
- 1 teaspoon vanilla extract: A splash of pure happiness for your whipped cream.
Step-by-Step Instructions
- Prep Your Berries: Grab your beautiful strawberries. Hull them (remove the green tops), then slice them up. Toss them into a bowl with the 1/4 cup granulated sugar designated for the berries. Give it a good stir and let them sit for at least 15-20 minutes. This magical process, called macerating, draws out their juices and creates a delicious syrup.
- Preheat & Prep: While the berries are doing their thing, preheat your oven to 400°F (200°C). Line a baking sheet with parchment paper. You’re almost ready to bake!
- Mix Dry Ingredients: In a large bowl, whisk together the flour, 1/4 cup granulated sugar (for shortcakes), baking powder, and salt. Make sure everything is well combined.
- Cut in the Butter: Add your very cold, cubed butter to the dry ingredients. Using a pastry blender, two knives, or even just your fingertips, cut the butter into the flour mixture until it resembles coarse crumbs with some pea-sized pieces remaining. **Resist the urge to overmix!**
- Add Milk & Combine: Pour in the milk (or buttermilk). Stir gently with a fork until the dough just comes together. Again, be gentle! An overworked dough means tough shortcakes, and nobody wants that.
- Shape & Bake: Drop spoonfuls of dough onto your prepared baking sheet. You should get about 6-8 shortcakes. If you’re feeling fancy, you can lightly flour your counter, gently pat the dough to about 1-inch thick, and use a biscuit cutter for uniform shapes. Bake for 12-15 minutes, or until the tops are golden brown.
- Whip the Cream: While the shortcakes are cooling slightly, pour the heavy cream into a chilled bowl (a cold bowl helps!). Add the powdered sugar and vanilla extract. Beat with an electric mixer on medium-high speed until you get beautiful, fluffy stiff peaks.
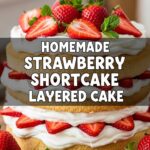
- Assemble Your Masterpiece: Once the shortcakes are warm (not piping hot, but definitely not cold!), carefully split each one in half horizontally. Spoon a generous dollop of your macerated strawberries onto the bottom half, top with a big cloud of whipped cream, and then crown it with the other half of the shortcake. Repeat with more berries and cream on top, because why not?
Common Mistakes to Avoid
- Overworking the Dough: This is a biggie! **Don’t knead it like pizza dough!** Treat it gently. A light touch ensures tender, flaky shortcakes.
- Warm Butter: The butter needs to be ice cold. If it melts into the flour too early, your shortcakes will be dense blobs instead of light, fluffy wonders.
- Not Macerating Berries: Just slicing them won’t give you that juicy, syrupy goodness that seeps into the shortcake. Let them mingle with sugar for a bit!
- Over-whipping Cream: You want fluffy peaks, not butter. Keep a close eye on it, especially if you’re using an electric mixer. Stop as soon as it’s firm enough to hold its shape.
Alternatives & Substitutions
Feeling adventurous or missing an ingredient? No stress, we got you!
- Other Fruits: While strawberries are classic, feel free to swap them out! Peaches, blueberries, mixed berries, or even raspberries work wonderfully. It’s your party, after all.
- Cream Alternatives: For a slightly lighter touch, Greek yogurt with a dollop of honey or even a coconut cream whip (if you’re going dairy-free) can be used. But, **IMO**, full-fat whipped cream is non-negotiable here for that true shortcake experience.
- Flour Swaps: You can experiment with whole wheat flour for a nuttier, denser shortcake, but stick to all-purpose for the classic light and fluffy texture.
FAQ (Frequently Asked Questions)
Got questions? I probably do too, but here are some common ones you might have:
Can I make the shortcakes ahead of time?
Sure, you can bake ’em, let ’em cool completely, and store them in an airtight container for a day or two. Reheat briefly in the oven or microwave before serving for that ‘fresh outta the oven’ vibe. But **BTW**, assembling just before serving is always best for maximum deliciousness!
What if I don’t have buttermilk?
No worries, easy fix! Add 1 tablespoon of lemon juice or white vinegar to regular milk, let it sit for 5 minutes. Voila, instant buttermilk! Science, I tell ya!
My whipped cream isn’t getting stiff. Help!
Is your cream super cold? Is your mixing bowl cold? Cold is key for whipping cream! Pop your bowl and whisk attachment in the freezer for 10-15 minutes before you start. Also, make sure it’s *heavy* cream, not half-and-half or light cream.
Can I use frozen strawberries?
You can, but they’ll likely be softer and release more water when thawed. Thaw them first, drain any excess liquid, then proceed with macerating. Fresh really does make a significant difference here though!
Are these really shaped like oven mitts?
Okay, okay, maybe not *literally* like actual oven mitts, unless you’re feeling super artistic with a cookie cutter! The “oven mitt” part is more about the warm, comforting, fresh-from-the-oven feeling they evoke. They’re just as necessary for your soul as actual oven mitts are for your hands! Consider it a cute metaphor for their cozy deliciousness.
Final Thoughts
See? Told you it was easy! And look at you, a culinary genius! You just whipped up a dessert that tastes like pure happiness and looks adorable. Now go impress someone—or yourself—with your new culinary skills. You’ve earned it! Seriously, nothing beats warm shortcake, sweet berries, and fluffy cream. Go forth and conquer, my friend, and enjoy every single bite!

