So you’re scrolling through TikTok, feeling a sudden urge to bake something ridiculously delicious but also kinda easy, right? Totally get it. Because who has time for complicated culinary acrobatics when there’s Netflix to watch?
Why This Recipe is Awesome
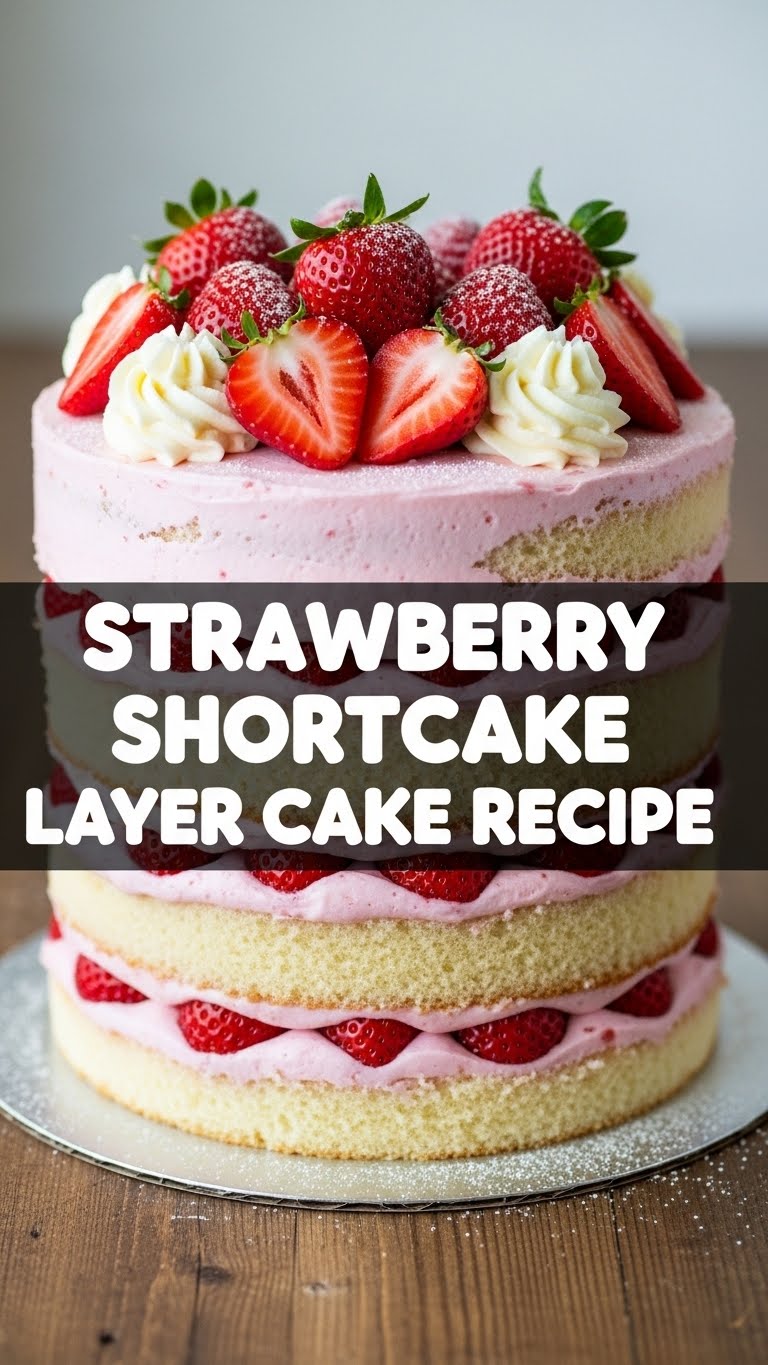
Okay, so this isn’t just *any* strawberry shortcake. This is the **Strawberry Shortcake Layer Cake** – basically, shortcake’s fancy, dressed-up cousin who still knows how to have a good time. Why is it awesome? First, it screams ‘summer picnic’ even when it’s pouring outside. Second, it looks super impressive, but in reality, it’s so **idiot-proof**, I swear even my cat could follow along (if she had opposable thumbs, obvs). Plus, we’re talking fresh strawberries and fluffy cream, people. What’s not to love?
Ingredients You’ll Need
- **For the Cake Layers:**
- **All-purpose flour:** 2 cups. The OG, the backbone, the reason we’re here.
- **Granulated sugar:** 1 cup. Sweetness, my old friend.
- **Baking powder:** 1 tablespoon. For that glorious lift, don’t skimp!
- **Salt:** ½ teaspoon. Just a pinch to make everything pop.
- **Unsalted butter:** ½ cup (1 stick), softened. Room temp, people! Don’t be using cold butter unless you *want* lumpy batter.
- **Large eggs:** 2. Yolks and whites, all together now.
- **Whole milk:** 1 cup. Full fat, because we’re not calorie counting today, okay?
- **Vanilla extract:** 1 teaspoon. Essential. Don’t even *think* about imitation.
- **For the Strawberry Filling:**
- **Fresh strawberries:** 2 lbs, hulled and sliced. The star of the show! Make sure they’re ripe and juicy.
- **Granulated sugar:** ¼ cup (or to taste). Depends on how sweet your berries are. Taste as you go, you’re the boss!
- **For the Whipped Cream Frosting:**
- **Heavy cream (or heavy whipping cream):** 2 cups, **chilled**. Super important!
- **Powdered sugar (confectioners’ sugar):** ½ cup (or to taste). For that silky smooth finish.
- **Vanilla extract:** 1 teaspoon. Again, the good stuff.
Step-by-Step Instructions
- **Get Ready, Set, Bake!** Preheat your oven to 350°F (175°C). Grease and flour two 8-inch round cake pans. Or, if you’re feeling fancy, line them with parchment paper circles. It just makes life easier, trust me.
- **Mix the Dry Stuff.** In a large bowl, whisk together the flour, sugar, baking powder, and salt. Give it a good whisk to make sure everything’s evenly distributed. No one wants a clump of baking powder in their bite!
- **Add the Wet Wonders.** Drop in the softened butter, eggs, milk, and vanilla extract. Beat with an electric mixer on low speed until just combined, then crank it up to medium and beat for 2 minutes. Scrape down the sides of the bowl midway through. We’re aiming for smooth, fluffy batter, not a workout.
- **Divide and Conquer.** Pour the batter evenly into your two prepared cake pans. Give them a gentle tap on the counter to release any air bubbles.
- **Bake It ‘Til Golden.** Bake for 25-30 minutes, or until a wooden skewer inserted into the center comes out clean. **Don’t overbake!** Dry cake is a sad cake.
- **Cool Down.** Let the cakes cool in their pans for 10-15 minutes before inverting them onto a wire rack to cool completely. **Patience is a virtue here, folks.** Trying to frost a warm cake is a one-way ticket to a melted mess.
- **Strawberry Prep.** While the cakes are chilling, gently mix the sliced strawberries with ¼ cup of sugar in a medium bowl. Let them hang out for 15-20 minutes. This draws out their juices, creating a delicious syrupy goodness.
- **Whip It Good!** In a very cold bowl (pop it in the freezer for 10 minutes beforehand!), combine the chilled heavy cream, powdered sugar, and vanilla extract. Beat on high speed with your electric mixer until stiff peaks form. **Don’t over-beat!** Unless you want butter, which, while delicious, is not what we’re going for here.
- **Assemble Your Masterpiece.** Place one cooled cake layer on your serving plate. Spread about a third of the whipped cream evenly over the top. Spoon half of the macerated strawberries (and their juices!) over the cream.
- **Stack and Finish.** Carefully place the second cake layer on top. Repeat with another third of the whipped cream and the remaining strawberries. Finish by spreading the last bit of whipped cream on top and around the sides.
- **Garnish & Devour.** Optionally, decorate with a few whole strawberries or mint leaves. Chill for at least 30 minutes to let it set. Then, cut yourself a massive slice and enjoy the fruits of your labor!
Common Mistakes to Avoid
- **Using cold butter:** Seriously, don’t. Room temperature butter creams better and gives you a much lighter cake. It’s a foundational step, **don’t skip softening!**
- **Overmixing the batter:** Once you add the wet to the dry, mix *just* until combined. Overmixing develops the gluten too much, leading to a tough, dry cake. Nobody wants that.
- **Opening the oven door constantly:** Resist the urge to peek! Every time you open the door, the temperature drops, and your cake might sink.
- **Not chilling the cream and bowl for whipped cream:** This is crucial for stable whipped cream. Warm cream equals soupy cream, and that’s just sad.
- **Frosting a warm cake:** This is a rookie move and will result in a runny, frustrating mess. **Let those cakes cool completely!**
Alternatives & Substitutions
- **Berries:** Not a strawberry purist? Swap ’em for raspberries, blueberries, or a mix of all three! Just make sure to macerate them with sugar too. IMO, fresh is always best, but frozen (thawed and drained) can work in a pinch for the filling.
- **Gluten-Free:** Use a 1:1 gluten-free baking flour blend. Make sure it contains xanthan gum. You might need to adjust baking time slightly, so keep an eye on it.
- **Dairy-Free:** Almond milk or oat milk can work for the cake. For the whipped cream, try a chilled coconut cream (the thick part from a can of full-fat coconut milk, chilled overnight) or a plant-based whipping cream alternative. Results may vary, but it’s worth a shot!
- **Cake Mix Hack:** Look, if you’re really pressed for time, a good quality boxed white cake mix can be your secret weapon. Just follow the package directions for two 8-inch rounds and then proceed with the strawberry filling and whipped cream. No judgment here!
FAQ (Frequently Asked Questions)
- **”My whipped cream isn’t getting stiff! What gives?”** Did you use cold cream and a cold bowl? And heavy whipping cream, not half-and-half? If yes, keep beating! Sometimes it just takes a minute. If it’s still soupy, it might not have enough fat content.
- **”Can I make this cake ahead of time?”** You can bake the cake layers a day in advance and store them wrapped tightly at room temperature. The strawberries can be sliced and sugared a few hours ahead and kept in the fridge. **Assemble the cake no more than 6-8 hours before serving** for the freshest taste and best texture. Whipped cream tends to weep after a while.
- **”Help! My cake layers stuck to the pan!”** Did you grease and flour adequately? Or use parchment paper? Next time, be more generous. If they stick, gently run a knife around the edges, invert, and pray. Sometimes a little bit of structural damage adds “rustic charm,” right?
- **”What’s the best way to store leftovers?”** Tightly covered in the fridge. It’ll be delicious for 2-3 days, though the whipped cream might soften a bit.
- **”Can I use frozen strawberries?”** For the filling, yes, but make sure they’re completely thawed and you drain off most of the excess liquid before mixing with sugar. For garnish, fresh is definitely superior!
Final Thoughts
See? That wasn’t so scary, was it? You just whipped up a showstopper of a cake that’s bursting with summery goodness. Whether you’re making it for a fancy brunch, a casual get-together, or just because Tuesday felt like a cake day (my kind of people!), you’ve totally nailed it. Now go impress someone—or yourself—with your new culinary skills. **You’ve earned it!** And don’t forget to snap a pic before it’s all gone. Happy baking, my friend!


