So, you’re staring at that last slice of regular, sugary strawberry shortcake in the display case, sighing dramatically because your blood sugar says, “Absolutely not, friend.” Or maybe you just want something delish that won’t send you on a sugar roller coaster? Been there, done that, got the slightly elevated glucose reading. But guess what? We’re about to whip up a Strawberry Shortcake that’s so good, your taste buds (and your pancreas) will throw a party. No guilt, all the glory!
Why This Recipe is Awesome
Okay, let’s be real. Most “sugar-free” or “diabetic-friendly” desserts taste like… well, regrets. But not this one! This recipe is a genuine game-changer. Why? Because it’s **idiot-proof**. Seriously, even if your culinary skills peak at microwaving popcorn, you can nail this. It uses simple ingredients, comes together faster than you can say “insulin resistance,” and most importantly, it actually tastes like the real deal. We’re talking fluffy shortcake, sweet berries, and creamy topping without the sugar crash. Plus, you get bragging rights. Who doesn’t love those?
Ingredients You’ll Need
No obscure ingredients here, just the good stuff. Get ready to gather your culinary squad:
- For the Shortcakes:
- 1 ½ cups almond flour: Our low-carb hero. Don’t even think about regular flour here unless you want sad, dense cakes.
- ½ cup erythritol or monk fruit sweetener (granulated): Your sugar-free BFF. Adjust to your sweetness preference, you rebel.
- 1 ½ teaspoons baking powder: For that much-needed lift.
- ¼ teaspoon salt: Balances everything out, like a good therapist.
- ¼ cup unsalted butter, very cold and cubed: This is key for flaky shortcakes, people! Don’t skimp, don’t melt.
- ½ cup heavy cream (or unsweetened almond milk): Brings it all together.
- 1 large egg: Binder extraordinaire.
- 1 teaspoon vanilla extract: Because everything’s better with vanilla.
- For the Strawberry Topping:
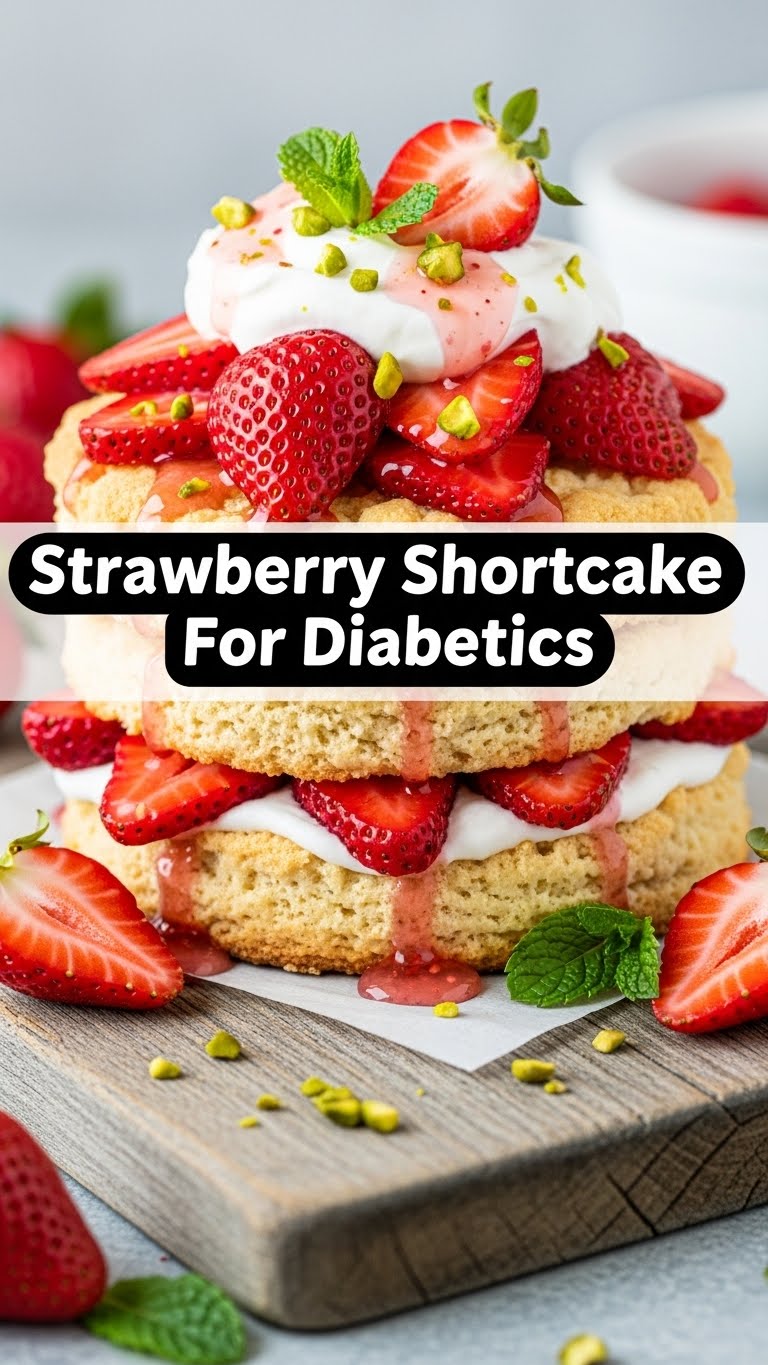
- 2 cups fresh strawberries, sliced: The star of the show!
- 2 tablespoons erythritol or monk fruit sweetener (powdered or granulated): Just a kiss of sweetness.
- 1 teaspoon lemon juice (optional): Brightens up those berries like a sunny day.
- For the Whipped Cream:
- 1 cup heavy cream, very cold: The luscious cloud on top.
- 1-2 tablespoons erythritol or monk fruit sweetener (powdered): Sweeten to taste, darling.
- ½ teaspoon vanilla extract: A final flourish.
Step-by-Step Instructions
- Preheat & Prep: Get your oven heated to 375°F (190°C). Line a baking sheet with parchment paper. Don’t skip the parchment, unless you enjoy scraping.
- Mix Dry Ingredients: In a large bowl, whisk together the almond flour, sweetener, baking powder, and salt. Make sure there are no lumpy surprises!
- Cut in Butter: Add the cold, cubed butter to the dry ingredients. Use a pastry blender, two forks, or your (clean!) fingertips to cut the butter into the flour mixture until it resembles coarse crumbs. We’re going for pea-sized pieces, not a melted mess.
- Combine Wet Ingredients: In a separate small bowl, whisk the heavy cream (or milk), egg, and vanilla extract.
- Form the Dough: Pour the wet ingredients into the dry ingredients. Mix gently with a spoon or your hands until just combined. **Do not overmix!** A slightly shaggy dough is a happy dough.
- Shape the Shortcakes: Turn the dough out onto your prepared baking sheet. Gently pat it into a roughly 1-inch thick circle. Use a 2-3 inch biscuit cutter (or a knife!) to cut out 6 shortcakes. Don’t twist the cutter; just press straight down for a good rise. Re-pat scraps if needed.
- Bake ‘Em Up: Bake for 12-15 minutes, or until golden brown and firm to the touch. They should smell divine! Let them cool completely on a wire rack. Patience, my friend.
- Sweeten the Strawberries: While the shortcakes are cooling, gently toss your sliced strawberries with 2 tablespoons of sweetener and the optional lemon juice in a medium bowl. Let them hang out and macerate (that means get juicy and delicious) for at least 10 minutes.
- Whip the Cream: In a separate chilled bowl (a cold bowl helps!), combine the cold heavy cream, 1-2 tablespoons powdered sweetener, and vanilla extract. Beat with an electric mixer on high speed until stiff peaks form. Don’t overdo it, or you’ll have butter!
- Assemble Your Masterpiece: Once the shortcakes are cool, slice each one in half horizontally. Spoon a generous amount of sweetened strawberries onto the bottom half, then dollop with plenty of whipped cream. Place the top half of the shortcake on, and if you’re feeling fancy (you are, aren’t you?), add another tiny dollop of cream and a berry on top.
Common Mistakes to Avoid
- Using warm butter: Rookie mistake! Warm butter melts too fast and won’t give you those delightful flaky layers. **Always use cold butter.**
- Overmixing the dough: This is the cardinal sin of baking. Overmixing develops gluten (even in almond flour, to a lesser extent) and leads to tough, sad shortcakes. **Mix until just combined.**
- Baking immediately: Not letting the shortcakes cool before assembly. Hot shortcakes will melt your beautiful whipped cream into a soupy mess. **Cool them completely.**
- Not chilling your cream/bowl for whipping: Warm cream just doesn’t whip up as nicely. A chilled bowl and cream are your best friends here for perfectly stiff peaks.
- Skipping the parchment paper: Unless you enjoy scraping baked-on dough from your baking sheet, don’t be a hero. Use the parchment!
Alternatives & Substitutions
Feeling adventurous? Or just out of something crucial? No worries, I got you!
- Sweeteners: If erythritol isn’t your jam, feel free to use xylitol (be careful if you have pets, as it’s toxic to them!), allulose, or any other granulated sugar-free sweetener you prefer. Just taste as you go!
- Flour: While almond flour is king here for low-carb, you *could* try a 50/50 mix with coconut flour (you’ll need more liquid, FYI, as coconut flour is super absorbent) but the texture won’t be quite the same. Stick to almond for the best results, IMO.
- Fruit: Not a strawberry fan? Or maybe they’re out of season? Raspberries, blueberries, or even a mixed berry medley with a touch of sweetener would be absolutely divine!
- Dairy-Free: For the shortcakes, you can use a plant-based butter alternative and unsweetened almond or coconut milk. For the whipped cream, chilled full-fat coconut cream (from a can, just the thick part!) whips up beautifully.
FAQ (Frequently Asked Questions)
Got questions? I’ve got (mostly sarcastic) answers!
- Can I use regular sugar instead of a sugar substitute? Well, technically yes, but then it wouldn’t be “Strawberry Shortcake For Diabetics,” would it? Go ahead if you’re making it for your non-diabetic friends, but for your sake, stick to the substitutes!
- My shortcakes didn’t rise! What went wrong? Did you check your baking powder expiry date? Did you overmix the dough? Or did you twist the biscuit cutter? Any of those can be the culprit. **Fresh baking powder and gentle handling are key!**
- Can I make this ahead of time? You can bake the shortcakes a day in advance and store them in an airtight container. Prep the strawberries a few hours ahead. Whip the cream right before serving for the freshest, fluffiest results. Nobody likes sad, deflated cream.
- How do I store leftovers? If you have any (unlikely, let’s be honest!), store assembled shortcakes loosely covered in the fridge for up to a day. The shortcakes will soften, but still be tasty. Keep components separate for best freshness.
- Is this suitable for a ketogenic diet? Yes, absolutely! With almond flour and sugar-free sweeteners, this fits perfectly into a keto lifestyle. Enjoy your low-carb bliss!
- What if my heavy cream won’t whip? Was it cold enough? Was the bowl cold? If it’s warm, it’s a no-go. Also, make sure it’s *heavy* cream, not half-and-half or light cream. Those imposters won’t cooperate!
Final Thoughts
See? Who said eating for your health had to be boring? You just conquered a delicious, diabetes-friendly strawberry shortcake that’s probably better than anything your Aunt Mildred makes (no offense, Aunt Mildred!). So go on, grab a fork, and enjoy every single bite of your creation. You’ve earned it, and your taste buds deserve this kind of joy. Now go impress someone—or yourself—with your new culinary skills. You rock!
