So, you’re craving something sweet, summery, and ridiculously easy, but your energy levels are currently hovering somewhere between “sloth” and “napping cat,” huh? Been there, done that, bought the T-shirt. Good news! We’re diving into the magical world of **Strawberry Shortcake Canister**—which basically means making the easiest, most delightful strawberry shortcake possible without breaking a sweat or dirtying every single dish in your kitchen. Because who needs extra stress when you can have extra dessert?
Why This Recipe is Awesome
Let’s be real: traditional shortcake can feel like a *project*. This, my friend, is not a project. This is a culinary high-five to your future self. Here’s the deal:
- It’s practically **idiot-proof**. Seriously, if I can do it without setting off the smoke alarm, you’re golden.
- It’s ridiculously **fast**. Like, “sudden craving to deliciousness in under an hour” fast.
- **Minimal cleanup**. We’re talking a bowl or two, maybe a baking sheet. Your dishwasher will barely notice.
- It tastes like summer decided to throw a party in your mouth, but without all the sticky clean-up. What’s not to love?!
Ingredients You’ll Need
Gather ’round, pantry warriors! Here’s your mission brief for ultimate deliciousness:
- For the Shortcakes (our “canister” quick-mix):
- 2 cups all-purpose flour (the basic stuff, no fancy business)
- 1/4 cup granulated sugar (just enough sweetness to make ’em happy)
- 1 tablespoon baking powder (our little fluffy cloud-maker)
- 1/2 teaspoon salt (don’t skip it, it brings out all the good flavors)
- 1/2 cup (1 stick) **COLD** unsalted butter, cut into small cubes (seriously, keep it cold, it’s key!)
- 3/4 cup milk or heavy cream (dairy or non-dairy, your call, but cream makes ’em extra rich)
- For the Strawberry Magic:
- 1 lb fresh strawberries, hulled and sliced (the prettier, the better, IMO)
- 1/4 cup granulated sugar (or more, if your berries are a bit tart)
- For the Whipped Cream Dream:
- 1 cup heavy whipping cream (go for the good stuff, you deserve it)
- 2 tablespoons powdered sugar (or to taste)
- 1/2 teaspoon vanilla extract (the secret ingredient to *everything*)
Step-by-Step Instructions
Alright, apron on (or don’t, we’re not judging), let’s get cooking!
- Prep Your Berries: Grab your strawberries, hull ’em, slice ’em up nice, and toss them gently with the 1/4 cup of sugar in a medium bowl. Let them hang out and get juicy while you make the shortcakes. This is called macerating, and it’s fancy for “letting sugar draw out all the good berry juices.”
- Preheat & Prep Pan: Crank up your oven to 400°F (200°C). Line a baking sheet with parchment paper. Trust me, parchment paper is your friend here.
- Mix Dry Ingredients: In a large bowl, whisk together the flour, 1/4 cup sugar, baking powder, and salt. Make sure there are no lumps—we want smooth sailing!
- Cut in Butter: Now for the fun part! Add your **COLD** butter cubes to the dry ingredients. Use your fingers, a pastry blender, or two knives to cut the butter into the flour until it resembles coarse crumbs, with some pea-sized pieces remaining. **This is crucial for flaky shortcakes!**
- Add Wet Ingredients: Pour in the milk or cream. Mix with a spoon or your hands just until combined. **DO NOT overmix!** A shaggy, slightly sticky dough is what you’re aiming for. Overmixing makes tough shortcakes, and nobody wants a tough shortcake.
- Shape ‘Em Up: Turn the dough out onto a lightly floured surface. Gently pat it into a round or rectangle about 3/4-inch thick. Use a biscuit cutter (or an upside-down drinking glass) to cut out individual shortcakes. You should get about 6-8. Re-roll scraps gently if needed.
- Bake ‘Em Golden: Place your shortcakes on the prepared baking sheet. Bake for 12-15 minutes, or until they’re golden brown and smell absolutely divine. Let them cool slightly on a wire rack.
- Whip the Cream: While the shortcakes are cooling, combine the heavy cream, powdered sugar, and vanilla extract in a cold bowl. Beat with an electric mixer until you have lovely, fluffy peaks. Don’t walk away during this step, or you’ll end up with butter (unless you want butter, then by all means!).
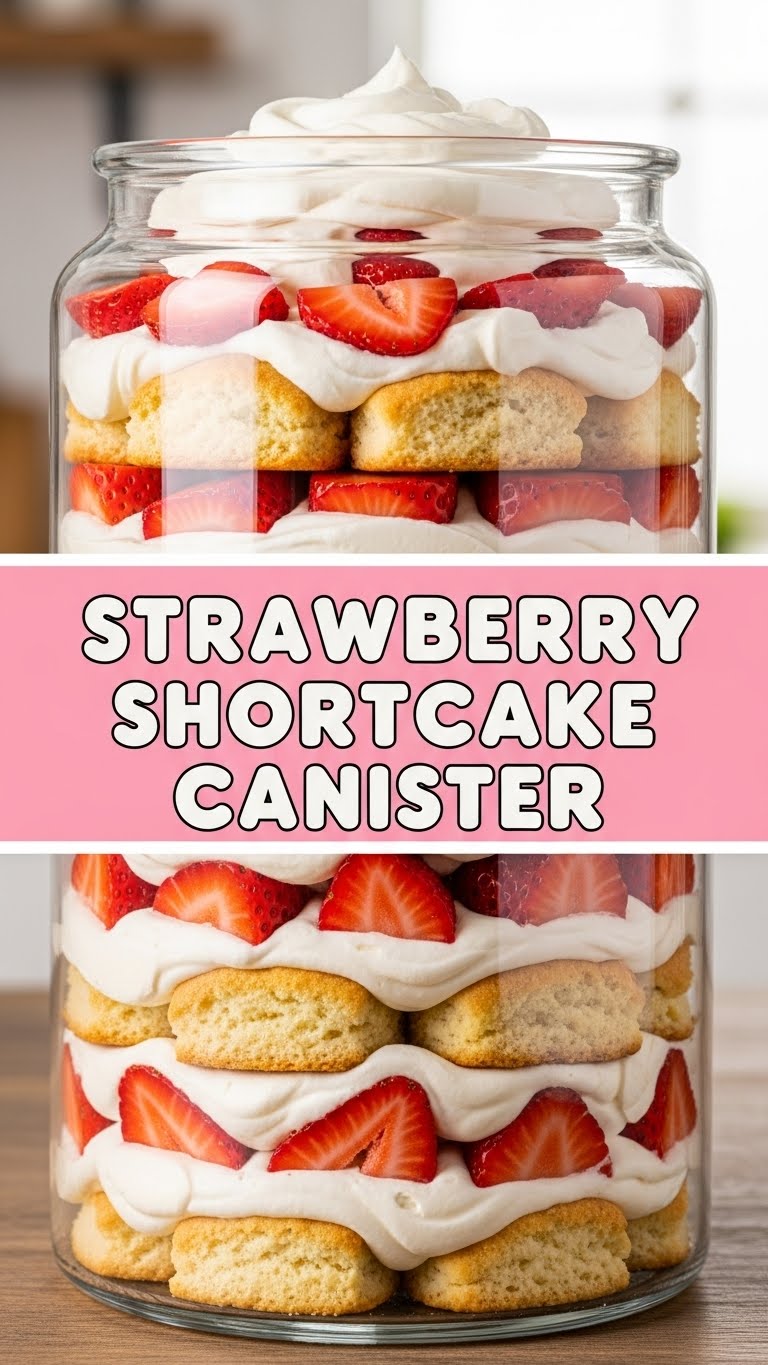
- Assemble Your Masterpiece: Once the shortcakes are cool enough to handle, slice each one in half horizontally. Pile on a generous spoonful of the juicy strawberries, then dollop a mountain of whipped cream on top. Replace the top half of the shortcake. Repeat.
- Serve & Devour: Serve immediately and bask in the glory of your effortless deliciousness. You’re welcome.
Common Mistakes to Avoid
Fear not, my culinary apprentice! Here are a few traps even the best of us (read: me, last Tuesday) fall into:
- Warm Butter Woes: Thinking you can get away with slightly soft butter? Think again! **Cold butter = flaky layers.** Warm butter = dense, sad shortcakes.
- Overmixing the Dough: This is probably the number one shortcake killer. Mix just until combined. A little lumpy is good, a smooth, elastic dough is bad.
- Not Preheating the Oven: Rookie mistake! A hot oven makes the shortcakes rise quickly and get that perfect texture.
- Skimping on Berries/Cream: Listen, this is shortcake. It’s meant to be gloriously over-the-top. Don’t be shy with the good stuff!
Alternatives & Substitutions
Feeling adventurous? Or just out of something key? No worries, we’ve got options!
- Different Fruits: Peaches, blueberries, raspberries, or even a mix of all three are fantastic. Just slice ’em, sugar ’em, and you’re good to go.
- Store-Bought Shortcakes: Shhh, I won’t tell! If you’re *really* pressed for time, grab some pre-made shortcakes or even plain biscuity-scones. It’s about the vibes, right?
- Cool Whip: Okay, if you’re in a pinch and don’t want to whip cream, Cool Whip works. But for real, authentic flavor, fresh whipped cream is king. Just sayin’.
- Dairy-Free: Use a plant-based milk for the shortcakes (almond or oat milk work great) and a coconut cream for whipping (make sure to chill a can of full-fat coconut milk overnight and scoop out the thick cream from the top!).
FAQ (Frequently Asked Questions)
Got questions? I’ve got (casual and possibly sarcastic) answers!
Can I make the shortcakes ahead of time?
Totally! They’re best fresh, but you can bake them a day in advance and store them in an airtight container at room temp. Just give them a quick toast before serving if you want that fresh-baked feel.
What if my strawberries aren’t super sweet?
Add a tiny bit more sugar when you’re macerating them. You can also add a squeeze of lemon juice to brighten their flavor!
Can I use margarine instead of butter?
Well, technically yes, but why hurt your soul like that? Butter provides that unparalleled flavor and flakiness. Live a little!
My whipped cream isn’t getting stiff, help!
Make sure your cream, bowl, and even your whisk attachment are **cold**. Stick them in the freezer for 10-15 minutes before whipping. Warm cream just won’t cooperate.
How long do leftovers last?
Assembled shortcakes are best eaten immediately to avoid soggy bottoms. If you have separate components, the shortcakes will last 1-2 days, berries 2-3 days, and whipped cream 1 day in the fridge.
Can I freeze the shortcake dough?
You bet! Cut out the shortcakes and freeze them on a baking sheet until solid, then transfer to a freezer bag. Bake from frozen, adding a few extra minutes to the baking time. Handy, right?
Final Thoughts
There you have it, folks! Your new go-to, no-fuss recipe for a strawberry shortcake that tastes like it took you all day but actually took about 45 minutes (shh, it’s our little secret). This isn’t just dessert; it’s a mood. It’s a hug in food form. Now go impress someone—or yourself—with your new culinary skills. You’ve earned it!


