So you’re craving something ridiculously light, fluffy, and just sweet enough to make your taste buds sing, but you don’t want to spend all day slaving away in the kitchen, huh? Same, friend, same. Get ready to meet your new obsession: the Japanese Strawberry Shortcake Cake. It’s like regular shortcake went on a spa retreat and came back zen, glowing, and impossibly elegant.
Why This Recipe is Awesome
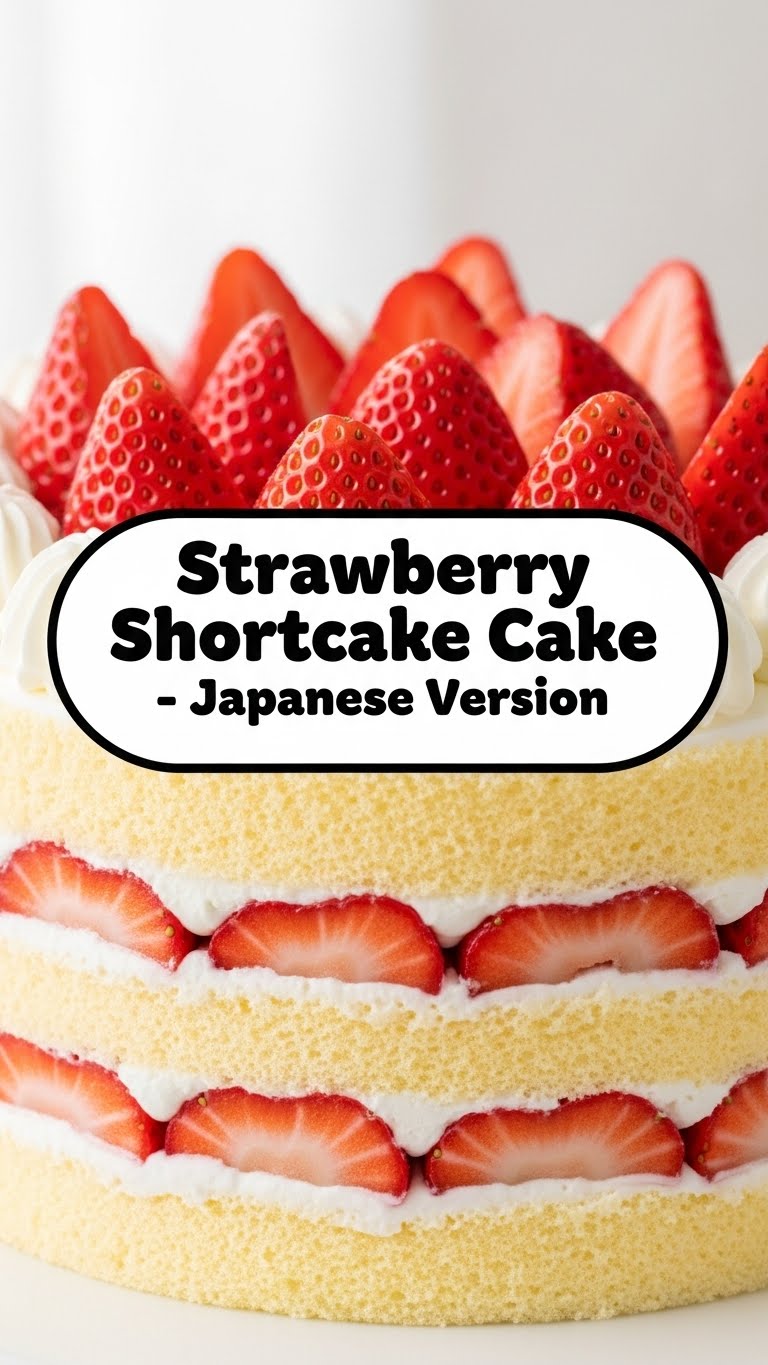
Okay, listen up. This isn’t your grandma’s dense, biscuit-y shortcake (no offense, Grandma, we still love you!). The Japanese version is a whole different beast. Think cloud-like sponge cake, perfectly sweet whipped cream, and fresh, vibrant strawberries. It’s **airy, delicate, and not overly sweet**, meaning you can totally justify having a second (or third) slice without feeling like you’ve eaten a brick. Plus, it looks super fancy with minimal effort, which, let’s be real, is half the battle for impressing anyone. It’s pretty much idiot-proof, even I didn’t mess it up on my first try.
Ingredients You’ll Need
Time to gather your edible treasures! Nothing too wild here, just good quality stuff, because, honestly, the cake will thank you.
- **For the Sponge Cake (Genoise):**
- **3 large eggs:** Room temperature, please! They whip up better when they’re not shivering.
- **75g (about 1/3 cup + 1 tbsp) granulated sugar:** Not too much, we’re aiming for delicate.
- **75g (about 2/3 cup) cake flour:** Sifted, of course, because nobody likes lumpy cake. If you don’t have cake flour, you can use all-purpose flour minus 1 tablespoon, replaced with 1 tablespoon cornstarch. Science!
- **20g (about 1.5 tbsp) unsalted butter:** Melted and cooled slightly. Don’t go pouring hot butter in, you’ll scramble your eggs, literally.
- **1 tbsp milk:** Whole milk works best.
- **1 tsp vanilla extract:** The good stuff, not the imitation kind, unless you like your cake tasting like a candle.
- **For the Whipped Cream & Filling:**
- **400ml (about 1.7 cups) heavy cream (35% or more fat):** Chilled, cold, arctic cold. This is key for stiff peaks.
- **40-50g (about 3-4 tbsp) granulated sugar:** Adjust to your sweet tooth, I like mine less sweet so the strawberries can shine.
- **1 tsp vanilla extract:** Again, use the good stuff.
- **400g (about 1 lb) fresh strawberries:** Washed, hulled, and sliced. The prettier, the better!
Step-by-Step Instructions
Alright, apron on, let’s do this! Don’t overthink it, just follow along.
- **Prep Your Pan:** Preheat your oven to 170°C (340°F). Grease and flour a 6-inch round cake pan, or line it with parchment paper. This cake is delicate, so a little non-stick help goes a long way.
- **Whisk the Eggs & Sugar:** In a heatproof bowl, combine eggs and sugar. Place the bowl over a saucepan with simmering water (don’t let the bowl touch the water!). Whisk constantly until the mixture is warm to the touch (about 40°C/104°F) and the sugar has dissolved. This helps create a stable foam.
- **Whip It Real Good:** Remove from heat and beat with an electric mixer on high speed for about 7-10 minutes. You’re looking for a thick, pale yellow, airy batter that leaves a ribbon trail when the whisk is lifted. **Don’t skimp on this step!**
- **Fold in the Flour:** Gently sift the cake flour over the egg mixture in 2-3 additions. Use a spatula to fold it in gently with an under-and-over motion, rotating the bowl. **Avoid overmixing**, or your cake will be tough. We want fluffy!
- **Add Wet Ingredients:** In a separate small bowl, whisk together the melted butter, milk, and vanilla. Take about a spoonful of your cake batter and mix it into the butter mixture to lighten it. Then, gently fold this butter mixture back into the main cake batter. Again, be gentle!
- **Bake Away:** Pour the batter into your prepared cake pan. Gently tap the pan on the counter a few times to release any large air bubbles. Bake for 25-30 minutes, or until a skewer inserted into the center comes out clean.
- **Cool It Down:** Remove the cake from the oven, immediately invert it onto a wire rack for 5 minutes (this helps prevent shrinking!), then flip it back upright and let it cool completely. **Patience is a virtue here.**
- **Whip the Cream:** While the cake cools, whip the very cold heavy cream, sugar, and vanilla extract until medium-stiff peaks form. Be careful not to over-whip it into butter.
- **Assemble Your Masterpiece:** Once the cake is completely cool (seriously, completely!), slice it horizontally into two or three even layers. Place one layer on your serving plate, spread a generous amount of whipped cream, and arrange sliced strawberries on top. Repeat with the next layer. Frost the top and sides of the cake with the remaining whipped cream.
- **Decorate & Chill:** Decorate with more fresh strawberries on top. Pop it in the fridge for at least 30 minutes to let the cream set a bit. Then, slice and serve!
Common Mistakes to Avoid
We all make mistakes, but let’s try to avoid these rookie errors, shall we?
- **Using Cold Eggs:** Seriously, room temperature eggs whip up higher and fluffier. Don’t skip this.
- **Not Sifting Flour:** You’ll end up with dense patches. It takes 30 seconds, just do it.
- **Overmixing the Batter:** This activates gluten, making your cake tough and chewy instead of light and airy. Mix *just* until combined.
- **Over-Whipping the Cream:** Suddenly you’ve got butter. Keep an eye on it; it goes from perfect to chunky real fast.
- **Cutting a Warm Cake:** This is a cardinal sin! It will crumble and tear. Let it cool fully. I know it’s hard, but **resist the urge!**
Alternatives & Substitutions
Feeling adventurous or missing an ingredient? No stress, we can tweak things!
- **Other Fruits:** While strawberries are classic, feel free to swap them out for other berries, kiwi slices, or even thinly sliced mango. Just make sure they’re not too watery.
- **Cake Flour vs. All-Purpose:** As mentioned, if you don’t have cake flour, you can use AP flour. For every cup of AP flour, remove 2 tablespoons and replace with 2 tablespoons of cornstarch. Sift it all together!
- **Dairy-Free Cream:** For those avoiding dairy, full-fat canned coconut cream (chilled overnight, use the thick cream on top) can be whipped up like heavy cream. It’ll add a subtle coconut flavor, which is a yummy twist, IMO!
- **Sweetness Level:** If you prefer a less sweet cake, reduce the sugar in both the cake and the whipped cream slightly. If you have a super sweet tooth, add a touch more!
FAQ (Frequently Asked Questions)
- **Can I make the cake layers ahead of time?** Absolutely! You can bake the sponge cake a day in advance, wrap it tightly in plastic wrap, and store it at room temperature. Just make sure it’s completely cooled before wrapping.
- **How long does Japanese Strawberry Shortcake Cake last?** It’s best eaten on the day it’s made for ultimate freshness. However, it will keep in an airtight container in the fridge for up to 2-3 days. The cake might absorb some moisture from the cream, making it a tiny bit softer.
- **Can I use frozen strawberries?** You can, but fresh is definitely preferred! Frozen strawberries release a lot of water when they thaw, which can make your cake soggy. If you must use them, thaw them completely and pat them very dry with paper towels.
- **What size cake pan should I use?** This recipe is for a 6-inch round cake pan. If you use an 8-inch pan, you might need to increase the recipe by about 1.5 times and adjust baking time.
- **Do I need a stand mixer?** While a stand mixer makes whipping eggs and cream much easier, a good hand mixer works perfectly fine! Just be prepared for an arm workout.
- **Is it really easy for a beginner?** Yes! It looks intimidating, but as long as you pay attention to the gentle folding and whipping steps, it’s quite forgiving. **You got this!**
- **Can I make it gluten-free?** You can try substituting the cake flour with a good quality gluten-free all-purpose flour blend (one that contains xanthan gum). Results may vary slightly in texture, but it should still be delicious!
Final Thoughts
So there you have it, your very own slice of Japanese heaven! This cake is a showstopper, but also incredibly comforting and perfect for any occasion (or just Tuesday night, because why not?). Don’t be shy, give it a whirl. And hey, even if it’s not absolutely perfect, it’s still homemade, and that’s what truly matters. Now go impress someone—or yourself—with your new culinary skills. You’ve earned it!


