So, you’ve scrolled past one too many perfectly curated baking posts and now you’re feeling ambitious, but also… kinda lazy? Same. Or maybe you just want to bake something that looks super cool without actually requiring a culinary degree. Well, my friend, you’ve hit the jackpot. Get ready for Spider Chocolate Chip Cookies – they’re spooky-cute, ridiculously tasty, and easier to make than deciding what to watch on Netflix.
Why This Recipe is Awesome
Because let’s be real, life’s too short for complicated baking. This recipe is so easy, your pet goldfish could probably follow it. (Disclaimer: Please do not let your goldfish bake.) It’s essentially your favorite chocolate chip cookie recipe, but with a fun, eight-legged twist that will make everyone go “Aww!” instead of “Eek!” Seriously, it’s pretty much **fail-proof**. Even if your usual baking success rate hovers around “burnt toast,” you’ll nail these. Plus, who doesn’t love a cookie that doubles as a conversation starter?
Ingredients You’ll Need
Gather your troops! Here’s what you’ll need to transform into a cookie wizard:
- 1 cup (2 sticks) Unsalted Butter, softened (aka: left out on the counter long enough that it looks a bit sad but is still useful).
- ¾ cup Granulated Sugar – the basic sweet stuff.
- ¾ cup Packed Light Brown Sugar – for that extra chewiness and depth. Don’t pack it lightly; actually pack it!
- 2 Large Eggs – room temperature, please. They mix better, trust me.
- 1 tsp Vanilla Extract – good quality, because it makes a difference. Don’t skimp!
- 2 ¼ cups All-Purpose Flour – measured correctly, no scooping directly from the bag like a barbarian!
- 1 tsp Baking Soda – the leavening magic.
- ½ tsp Salt – balances out all that sweetness. Crucial!
- 1 ½ cups Semi-Sweet Chocolate Chips – because it’s not a chocolate chip cookie without, well, chocolate chips.
- 12-15 Oreo Sandwich Cookies, split in half – for the spider bodies.
- Pretzel Sticks or melted chocolate in a piping bag – for the spider legs. You choose your weapon.
- Candy Eyes (optional, but highly recommended for maximum cuteness!)
Step-by-Step Instructions
- Preheat your oven to 375°F (190°C). Line a couple of baking sheets with parchment paper. This is key for easy cleanup and preventing stickage, FYI.
- Cream the butter and sugars. In a large bowl, using an electric mixer, beat the softened butter, granulated sugar, and brown sugar until light and fluffy. This should take about 2-3 minutes.
- Add the eggs and vanilla. Beat in the eggs, one at a time, until fully incorporated. Stir in the vanilla extract. Scrape down the sides of the bowl to make sure everything’s mixed.
- Whisk the dry ingredients. In a separate medium bowl, whisk together the flour, baking soda, and salt. Don’t skip this, it ensures even distribution.
- Combine wet and dry. Gradually add the dry ingredient mixture to the wet ingredients, mixing on low speed until just combined. **Do not overmix!** Lumps are fine, overmixing is a crime against cookies.
- Stir in the chocolate chips. Fold in the chocolate chips by hand with a spatula. You want a good, even distribution of chocolatey goodness.
- Scoop and bake. Drop rounded tablespoons of dough onto your prepared baking sheets, leaving a couple of inches between each. Bake for 9-11 minutes, or until the edges are golden brown and the centers are still slightly soft.
- Cool slightly. Let the cookies cool on the baking sheets for about 5 minutes before transferring them to a wire rack to cool completely. This prevents them from falling apart.
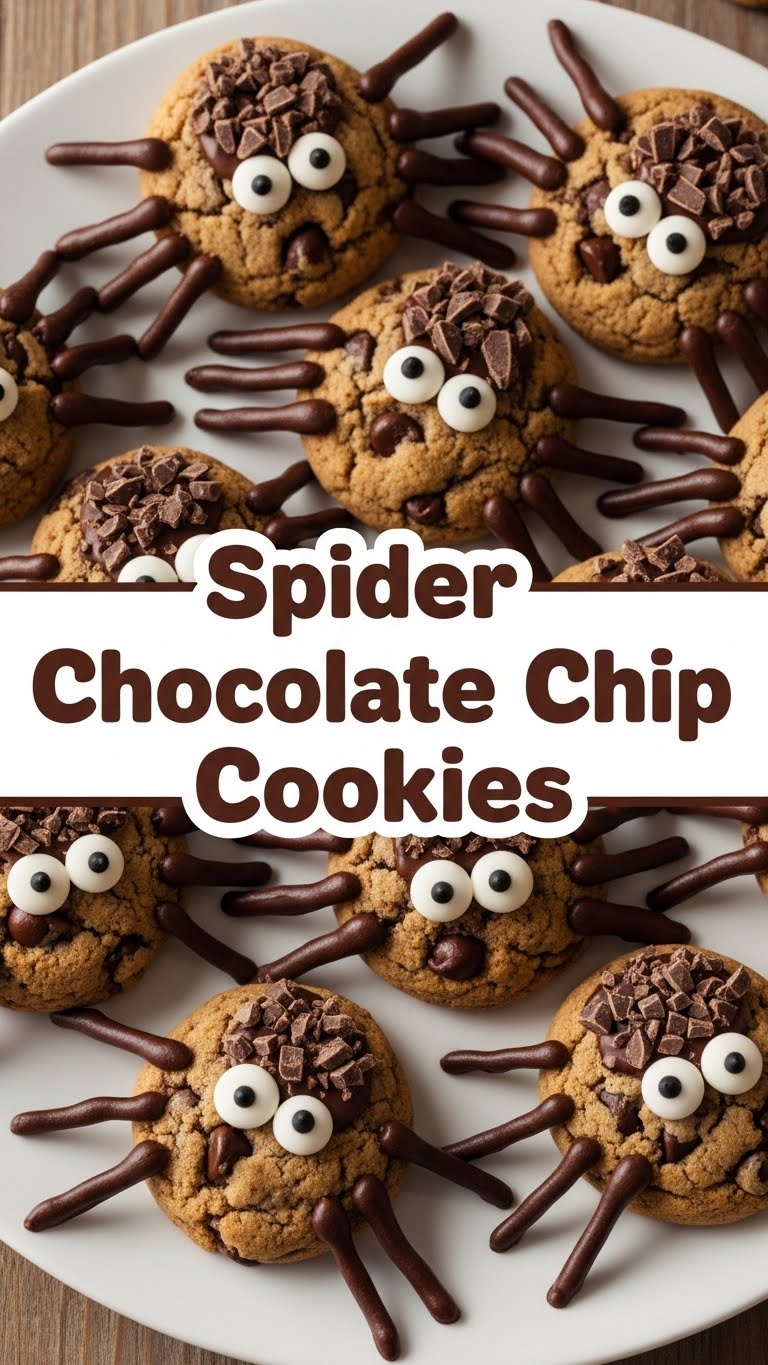
- Decorate your spiders! Once the cookies are cooled, place half an Oreo cookie (cream side down) on top of each chocolate chip cookie for the spider’s body. Break pretzel sticks into small “leg” pieces (about 1-1.5 inches long) and gently insert four into each side of the Oreo body. If using melted chocolate, pipe eight small lines as legs. Attach candy eyes with a tiny dab of melted chocolate or icing.
Common Mistakes to Avoid
- Overmixing the dough: I said it once, I’ll say it again. You want tender, chewy cookies, not dense, tough hockey pucks. Mix until just combined, then stop!
- Not softening your butter: Trying to cream cold butter is like trying to convince a cat to take a bath. It’s a struggle, and the results are messy. Softened butter creams beautifully.
- Eyeballing ingredients: This isn’t abstract art, folks. Baking is a science. Use proper measuring cups and spoons, especially for flour. A kitchen scale is your best friend, IMO.
- Overbaking: Pull your cookies out when the edges are golden, and the centers still look a little soft and underbaked. They’ll continue to cook on the hot baking sheet, resulting in that perfect chewy center.
Alternatives & Substitutions
Feeling adventurous? Or just missing an ingredient? No worries, we can make this work:
- Chocolate Chips: No semi-sweet? Milk chocolate, dark chocolate, or even a mix of different chips will work. White chocolate chips could make for some albino spiders – kind of creepy, kind of cool!
- Spider Bodies: If Oreos aren’t your jam, try a large Rolo candy, a mini Reese’s peanut butter cup (upside down!), or even a large M&M. Get creative!
- Spider Legs: Pretzels are easy, but you could also melt some dark chocolate and pipe thin lines onto parchment paper, let them set, and then gently place them on your cookies. Or even use black licorice strings, if you’re brave.
- Butter: You *can* technically use margarine, but for the best flavor and texture, stick with real butter. Why deny yourself the good stuff?
FAQ (Frequently Asked Questions)
- Do I *have* to chill the dough? I’m impatient!
For these specific cookies, you usually don’t *have* to, but a quick 30-minute chill can sometimes help prevent spreading too much. If you’re like me and have the patience of a goldfish, just skip it and embrace the delicious chaos!
- Can I make these gluten-free?
Yep! Just swap out the all-purpose flour for your favorite 1:1 gluten-free baking flour blend. Make sure your Oreos and pretzels are also GF if you’re going full gluten-free!
- My cookies spread too much! What happened?
Could be a few things: butter was too soft, oven temperature was off, or you didn’t measure your flour correctly. Try chilling the dough next time, or adding an extra tablespoon or two of flour if your dough feels unusually sticky.
- How do I store these spooky treats?
Keep them in an airtight container at room temperature for up to 3-4 days. They rarely last that long, though!
- Can I skip the spider part and just make regular chocolate chip cookies?
Well, yes, obviously. But why would you want to? The spiders are half the fun! You do you, boo.
Final Thoughts
So there you have it, folks! Your very own batch of creepy-crawly (but oh-so-cute!) Spider Chocolate Chip Cookies. These are perfect for Halloween parties, surprising your kids, or just making a Tuesday feel a little more festive. Now go forth and spread some joy, or mild arachnophobia, with these bad boys. You totally nailed it! And hey, if they don’t look exactly like the picture, who cares? They’ll still taste amazing. Happy baking!


