So, you’re scrolling through endless feeds, a rumbling in your tummy, thinking, “I need something epic, but also… can it be quick?” Yep, been there, done that, got the crumb-stained t-shirt. And today, my friend, we’re diving headfirst into a concoction that’s basically a hug, a bonfire, and a sugar rush all rolled into one: S’mores Chocolate Chip Cookies!
Why This Recipe is Awesome
Why bother with this particular masterpiece, you ask? Well, aside from the fact that it combines the gooey, toasty magic of s’mores with the classic comfort of a chocolate chip cookie (hello, best of both worlds!), it’s also **ridiculously easy**. Seriously, if I can pull this off without setting off the smoke detector, you’re golden. Plus, it’s a major crowd-pleaser and lets you relive those campfire memories without, you know, needing an actual campfire. It’s basically nostalgia you can eat, and who doesn’t need a little more of that?
Ingredients You’ll Need
Gather your troops, because these goodies don’t make themselves!
- 1 cup (2 sticks) unsalted butter, softened. And by “softened,” I mean not melted, not rock hard, just perfectly smooshy.
- ¾ cup granulated sugar. The white stuff.
- ¾ cup packed light brown sugar. The chewy secret ingredient.
- 2 large eggs. Ideally, happy chicken eggs at room temperature.
- 1 teaspoon vanilla extract. Use the good stuff; it makes a difference!
- 2 ¼ cups all-purpose flour. The main event.
- 1 teaspoon baking soda. For that perfect lift.
- ½ teaspoon salt. Don’t skip it; it balances the sweetness!
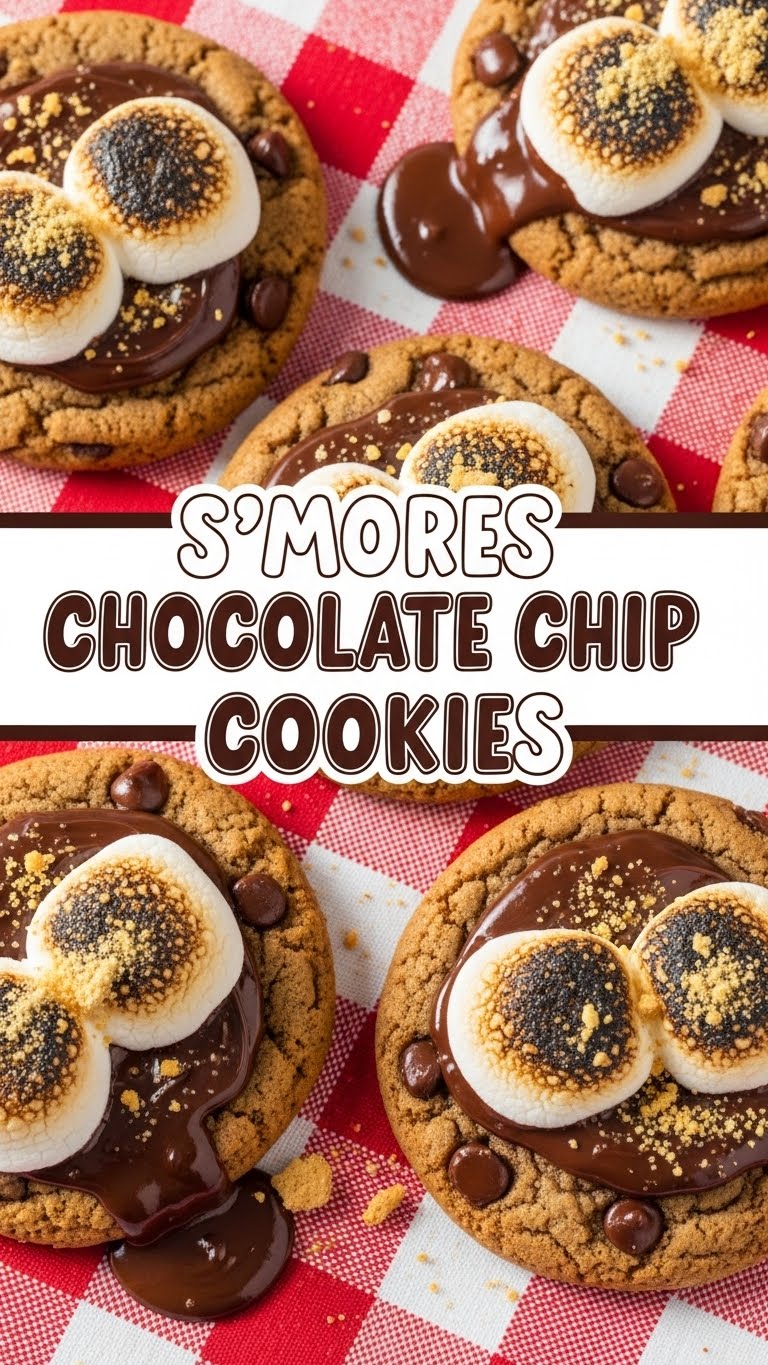
- 1 ½ cups chocolate chips. Semi-sweet is classic, but hey, you do you.
- 1 cup mini marshmallows. The star of the s’mores show!
- ½ cup crushed graham cracker crumbs. The crunch, the texture, the flavor.
Step-by-Step Instructions
Alright, apron on, game face on. Let’s make some magic!
- First things first: Preheat your oven to **375°F (190°C)**. Line two baking sheets with parchment paper. This is non-negotiable for easy cleanup and no-stick deliciousness.
- In a large bowl, cream together the softened butter, granulated sugar, and brown sugar until light and fluffy. This should take about 2-3 minutes with an electric mixer. Don’t rush it; it’s a crucial step for cookie texture.
- Beat in the eggs one at a time, making sure each is fully incorporated before adding the next. Then, stir in the vanilla extract. Scrape down the sides of the bowl to ensure everything mixes evenly.
- In a separate medium bowl, whisk together the flour, baking soda, and salt. Give it a good mix to distribute everything.
- Gradually add the dry ingredients to the wet ingredients, mixing on low speed until just combined. **Do not overmix!** Overmixing develops gluten, leading to tough cookies. And nobody wants a tough cookie.
- Fold in the chocolate chips and graham cracker crumbs. Use a spatula for this, gently incorporating them into the dough.
- Scoop rounded tablespoons of dough onto your prepared baking sheets, leaving about 2 inches between each cookie.
- Bake for 8-10 minutes. At the 8-minute mark, pull the trays out. Quickly (but carefully!) top each cookie with 3-4 mini marshmallows.
- Pop them back in the oven for another 2-4 minutes, or until the edges are golden brown and the marshmallows are gloriously puffed and lightly toasted. Keep a close eye on them to prevent burning!
- Remove from the oven and let the cookies cool on the baking sheets for 5 minutes before transferring them to a wire rack to cool completely. Or, you know, just eat them warm. Your call.
Common Mistakes to Avoid
Because even the best of us have cookie fails. Learn from my past blunders!
- Overmixing the Dough: We covered this, but it’s worth repeating: less is more when it comes to mixing after adding flour. Mix until just combined, then stop!
- Not Using Room Temperature Butter and Eggs: Cold ingredients don’t cream together as well, leading to a less cohesive and often denser cookie. Plan ahead, people!
- Eyeballing the Flour: Thinking you can eyeball the flour? Trust me, a kitchen scale is your friend here, or at least a proper scoop-and-level technique. Too much flour means hockey pucks, not cookies.
- Adding Marshmallows at the Beginning: **Rookie mistake!** They’ll melt into oblivion and make a sticky mess on your baking sheet. Wait until the last few minutes for that perfect gooey top.
- Overbaking: Cookies continue to cook a bit after they come out of the oven. They might look slightly underdone in the center, but that’s what makes them soft and chewy. Pull them when the edges are set and golden.
Alternatives & Substitutions
Feeling creative? Or just missing an ingredient? No stress, we can improvise!
- Chocolate Chips: Not a fan of semi-sweet? Go dark, go milk, go a mix! White chocolate chips also work wonderfully if you’re feeling a bit fancy. Your cookie, your rules.
- Marshmallows: If you can’t find mini marshmallows, just snip larger ones into smaller pieces with kitchen shears (tip: lightly oil them first to prevent sticking!).
- Graham Crackers: Out of graham crackers? Crushed digestive biscuits or even vanilla wafers could work in a pinch for that added crunch, though the flavor won’t be exactly the same.
- Gluten-Free: Want to go GF? Absolutely! Just swap out the all-purpose flour for a good 1:1 gluten-free baking blend and ensure your graham crackers are GF (they exist!).
- Extra Flair: Feeling adventurous? Add a sprinkle of sea salt on top before baking for that fancy-pants sweet and salty vibe. So good, **IMO**.
FAQ (Frequently Asked Questions)
Got questions? I’ve got (casual) answers!
- Can I use margarine instead of butter? Well, technically yes, but why hurt your soul like that? Butter provides a richer flavor and better texture. Stick with butter for optimal deliciousness.
- Do I *have* to chill the dough? You *can* skip it, but your cookies might spread more. A little chill time (even 30 minutes) helps them hold shape and develops flavor. **FYI**, it’s always a good idea if you have the time.
- My marshmallows burned! What gives? You probably added them too soon or baked too long after adding them. Next time, add them halfway through or even closer to the end for just a quick toast. Keep an eye on them—they go from perfectly golden to charcoal quickly!
- Can I make these ahead of time? Absolutely! You can scoop the dough and freeze the balls. When you’re ready to bake, just place them on a baking sheet and add a few extra minutes to the baking time.
- How long do they last? If they last longer than 24 hours in your house, you have way more self-control than I do! Store them in an airtight container for 3-4 days at room temp. Though, let’s be real, they’re best warm.
- Why are my cookies flat? Could be a few things! Butter too soft/melted, oven not hot enough, or your leavening agent (baking soda) might be old. Make sure your baking soda is fresh!
Final Thoughts
There you have it, folks! Your new go-to recipe for when you need a little bit of magic, a little bit of comfort, and a whole lot of deliciousness. These S’mores Chocolate Chip Cookies are guaranteed to bring smiles and maybe even a little happy dance. Now go forth and bake! Share ’em, hoard ’em (no judgment here!), just enjoy ’em. You’ve officially leveled up your cookie game. Now go impress someone—or yourself—with your new culinary skills. You’ve earned it!


