So you’re craving something warm, gooey, and packed with cinnamon-sugar goodness, but the thought of spending an entire afternoon wrestling with dough makes you want to just order takeout? I feel you. Deeply. That’s why we’re making tiny cinnamon rolls today. Think of them as the espresso shot of the cinnamon roll world: all the flavor, less commitment, and seriously, ridiculously cute. Perfect for when you want a little hug in edible form without the epic saga of a full-sized batch. Let’s do this!
Why This Recipe is Awesome
Okay, let’s be real. This recipe is awesome because it’s practically **idiot-proof**. Even I, someone who once mistook baking soda for baking powder (don’t ask), managed to nail these. They’re quick, they’re small (meaning fewer guilt pangs, right?), and they hit that sweet spot between “I made something amazing” and “I still have time for Netflix.” Plus, the small size means they bake faster, and who wants to wait around when there’s cinnamon involved? Not us, friend. Not us.
Ingredients You’ll Need
- For the Dough:
- 1 cup warm milk (around 105-115°F – just warm to the touch, not scalding. Don’t murder the yeast!)
- 2 ¼ teaspoons active dry yeast (one standard packet, the little magic dust that makes things fluffy)
- ¼ cup granulated sugar (for sweetness and to wake up that yeast)
- 1 large egg, room temperature (gives it richness)
- ¼ cup unsalted butter, melted (because we’re in charge of the salt here), then slightly cooled
- ½ teaspoon salt (don’t skip this, it balances everything!)
- 2 ½ to 3 cups all-purpose flour (the MVP of baking, start with 2.5 and add more if needed)
- For the Filling:
- ¼ cup unsalted butter, softened (soft, not melted, for spreadability)
- ½ cup packed light brown sugar (the gooey caramel magic)
- 1 tablespoon ground cinnamon (the star of the show!)
- For the Glaze:
- 1 cup powdered sugar (confectioners’ sugar, for that snowy finish)
- 2-3 tablespoons milk (any kind works, you decide the consistency)
- ½ teaspoon vanilla extract (because vanilla makes everything better)
Step-by-Step Instructions
- Activate the Yeast: In a large bowl, combine the warm milk, yeast, and a pinch of that ¼ cup sugar. Stir gently and let it sit for about 5-10 minutes. It should get foamy – that means your yeast is alive and ready to party!
- Mix the Dough: To the foamy yeast mixture, add the remaining granulated sugar, egg, melted butter, and salt. Whisk it all together. Then, gradually add the flour, starting with 2.5 cups, mixing until a shaggy dough forms.
- Knead It Out: Turn the dough out onto a lightly floured surface. Knead for about 5-7 minutes until it’s smooth and elastic. If it’s too sticky, add a tiny bit more flour, but be careful not to add too much – we want soft rolls! Form it into a ball.
- First Rise (The Quickie): Lightly grease the bowl you used earlier. Place the dough ball in, flip it once to coat, then cover with a clean kitchen towel or plastic wrap. Let it rise in a warm spot for about 45 minutes to 1 hour, or until roughly doubled in size. **Quick tip: a warm oven (turned off, of course!) with the light on works wonders.**
- Prep the Filling: While the dough is rising, mix the softened butter, brown sugar, and cinnamon in a small bowl until well combined. Set aside your future deliciousness.
- Roll ‘Em Out: Once the dough has risen, punch it down gently to release the air. On a lightly floured surface, roll the dough into a rectangle, about 12×8 inches. Try to keep it as even as possible.
- Spread the Love: Evenly spread your cinnamon-sugar mixture over the entire surface of the dough rectangle, going almost to the edges.
- Roll ‘Em Up: Starting from one of the long sides, carefully and tightly roll the dough into a log. Pinch the seam closed to seal it.
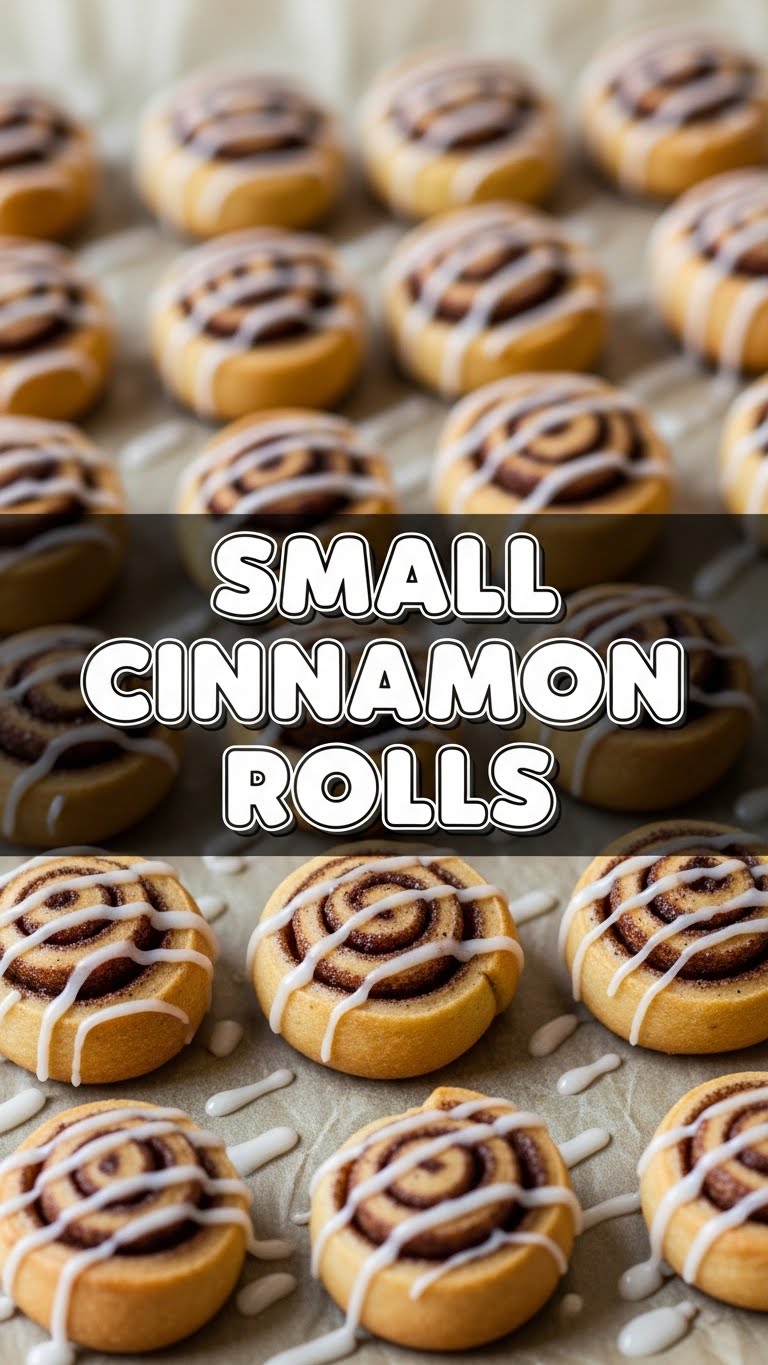
- Slice and Dice: Using a sharp knife or even unflavored dental floss (yes, really, it makes cleaner cuts!), cut the log into 12-15 equal slices, about ¾ to 1 inch thick.
- Second Rise & Bake: Arrange the slices in a lightly greased 8×8 inch baking dish (or similar size). Cover loosely and let them rise again for another 20-30 minutes, or until visibly puffy. Meanwhile, **preheat your oven to 375°F (190°C)**. Bake for 15-20 minutes, or until golden brown and the centers are cooked through.
- Whip Up the Glaze: While the rolls are baking or cooling slightly, whisk together the powdered sugar, milk, and vanilla extract until smooth. Adjust milk for desired consistency – want it thicker? Less milk. Drizzly? More milk!
- Glaze and Devour: Let the cinnamon rolls cool for a few minutes (but not too long, warm is best!). Drizzle or spread the glaze generously over the top. Then, go on, grab one. You’ve earned it!
Common Mistakes to Avoid
- **Murdering the Yeast:** Don’t use water that’s too hot! If it’s boiling, your yeast is toast, and your dough won’t rise. Aim for bathwater warm.
- **Over-flouring:** Resist the urge to dump in all the flour. A slightly sticky dough is usually better than a stiff, dry one. Too much flour means tough rolls.
- **Skimping on the Rise Time:** Patience, young padawan! If your dough hasn’t doubled, it needs more time. A rushed rise equals dense, sad rolls.
- **Not Softening the Butter Enough for Filling:** If your butter is too cold, it’ll tear the dough when you try to spread it. Soft, spreadable butter is key!
- **Overbaking:** Keep an eye on them! Overbaked cinnamon rolls are dry cinnamon rolls. Pull them out when they’re golden brown, not deep brown.
- **Forgetting to Preheat the Oven:** Rookie mistake! Your oven needs to be at temperature before the rolls go in for consistent baking.
Alternatives & Substitutions
Feeling adventurous or just out of something? No worries, we’ve got options:
- Dairy-Free? Swap regular milk for almond or oat milk, and use a plant-based butter (like Miyoko’s or Earth Balance) for both the dough and filling. They’ll still be delish!
- Different Spices: Want to spice things up (literally)? Add a pinch of nutmeg, cardamom, or even a tiny bit of ginger to your cinnamon-sugar filling. Fall vibes, anyone?
- Cream Cheese Glaze: Instead of the simple glaze, whip up a quick cream cheese frosting! Just soften 2 oz cream cheese with 2 tbsp softened butter, then beat in 1 cup powdered sugar, 1 tbsp milk, and ½ tsp vanilla extract. **IMO, this is the ultimate upgrade.**
- Whole Wheat Flour: You *can* substitute some whole wheat flour (say, half all-purpose, half whole wheat), but be warned: your rolls might be a bit denser and less fluffy. Not bad, just different!
FAQ (Frequently Asked Questions)
Got questions? I’ve got answers (and opinions, naturally).
Can I make these ahead of time?
Absolutely! You can assemble the rolls and place them in the baking dish, then cover tightly and refrigerate overnight. In the morning, let them sit at room temperature for 30-60 minutes before baking to allow for a final rise. Voila, fresh morning treats!
Do I need a stand mixer for this recipe?
Nope! While a stand mixer with a dough hook makes life easier, it’s totally not required. My arms are my mixer, and yours can be too! Just get ready for a mini bicep workout when kneading.
What if my yeast doesn’t foam?
Uh oh, you’ve got a yeast problem. It might be expired, or your milk was too hot/cold. Start over with new yeast and double-check that milk temperature. Don’t waste your precious ingredients on dead yeast!
Can I freeze these tiny cinnamon rolls?
You bet! Bake them, let them cool completely, then freeze them glazed or unglazed in an airtight container for up to a month. Reheat gently in the microwave or oven. They’re almost as good as fresh!
Why are my cinnamon rolls dry?
Chances are you overbaked them or used too much flour in the dough. Remember, golden brown, not dark brown. And resist that urge to add too much flour during kneading!
Can I make them bigger?
Sure, you can cut thicker slices, but they’ll need a bit longer to bake, and they might lose some of their “cute tiny” appeal. But hey, you do you!
Final Thoughts
There you have it, folks: tiny cinnamon rolls that deliver maximum joy with minimum fuss. This recipe is your new secret weapon for impressing guests (or just yourself, **FYI**, which is arguably more important). So go forth, bake these beauties, and bask in the glory of warm, cinnamon-y goodness. Now go impress someone—or yourself—with your new culinary skills. You’ve earned it!


