Okay, so you’ve got this cute little chocolate cake sitting there, looking all lonely and… brown. And let’s be real, while delicious, a naked cake is just begging for a glow-up. You’re not looking to win ‘Bake Off’ here, you just want something that screams “I tried!” (or “I totally bought this and made it look fancy!”). No judgment, friend, we’re all about minimal effort, maximum impact.
Why This Decoration Guide is Awesome
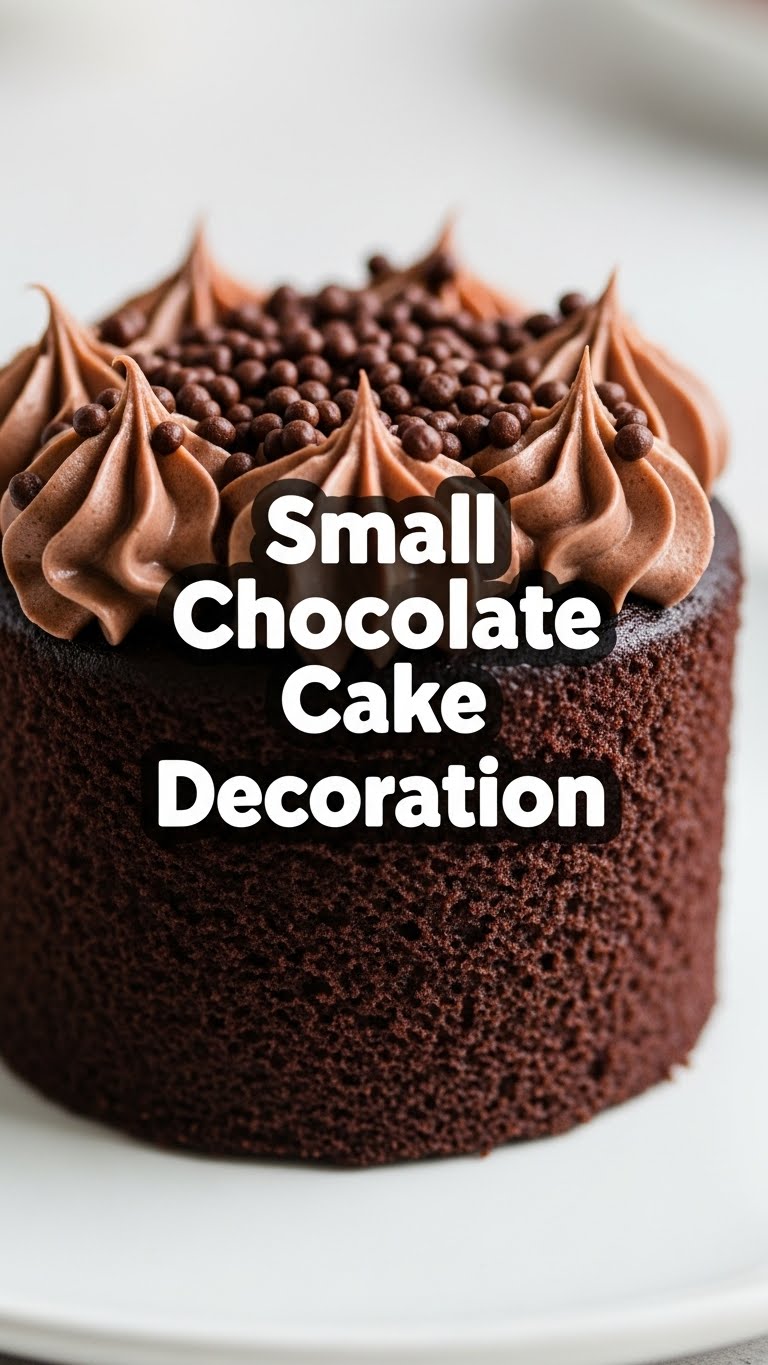
Because it’s for small cakes, meaning less surface area to mess up! This isn’t about intricate piping bags and fondant sculptures. This is about making your little chocolate delight look like it walked straight out of a trendy café, but only required about 15 minutes of actual effort. It’s idiot-proof, even I didn’t mess it up, and that’s saying something. Plus, who doesn’t love a good excuse to play with sprinkles?
Ingredients You’ll Need
Alright, gather your troops! (Or, you know, just raid your pantry and fridge.)
- Your Small Chocolate Cake: The star of the show! Hopefully it’s cooled down, otherwise, we’re making soup, not cake.
- For the Frosting/Topping: (Pick one or mix and match!)
- Store-bought Chocolate Frosting: The ultimate lazy genius move. No shame in this game.
- Homemade Ganache: (1/2 cup chocolate chips + 1/4 cup heavy cream). Because melted chocolate just hits different, IMO.
- Simple Buttercream: (1/2 stick softened butter, 1 cup powdered sugar, 1-2 tbsp milk/cream, 1/4 tsp vanilla extract). Fancy, but still easy. Add a tablespoon of cocoa powder for chocolate buttercream!
- Fun Toppings: (This is where the magic happens!)
- Sprinkles: The OG of instant party. Any color, any shape!
- Chocolate Shavings/Chips: Adds a touch of sophistication. Or just more chocolate, because why not?
- Fresh Berries: Raspberries, strawberries, blueberries – they add color, a bit of tartness, and make it look “healthy.” (Shhh, don’t tell.)
- Mini Candy Bars/Chocolates: Break ’em up, stick ’em on. Instant wow factor.
- Edible Glitter/Dust: For when you want your cake to sparkle like your personality.
- Chopped Nuts: Pecans, walnuts, almonds – for that rustic, crunchy vibe.
Step-by-Step Instructions
Let’s get this tiny cake looking fabulous! Remember, active voice, active awesome decorator!
- Cool it Down, Buttercup: Seriously, if your cake isn’t completely cool, stop. Go watch some Netflix. Come back later. Applying frosting to a warm cake is a one-way ticket to a soupy mess.
- Prep Your Topping:
- Store-bought: Just pop open the lid. Easy peasy.
- Ganache: Heat cream until just simmering. Pour over chocolate chips. Let sit for 5 minutes, then stir until smooth and glossy. Let it cool a bit until it’s thick but still pourable.
- Buttercream: Beat softened butter until fluffy. Gradually add powdered sugar, then milk/cream and vanilla (and cocoa if using). Beat until smooth and luscious.
- The (Optional, but Recommended) Crumb Coat: Apply a very thin layer of your chosen frosting/ganache all over the cake. This traps any stray crumbs. Chill the cake for 10-15 minutes in the fridge. This makes the final layer so much smoother.
- The Main Event – Frosting Time! Take a generous dollop of your frosting/ganache and spread it evenly over the top and sides of your cake. Don’t stress about perfect smoothness; a rustic swirl with a spoon or offset spatula looks charming on a small cake.
- Decorate Like a Boss: This is the fun part!
- Sprinkles: Just go wild! Roll the sides of the cake in sprinkles, or just shower them generously on top.
- Berries: Arrange them artfully on top, or around the base.
- Chocolate: Grate some chocolate over the top, or strategically place chocolate chips/shavings.
- Mix and Match: A ring of raspberries in the middle, surrounded by sprinkles? A few mini candy pieces, then a sprinkle dust-off? Your cake, your rules!
- Show It Off (Or Eat It Immediately): Once decorated, give it another 5-10 minutes in the fridge to set, especially if you used ganache or soft buttercream. Then, behold your masterpiece!
Common Mistakes to Avoid
We’ve all been there, trust me. Learn from my… extensive field research.
- Frosting a Warm Cake: As mentioned, don’t do it. It’s like trying to put a sweater on a melting snowman. Total disaster.
- Overmixing Buttercream: If you’re making buttercream, stop mixing once it’s smooth. Overmixing incorporates too much air, making it less stable and sometimes curdled-looking.
- Not Chilling the Crumb Coat: Thinking you can skip this step and still have a pristine finish? Rookie mistake. Embrace the chill!
- Trying to Achieve Perfection: It’s a small, fun cake, not a wedding cake. Embrace the imperfections; they add character! Plus, who’s really inspecting it that closely before devouring it?
- Forgetting to Taste the Frosting: I mean, why even bother if you’re not taste-testing every step of the way? It’s quality control, people!
Alternatives & Substitutions
Feeling creative or just missing an ingredient? No worries, we’ve got options!
- No Heavy Cream for Ganache? You *can* use full-fat milk, but the ganache won’t be as rich or set as firmly. Heavy cream is king here, FYI.
- Out of Butter for Buttercream? Margarine can work in a pinch, but honestly, why hurt your soul like that? Butter just tastes better. Your call, though.
- Want a Different Frosting Flavor? Add a little instant coffee to chocolate buttercream for a mocha twist, or orange zest for a chocolate-orange vibe.
- No Fresh Berries? Canned cherries (drained!), dried cranberries, or even some thinly sliced apple can work for a rustic touch.
- Chocolate Shortage? (Gasp!) Use crushed cookies (Oreos, Biscoff), toasted coconut, or even a simple dusting of powdered sugar for a snowy effect.
FAQ (Frequently Asked Questions)
- Do I need special tools like a piping bag?
Nope! A butter knife, a spoon, or a small offset spatula (if you’re feeling fancy) will do the trick for spreading. Your hands are your best tools for sprinkling!
- Can I use whipped cream instead of frosting?
You totally can, but be aware that whipped cream doesn’t hold up as long as frosting, especially at room temperature. It’s best eaten pretty quickly after decorating.
- How long will my decorated cake last?
If stored in an airtight container in the fridge, typically 3-5 days. If you used fresh berries, they might get a bit soft after a day or two, so plan accordingly.
- What if my ganache is too thick/thin?
Too thick? Gently warm it over a double boiler or in the microwave for a few seconds, stirring until it loosens. Too thin? Add a few more chocolate chips, let them melt, then stir. Or pop it in the fridge for a few minutes to thicken up.
- My buttercream is lumpy, help!
Lumps are usually from cold butter or not sifting your powdered sugar. Make sure your butter is truly softened, and if you can, give that powdered sugar a quick sift before adding it. A little extra beating often smooths things out!
- Where do I get a small chocolate cake if I don’t want to bake?
Grocery store bakery sections, local cafes, or even some individual brownie/cake slices can be given this treatment. Get creative!
Final Thoughts
See? That wasn’t scary at all! You just turned a humble little chocolate cake into a showstopper, or at least a really delicious, pretty treat for yourself (which is arguably more important). Now go impress someone—or yourself—with your new culinary *~artistry~*. You’ve earned it! And maybe a slice of that cake, too. 😉


