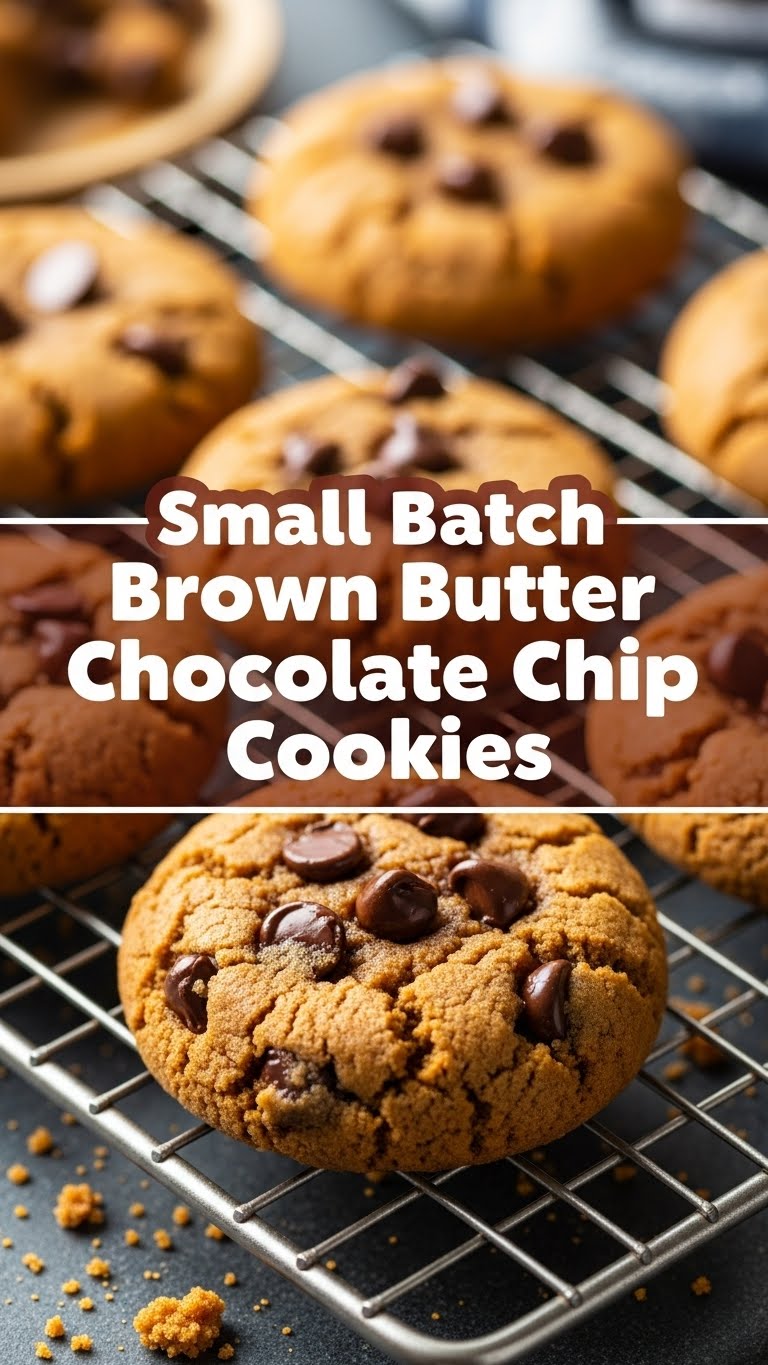
So, you’ve got that cookie craving hitting hard, but the thought of making a giant batch that’ll either go stale or disappear into your own personal abyss (no judgment here!) is just… nope. You want *just enough* cookies. Like, for you, maybe a friend, or your secret midnight snack stash. You’re in luck, my friend. We’re diving into the glorious world of Small Batch Brown Butter Chocolate Chip Cookies. Get ready for minimal effort, maximum deliciousness.
Why This Recipe is Awesome
First off, it’s small batch. Meaning, you won’t be swimming in cookies for days (unless you *want* to make it twice, which, again, no judgment). Second, it features **brown butter**. It’s basically butter’s glow-up. Adds this nutty, caramel-y depth that’s just *chef’s kiss*. Third, it’s pretty much **idiot-proof**. Seriously, if I can do it without setting off the smoke detector, you’re golden. Plus, minimal cleanup. Win-win-win. And did I mention the chewiness? Oh, the chewiness!
Ingredients You’ll Need
- Unsalted Butter (4 tbsp / 1/4 cup): Just a smidge. The good stuff. We’re browning it, baby!
- Granulated Sugar (2 tbsp): The classic sweetness.
- Light Brown Sugar, packed (1/4 cup): This is your secret weapon for chewiness and that lovely caramel note. Don’t skimp!
- Egg Yolk (1 large): We’re going for chewy perfection, not a cakey disaster. Save the white for an omelet, or just toss it (I won’t tell).
- Vanilla Extract (1/2 tsp): Don’t even *think* about skipping this. It’s the soul of the cookie. Good quality, please!
- All-Purpose Flour (1/2 cup + 1 tbsp): Standard stuff. No fancy flours required unless you’re feeling adventurous.
- Baking Soda (1/4 tsp): For a little lift and spread.
- Salt (1/4 tsp): Balances the sweetness and makes everything pop. Trust me on this one.
- Chocolate Chips (1/4 cup + 2 tbsp): Your favorite kind. I’m a dark chocolate fan, but you do you! A mix of chips and chopped chocolate is also divine.
Step-by-Step Instructions
- Brown the Butter: Grab a small, light-colored saucepan (so you can see the magic happen!). Melt the butter over medium heat. Keep stirring, and it will foam, then turn clear, then start getting these lovely little golden-brown bits at the bottom. It’ll smell nutty, like toasted hazelnuts. As soon as you see those brown bits and smell the nuttiness (about 3-5 minutes), immediately pour it into a heatproof bowl to stop the cooking. **Don’t burn it!**
- Cool it Down: Let that glorious brown butter cool for about 10-15 minutes. It should still be liquid but not screaming hot.
- Mix the Wet Stuff: Add the granulated sugar, brown sugar, egg yolk, and vanilla extract to the cooled brown butter. Whisk vigorously for about 1 minute until it’s lightened in color and looks smooth and creamy. You’re building structure here, so whisk well!
- Combine Dry Ingredients: In a separate small bowl, whisk together the flour, baking soda, and salt.
- Bring It All Together: Gradually add the dry ingredients to the wet ingredients, mixing with a spatula or wooden spoon until *just* combined. **Stop mixing** as soon as you don’t see any dry streaks. Overmixing equals tough cookies, and we’re not about that life.
- Chocolate Time: Fold in those chocolate chips. Make sure they’re evenly distributed.
- Chill Out, Dough! Cover the bowl and refrigerate the dough for at least 30 minutes, or up to 2 hours. This is crucial for flavor development and preventing sad, flat cookies. **Seriously, don’t skip this.**
- Preheat & Prep: While the dough chills, preheat your oven to 350°F (175°C). Line a baking sheet with parchment paper or a silicone mat.
- Scoop & Bake: Scoop the dough into 3-4 equal balls (about 2 tablespoons each). Place them on the prepared baking sheet, leaving some space between them.
- Bake to Perfection: Bake for 10-12 minutes, or until the edges are golden brown and set, but the centers still look a *tiny* bit soft and gooey.
- Cool & Devour: Let the cookies cool on the baking sheet for 5 minutes before transferring them to a wire rack to cool completely (if you can wait that long, LOL). Enjoy your masterpiece!
Common Mistakes to Avoid
- Not browning the butter enough: Don’t rush it! That nutty aroma and deep color are key to the flavor. It should smell like toasted nuts, not burnt popcorn.
- Burning the butter: On the flip side, keep an eye on it! If it smells acrid or looks black, you’ve gone too far. Start over; burnt butter is a no-go.
- Overmixing the dough: I said it once, I’ll say it again: **stop mixing as soon as the flour disappears.** Overworking the gluten makes for tough, less tender cookies.
- Skipping the chill time: Rookie mistake! Your cookies will spread into sad, flat pancakes. That chill time allows the butter to solidify and the flavors to meld. Patience, grasshopper.
- Overbaking: Pull them out when the edges are set but the center still looks a *tiny* bit soft. They’ll continue to firm up as they cool on the hot baking sheet. A slightly underbaked cookie is better than a dry one, IMO.
Alternatives & Substitutions
Feeling a little wild? Here are some simple swaps to keep things interesting:
- Chocolate Adventure: Swap out the chips for chopped dark chocolate bars, milk chocolate, white chocolate chunks, or even M&Ms if you’re feeling playful. Mini chips work great too!
- Nutty Crunch: Add a tablespoon or two of finely chopped walnuts or pecans to the dough for an extra layer of texture and flavor.
- Salt Bae Moment: Sprinkle a tiny pinch of flaky sea salt on top of the cookies right after they come out of the oven. It enhances the chocolate and brown butter beautifully.
- Flour Power: While I haven’t personally tested it, a good 1:1 gluten-free flour blend *might* work here. Just be aware the texture could be slightly different. Proceed with caution, my GF friends.
FAQ (Frequently Asked Questions)
Got questions? I’ve got answers (mostly good ones).
- Do I *have* to chill the dough? YES. Unless you like sad, flat, spreading-into-one-giant-blob cookies. The chill time is non-negotiable for that perfect texture and flavor.
- Can I double the recipe? Absolutely! Just double all the ingredients. Don’t blame me when you eat them all, though. You’ve been warned.
- My brown butter got too dark! Is it ruined? If it smells burnt, like a campfire that got out of control, then yes, probably. Best to start over. It’s better to have lightly browned butter than acrid, burnt butter.
- Can I use a whole egg instead of just the yolk? You *can*, but the extra egg white will make the cookies slightly more cakey and less chewy. We’re going for ultimate chewiness here, remember? The yolk provides richness and chew.
- How long do these small-batch wonders last? In my house? About an hour, maybe two. Realistically, store them in an airtight container at room temperature for 3-4 days. But honestly, they’re best on day one!
- My cookies came out flat. What happened? Likely culprits: warm butter, skipping the chill time, or an oven that’s not hot enough. Make sure your butter has cooled, your dough is chilled, and your oven is properly preheated!
Final Thoughts
See? That wasn’t so scary, was it? You just whipped up a batch of glorious, chewy, chocolate-packed cookies with that irresistible brown butter magic. You’ve managed to satisfy that intense craving without committing to a full-on bakery production. Now go forth and conquer your cravings, share with a lucky soul (or don’t, I won’t tell), and bask in the glory of your culinary prowess. You totally nailed it!


