Short, Catchy Intro
So you’re craving something tasty but too lazy to spend forever in the kitchen, huh? Same. And let’s be real, sometimes you just need that sweet, creamy hug only a good flan can give. But wait, isn’t flan super complicated and fancy? Nuh-uh! We’re making the “impress your friends with minimal effort” version today. Get ready to whip up a slice of heaven that tastes like you spent all day slaving, but really, you just pressed a few buttons. You’re welcome.
Why This Recipe is Awesome
Okay, first things first: **this recipe is practically idiot-proof.** Seriously, if I can do it without setting off the smoke alarm (mostly), you totally can too. It uses super common ingredients you probably already have lurking in your pantry, meaning no special trips to a fancy store. Plus, it looks incredibly elegant when it’s done, making you seem like a culinary genius when, in reality, you just poured some stuff into a mold. It’s creamy, it’s custardy, it’s got that dreamy caramel goo – basically, it’s a dessert triple threat. And **it’s surprisingly quick to assemble** before it does its magic in the oven. Minimal fuss, maximum deliciousness. What’s not to love?
Ingredients You’ll Need
Gather your goods, my friend! Here’s what you’ll be needing for this creamy dream:
- For the Caramel:
- 1 cup granulated sugar (the regular white stuff)
- ¼ cup water (just plain tap water, no fancy spring water required)
- For the Flan:
- 1 can (14 oz) sweetened condensed milk (the sticky, sweet good stuff)
- 1 can (12 oz) evaporated milk (don’t mix this up with condensed milk, they’re different!)
- 4 large eggs (room temp if you’re feeling fancy, but straight from the fridge works too, don’t sweat it)
- 1 teaspoon vanilla extract (the real deal if you have it, imitation is fine in a pinch)
- A pinch of salt (just to make everything else taste even better, trust me)
- Equipment:
- A 9-inch round cake pan or a flan mold (metal or glass, your call)
- A larger baking dish for your water bath (big enough to fit your flan mold inside)
- A blender (for ultimate laziness and smoothness) or a whisk and a bowl (if you like arm workouts)
Step-by-Step Instructions
Alright, chef, let’s get this show on the road!
- Caramel Time! Grab your flan mold or cake pan. In it, combine the 1 cup of sugar and ¼ cup water. Pop it onto your stove over medium heat. Don’t stir it initially! Just let the sugar dissolve and start bubbling.
- Once it begins to bubble, you can gently swirl the pan occasionally (no spoons!). Watch it like a hawk – it’ll go from clear to amber to deep golden brown. **The moment it’s a rich amber color, take it off the heat immediately!** It burns fast. Carefully swirl it around the bottom and slightly up the sides of your pan to coat evenly. Set aside.
- Flan Batter Blitz: Preheat your oven to 350°F (175°C). In your blender (or a large bowl with a whisk), combine the sweetened condensed milk, evaporated milk, eggs, vanilla extract, and a pinch of salt. Blend until super smooth, about 30 seconds. No lumps allowed!
- Assemble the Magic: Carefully pour the flan mixture over the hardened caramel in your prepared pan. Place this pan inside your larger baking dish. Now, carefully pour hot water into the larger baking dish, making sure it comes about halfway up the sides of your flan pan. This is your water bath, important for that silky texture!
- Bake it Up: Carefully transfer the whole contraption (water bath and all) to your preheated oven. Bake for about 50-60 minutes, or until the edges are set but the center still has a slight jiggle. A knife inserted near the edge should come out clean.
- Cool Down: Once baked, carefully remove the flan pan from the water bath (the water will be hot!). Let it cool on a wire rack at room temperature for about an hour. Then, cover it with plastic wrap and chill in the fridge for at least 4 hours, or ideally, overnight. **Patience is a virtue here, don’t rush it!**
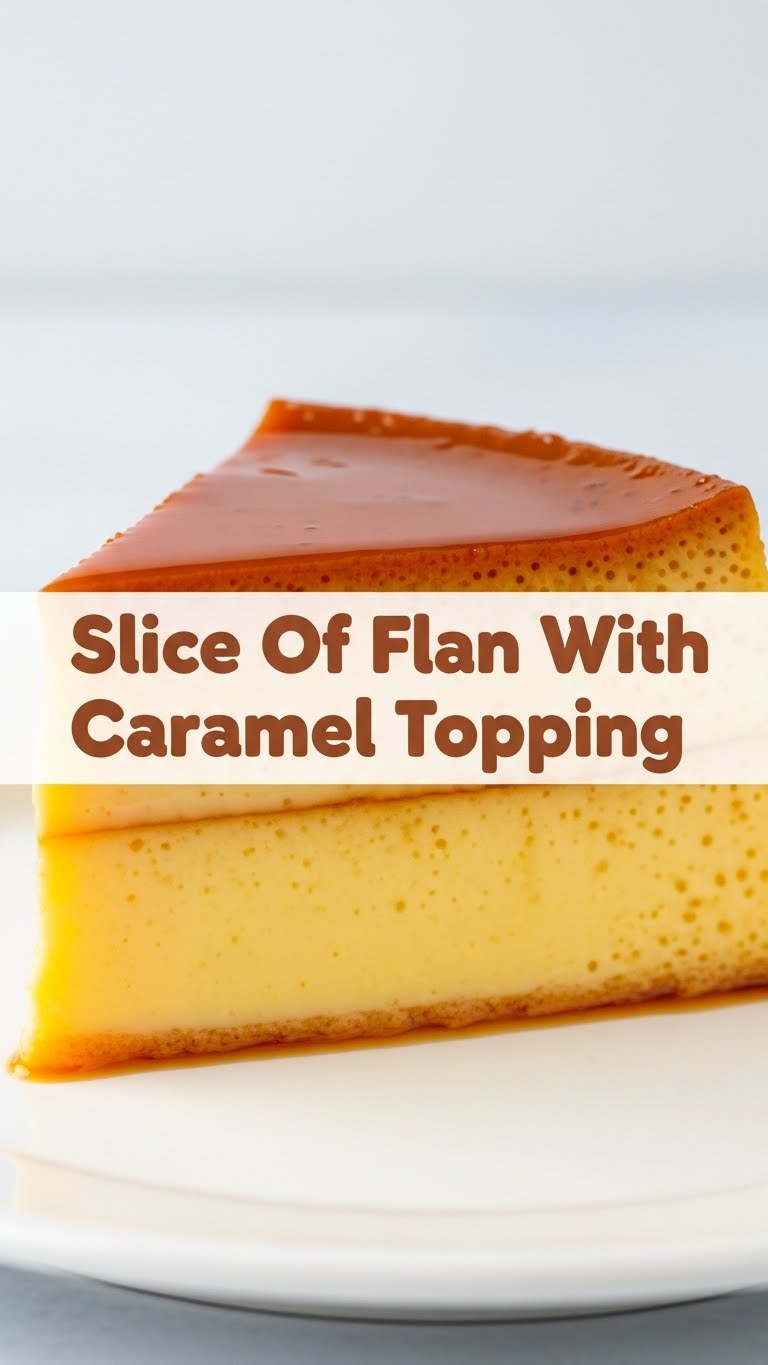
- The Grand Reveal: When you’re ready to serve, run a thin knife around the edge of the flan to loosen it. Place a serving plate upside down over the flan pan, then confidently flip the whole thing over! Give it a little shake if it’s being stubborn. The flan should slide out, bathing in its glorious caramel sauce. Slice and devour!
Common Mistakes to Avoid
Don’t be that person. Seriously.
- **Burning the Caramel:** Rookie mistake number one! It goes from perfect to burnt garbage in like, 0.5 seconds. Stay vigilant, my friend. **A slightly lighter caramel is better than a bitter, burnt one.**
- **Not Using a Water Bath:** Thinking you can skip this? Think again! The water bath (bain-marie, if you want to sound fancy) is crucial for even cooking and that super smooth, creamy texture. Otherwise, you’ll end up with a rubbery, eggy mess.
- **Under-Chilling:** Trying to flip it warm? You’re asking for a flan disaster. It needs that fridge time to fully set and firm up. Otherwise, it’ll just collapse into a sad, jiggly puddle.
- **Over-baking:** If you bake it too long, it’ll get little holes and taste more like an omelet than a luscious dessert. Keep an eye on that jiggle!
Alternatives & Substitutions
Feeling adventurous or just missing an ingredient? No worries, we can usually make it work!
- **Milk Combo:** Can’t find evaporated milk? You can sometimes get away with using more whole milk, but the texture might be slightly less rich. Some folks even use a splash of heavy cream for extra decadence. YOLO, right?
- **Flavor Boosts:** Feeling vanilla-d out? Try adding a pinch of cinnamon, a tiny bit of almond extract (be careful, it’s strong!), or even some orange zest to the flan mixture. Your flan, your rules.
- **Individual Servings:** Instead of one big flan, you can pour the mixture into ramekins. Just adjust the baking time down to about 30-40 minutes. Perfect for portion control (or convincing yourself you only ate one).
- **Store-Bought Caramel:** Okay, okay, if you’re *really* lazy, you can totally use store-bought caramel sauce. But IMO, homemade caramel is superior and adds that extra “wow” factor. But hey, no judgment here!
FAQ (Frequently Asked Questions)
Got questions? I’ve got (casual) answers!
- **”My caramel hardened instantly! Did I mess up?”** Nope, that’s totally normal! It’s supposed to. Once it cools, it becomes a hard candy layer. It’ll melt back into a glorious sauce when the flan bakes and chills. Just make sure you coated the pan before it got rock hard.
- **”My flan has bubbles on top, what happened?”** Probably blended it too vigorously or poured it in too quickly. Next time, let the batter sit for 5-10 minutes before pouring, or pour it through a fine-mesh sieve to catch those pesky air bubbles. It still tastes great though, so don’t fret!
- **”Can I use a different size pan?”** Sure, but you might need to adjust baking times. A wider, shallower pan will bake faster; a narrower, deeper one will take longer. Just keep an eye on that jiggle!
- **”How do I know if it’s cooked enough?”** The edges should be set, but the center will still have a slight wobble. Think of it like a perfectly set Jell-O – not liquid, but not completely rigid. A knife inserted about an inch from the edge should come out clean.
- **”How long does flan last in the fridge?”** Covered properly, it’s usually good for 3-4 days. But let’s be real, it rarely lasts that long, right?
Final Thoughts
And there you have it, folks! Your very own, incredibly delicious, ridiculously easy flan. You just whipped up a dessert that tastes like a fancy restaurant dish but required minimal stress and maximum chill. Go on, pat yourself on the back, you culinary rockstar! Now go impress someone—or yourself—with your new culinary skills. You’ve earned it! Enjoy that creamy, dreamy, caramel-y goodness. You deserve every single bite.

