So, you’ve scrolled past one too many perfect-looking pies on your feed, and now that sweet, cinnamony craving has hit you like a runaway freight train, huh? And not just any pie – we’re talking a classic apple pie, but with those delightfully chewy little bursts of sunshine: raisins! Look, I get it. Life’s short, and sometimes you just need that warm, cozy, ridiculously tasty hug in a pie plate. You want to make something amazing without needing a culinary degree or a full day off work. Good news, my friend. You’ve come to the right place. Forget the drama; let’s bake some deliciousness!
Why This Recipe is Awesome
Okay, let’s be real. There are a million apple pie recipes out there. So why *this* one? Because it’s the one where we embrace the raisins! Yes, I said it. For those of you who think raisins in apple pie are controversial, I say: you’re missing out on a textural and flavor party. This recipe is designed to be **ridiculously easy**, even if your past baking attempts have resulted in something resembling a charcoal briquette. We’re talking flaky crust, perfectly tender apples, and those sweet, plump raisins that add a little chew and a whole lotta “oomph.” It’s basically idiot-proof, and trust me, if I can make it without setting off the smoke alarm, so can you. Plus, your kitchen will smell like pure autumnal bliss, and who doesn’t want that?
Ingredients You’ll Need
Gather ’round, my fellow food adventurer! Here’s what you’ll need to conjure up this masterpiece. No fancy-pants, hard-to-find stuff, promise!
- **Apples (6-8 medium):** A mix is best! Think Granny Smith for tartness (to balance the sweet) and something like Fuji or Honeycrisp for flavor and texture. Don’t be shy; aim for about 6-8 cups sliced.
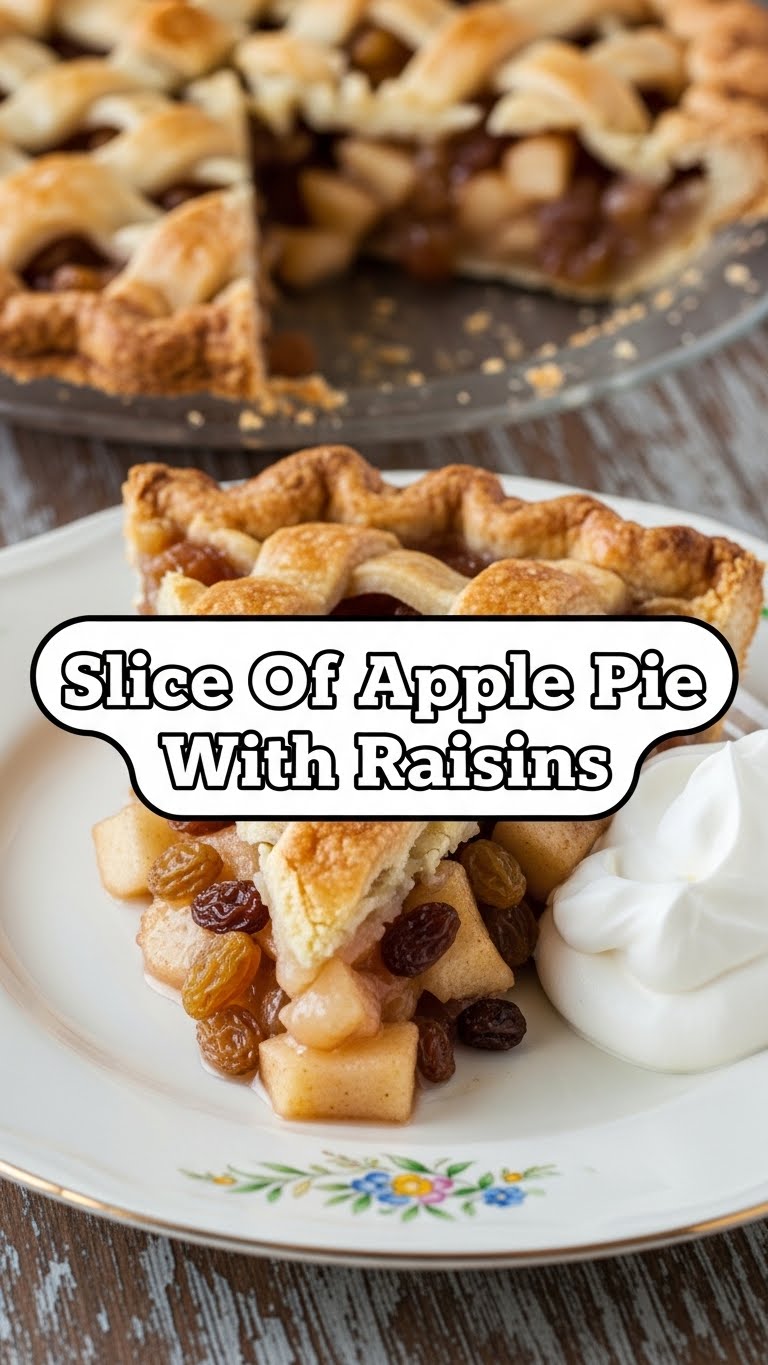
- **Golden Raisins (½ cup):** Or regular ones, if you’re feeling wild. Just don’t skip ’em! They add that lovely chew and a burst of concentrated sweetness.
- **Granulated Sugar (½ cup):** The OG sweetener.
- **Brown Sugar (¼ cup, packed):** Adds a deeper, caramel-y note. Pure magic.
- **All-Purpose Flour or Cornstarch (¼ cup):** Our thickening agent. No one wants a watery pie, am I right?
- **Ground Cinnamon (1 tsp):** Because what’s apple pie without cinnamon? A sad, sad thing, that’s what.
- **Nutmeg (½ tsp):** Freshly grated if you’re feeling fancy, but pre-ground works just fine.
- **Pinch of Salt:** Don’t skip this! It enhances all the other flavors. Science!
- **Lemon Juice (1 tbsp):** Keeps your apples from browning and adds a much-needed zing.
- **Unsalted Butter (2 tbsp):** Cut into small pieces, for extra richness in the filling.
- **Pre-made Pie Crusts (2 discs):** Seriously, save yourself the stress. Unless you *love* making crust from scratch, then go for it, you superhero!
- **Egg Wash (1 egg + 1 tbsp water, optional):** For that glorious golden-brown, shiny crust.
Step-by-Step Instructions
Alright, apron on, game face ready! Let’s get baking. These steps are practically foolproof, I swear.
- **Prep the Apples & Raisins:** First, peel, core, and slice your apples into roughly ¼-inch thick pieces. Aim for consistency so they cook evenly. Toss them into a large bowl. Now, add those glorious raisins to the apples. You can soak the raisins in hot water for 10 minutes beforehand if you want them extra plump, then drain them.
- **Mix the Filling:** In a separate small bowl, whisk together the granulated sugar, brown sugar, flour (or cornstarch), cinnamon, nutmeg, and salt. Sprinkle this dry mixture over the apples and raisins. Add the lemon juice. Using your hands (the best tools!), gently toss everything until the apples are well coated.
- **Assemble the Bottom Crust:** Lightly flour your work surface and unroll one of the pie crusts. Carefully place it into a 9-inch pie plate. Trim the edges, leaving about a ½-inch overhang. Don’t worry about perfection; rustic is charming!
- **Fill ‘Er Up!:** Pour the apple-raisin mixture into the pie crust. Try to mound it slightly in the center, as the apples will cook down. Dot the top of the filling with the small pieces of butter. This creates pockets of deliciousness!
- **Top it Off:** Unroll the second pie crust. You can place it directly over the filling, or get fancy and do a lattice top (there are tons of quick tutorials online if you’re feeling ambitious!). Trim the edges, leaving a ½-inch overhang, and then crimp the top and bottom crusts together to seal. If you have a full top crust, don’t forget to cut a few slits in the top for steam to escape.
- **Egg Wash & Bake:** If using, whisk the egg and water together for the egg wash, then brush it gently over the top crust. Sprinkle with a little extra sugar for sparkle, if you like. Now, here’s the crucial part: **preheat your oven to 425°F (220°C)**. Place the pie on a baking sheet (to catch any drips) and bake for 15-20 minutes at 425°F.
- **Reduce & Continue Baking:** After the initial blast, reduce the oven temperature to 375°F (190°C) and continue baking for another 35-45 minutes, or until the crust is golden brown and the filling is bubbly. If the crust starts browning too quickly, tent it loosely with aluminum foil.
- **The Hardest Part: Cool Down:** Remove the pie from the oven and, I know this is tough, but let it cool on a wire rack for at least 2-3 hours before slicing. This allows the filling to set properly. Patience, my friend, patience!
Common Mistakes to Avoid
Listen up, buttercup! We’re all human, and mistakes happen. But here are a few rookie errors we can totally skip to ensure pie perfection:
- **Not Preheating the Oven:** Seriously, don’t even think about it. A cold oven equals a sad, soggy crust. **Always preheat!**
- **Overfilling the Pie:** More isn’t always better, especially when it results in apple goo overflowing onto your oven floor. Leave a little room at the top.
- **Under-Baking:** This is a cardinal sin. If your crust isn’t golden and your filling isn’t bubbling enthusiastically, it needs more time. Raw apples are no fun.
- **Skipping the Cooling Time:** I know, the smell is intoxicating, but cutting into a hot pie will result in a runny, messy slice. Let it cool; it’s worth it, I promise.
- **Forgetting the Raisins:** Okay, this isn’t a “mistake” in the traditional sense, but if you’re making *this* recipe, you *need* the raisins. It’s in the title!
Alternatives & Substitutions
Feeling a little adventurous, or just missing an ingredient? No stress, we can totally roll with it!
- **Apple Varieties:** Don’t have the exact apple types? No biggie! Just aim for a mix of sweet and tart. Even just one type will still make a delicious pie, though.
- **Raisin Alternatives:** If you absolutely, positively *cannot* stand raisins (and we can still be friends, barely 😉), dried cranberries or chopped dried apricots would be a decent substitution for a different kind of chew and tang.
- **Spice It Up:** Want more warmth? Add a pinch of ground ginger or allspice. Love cardamom? A tiny dash would be divine.
- **Crust From Scratch:** If you’re a baking wizard and prefer homemade, go for it! Just make sure it’s a good, sturdy pastry that can hold all that delicious filling.
- **Sugar Swap:** You can adjust the amount of sugar to your preference or the sweetness of your apples. For a slightly less sweet pie, reduce by ¼ cup.
FAQ (Frequently Asked Questions)
Got questions? I’ve got answers! Mostly. Maybe.
- **”Can I use all Granny Smiths for the apples?”** Well, technically yes, but why make your pie *that* tart? A mix gives you a much more balanced flavor profile. Think of it as a flavor orchestra!
- **”Do I *really* have to add the raisins? I’m not a fan…”** Is that even a question?! This is a *Slice Of Apple Pie With Raisins* recipe! You can try without, but then it’s just… apple pie. And we’re going for extra special here. Just kidding (mostly!). You can omit them, but you’ll miss out on that lovely chew.
- **”How do I prevent a soggy bottom crust?”** Ah, the age-old pie dilemma! A hot oven start helps. Also, making sure your filling isn’t too wet (that’s what the flour is for!) and giving it enough time to bake thoroughly. Some folks swear by blind baking the bottom crust first, but for this recipe, we’re keeping it simple.
- **”Can I make the filling ahead of time?”** You can prep the apples a few hours in advance, tossing them with the lemon juice to prevent browning. But it’s best to mix the sugar/spice mixture and assemble the pie right before baking to avoid a super watery filling.
- **”How long does apple pie last?”** Covered, at room temperature for a day or two, or in the fridge for up to 4-5 days. If it lasts that long without being devoured, I’d be impressed!
- **”My crust is browning too fast, but the inside isn’t done! Help!”** Rookie mistake… just kidding! This happens. Simply create a little “tent” with aluminum foil over the pie to shield the crust, and let the inside continue baking.
Final Thoughts
Phew! You made it. You’ve now officially graduated from “pie admirer” to “pie creator.” See? I told you it wasn’t that scary. This apple pie with raisins is more than just a dessert; it’s a warm hug, a cozy blanket, and a delicious trip down memory lane all rolled into one. So go ahead, grab a slice (or two, I won’t tell), maybe a scoop of vanilla ice cream, and bask in your glorious achievement. Now go impress someone—or yourself—with your new culinary skills. You’ve earned it!


