So, you’re craving something warm, sweet, and comforting, but the idea of spending hours in the kitchen sounds about as appealing as doing your taxes on a Saturday, huh? Same, friend, same. We’ve all been there – staring into the abyss of an empty fridge, fantasizing about something glorious, but also really, really wanting to keep our lounge-wear on. Well, buckle up, buttercup, because I’m about to drop a recipe bomb on you that’s so easy, so delicious, and so ridiculously satisfying, you’ll wonder why you ever bothered with those complicated, multi-page epics.
Why This Recipe is Awesome
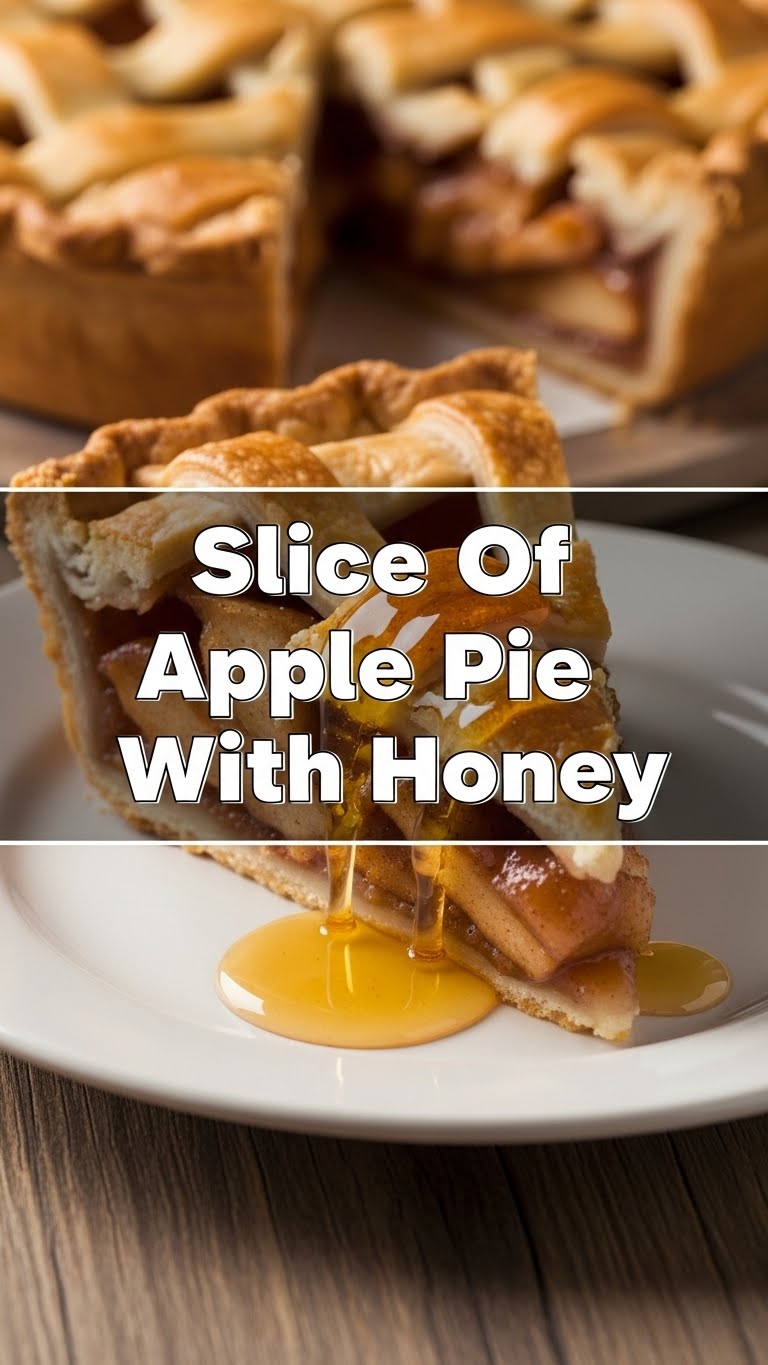
Let’s be real: who has time for fussy, from-scratch pie crusts on a Tuesday? Not me, and probably not you. This recipe is your secret weapon, your culinary shortcut to dessert heaven. It’s **idiot-proof**, I swear. I made it after a particularly long day, and not only did I not burn down the kitchen, but it actually tasted like something a fancy bakery would sell. The star here isn’t just the apples; it’s that glorious, sticky honey that takes a regular apple pie slice and elevates it to “OMG, what is this magic?!” status. Plus, it uses a pre-made crust, which means you’re basically 75% done before you even begin. Less stress, more pie. You’re welcome.
Ingredients You’ll Need
Gather ’round, my sweet-toothed companions! Here’s your shopping list for a slice of pure joy:
- **1 single-serving pre-made pie crust** (Because life’s too short to roll dough when you’re craving pie *now*.)
- **1 large apple** (Or two small ones. Granny Smith is my go-to for that lovely tart balance, but a Honeycrisp or Fuji works if you like it sweeter. Don’t be shy!)
- **2-3 tablespoons honey** (The good stuff, if you have it! Local honey adds extra character, IMO.)
- **1 tablespoon unsalted butter**, melted (Because butter makes everything better, it’s a scientific fact.)
- **1/4 teaspoon ground cinnamon** (Or a tiny pinch of nutmeg if you’re feeling spicy.)
- **A tiny pinch of salt** (Don’t skip this! It makes all the sweet stuff taste even sweeter.)
- **Optional: A drizzle of extra honey** for serving (Highly recommended, obviously.)
Step-by-Step Instructions
- **Preheat Power-Up:** First things first, get that oven hot! Set it to **375°F (190°C)**. Trust me, waiting for the oven to preheat *after* everything is prepped is just a recipe for hangry impatience.
- **Apple Prep Party:** Grab your apple. Peel it (or don’t, if you’re feeling rustic and rebellious!). Core it, then slice it thinly. We’re talking about 1/8 to 1/4 inch thick. Thinner slices cook faster and are easier to arrange.
- **Mix Master:** In a medium bowl, combine your sliced apples, honey, melted butter, cinnamon, and that tiny pinch of salt. Toss everything gently until the apples are glistening and coated. It should smell heavenly already, FYI.
- **Crust Comfort:** Unroll your pre-made pie crust. If it’s frozen, let it thaw a bit on the counter. Carefully press it into a small pie dish or even a sturdy oven-safe ramekin if you’re making a super individual portion. Trim any huge overhangs, but don’t worry about perfection. Rustic is charming!
- **Fill ‘er Up!:** Scoop your apple mixture into the crust. Pile those apples high! They’ll shrink down a bit as they cook. You can arrange them in a pretty pattern if you’re feeling fancy, or just dump ’em in. No judgment here.
- **Bake Off!:** Pop your pie into the preheated oven. Bake for about **20-30 minutes**, or until the crust is golden brown and the apples are fork-tender. If the crust starts browning too fast, you can loosely tent it with aluminum foil.
- **Honey Drizzle Finale:** Once baked, let your pie cool for a few minutes. This is the hardest part, I know. Then, slice it up and, for an extra touch of decadence, drizzle with a little more honey just before serving. Boom!
Common Mistakes to Avoid
Nobody’s perfect, but we can avoid some common pitfalls, right?
- **Not Preheating the Oven:** Rookie mistake! Your pie needs that initial burst of heat to set the crust properly. Don’t rush it.
- **Overfilling the Crust:** We all love apples, but too much filling can lead to a soupy mess or a crust that overflows. A little space at the top is a good thing.
- **Under-baking:** Resist the urge to pull it out too early! Make sure the crust is truly golden and the apples are tender. A pale crust is a sad crust.
- **Eating It Immediately:** Okay, this isn’t a *mistake* per se, but letting it cool for 10-15 minutes allows the filling to set a bit, preventing a lava-like explosion of apple-honey goodness all over your chin. Patience, young grasshopper!
Alternatives & Substitutions
Feeling adventurous? Here are a few ways to tweak this winner:
- **Spice it Up:** Not a cinnamon fan? Try a pinch of cardamom for a sophisticated twist, or a tiny grating of fresh ginger for some zing.
- **Apple Varieties:** While I love a good Granny Smith for its tartness, feel free to experiment! Gala or Fuji will give you a sweeter pie. A mix of sweet and tart apples is also stellar.
- **Honey Hues:** Different kinds of honey have different flavor profiles. Clover honey is classic, but buckwheat honey will give you a darker, more robust flavor. Try what you have on hand!
- **Nutty Crunch (Optional):** Want some texture? A sprinkle of chopped walnuts or pecans (about a tablespoon) mixed with the apples adds a nice crunch.
FAQ (Frequently Asked Questions)
Got questions? I’ve got answers (mostly humorous ones).
- **Can I use frozen pie crust?** Absolutely! That’s exactly what this recipe is designed for. Thaw it according to package directions.
- **What if I don’t have butter? Can I use oil?** Well, technically yes, but why hurt your soul like that? Butter adds so much flavor and richness. If you absolutely *must*, a neutral oil like canola or vegetable oil could work in a pinch, but the flavor won’t be as glorious.
- **My pie crust is getting too dark too fast! Help!** Don’t panic! Just loosely tent a piece of aluminum foil over the pie. That’ll shield the crust while the apples finish cooking.
- **Can I add more honey? I really love honey.** You do you, boo! Add another tablespoon or two to the apple mixture if you want it super sweet and gooey. Just be mindful it might make the filling a little runnier.
- **How do I know the apples are cooked through?** Stick a knife or a fork into them. If they slide in easily with minimal resistance, they’re good to go.
- **Can I make a bigger pie?** Of course! Just scale up your ingredients (maybe 3-4 apples for a full 9-inch pie, 1/4 cup honey, 2 tablespoons butter, etc.) and bake for a longer time, likely 45-60 minutes, checking for doneness.
Final Thoughts
See? That wasn’t scary at all! You just whipped up a slice of apple pie with honey that’s probably already making your kitchen smell like a cozy autumn dream. This little gem is perfect for a solo treat, or if you’re feeling generous, sharing with a super special someone (emphasis on *super special* because it’s that good). Now go impress someone – or, more importantly, yourself – with your new culinary skills. You’ve earned it, my friend. Dig in!


