So, you’re craving something decadently chocolatey but the thought of spending an entire afternoon in the kitchen makes you want to crawl under a blanket? Same, friend, same. We’re here for the good times, the delicious food, and absolutely *minimal* fuss. That’s why we’re diving into the glorious world of a Simple Chocolate Truffle Cake Design. Get ready to impress everyone (including yourself) with shockingly little effort. You’re welcome.
Why This Recipe is Awesome
Listen, this isn’t just a cake; it’s a chocolate-infused superpower that makes you look like a pastry chef without needing a culinary degree. Seriously. It’s the kind of recipe that lets you brag about your baking skills while secretly knowing you basically just melted chocolate and poured it. It’s practically idiot-proof, and if I didn’t mess it up, you definitely won’t. Plus, it uses a rich, luscious ganache that doubles as frosting and the “truffle” part, meaning less faffing about with multiple components. Win-win-win!
Ingredients You’ll Need
Gather your chocolatey arsenal! Most of these are likely chilling in your pantry already. Or they should be, for chocolate emergencies.
- Your Favorite Chocolate Cake Mix: (Yep, we’re keeping it REAL simple.) Or, if you’re feeling ambitious, your go-to scratch recipe.
- Eggs, Oil, Water: Whatever your cake mix demands. Follow its lead.
- Good Quality Dark Chocolate (at least 60% cocoa): About 1.5 cups (roughly 9-10 oz). This is crucial! Don’t skimp here; life’s too short for bad chocolate.
- Heavy Cream (aka Whipping Cream): 1 cup. This is what makes the ganache silky smooth and oh-so-dreamy.
- Unsalted Butter: 2 tablespoons. Just a little bit for that extra sheen and richness in the ganache.
- Cocoa Powder (for dusting): Unsweetened, obviously. Or sprinkles. Or both!
- Optional Embellishments: Fresh berries, chocolate shavings, a tiny edible gold leaf if you’re feeling extra bougie.
Step-by-Step Instructions
Alright, let’s get down to business. Don’t blink, you might miss a step because it’s that easy!
Bake Your Cake: Follow the instructions on your cake mix box or your chosen recipe. Grease and flour a 9-inch round cake pan like your life depends on it. Pour in the batter and bake until a toothpick inserted into the center comes out clean. Let it cool completely on a wire rack. Patience, young padawan!
Make the Glorious Ganache: While your cake cools, chop your dark chocolate into small, uniform pieces. This helps it melt evenly. Place the chopped chocolate in a heat-proof bowl.
Heat the Cream: In a small saucepan, gently heat the heavy cream over medium heat until it just begins to simmer around the edges. Don’t let it boil vigorously! As soon as you see those tiny bubbles, remove it from the heat.
Pour and Wait: Pour the hot cream directly over the chopped chocolate. Do NOT stir immediately! Let it sit for 5 minutes. This gives the hot cream time to melt the chocolate. This waiting game is surprisingly effective, IMO.
Stir to Perfection: After 5 minutes, gently whisk the mixture starting from the center and working your way out, until it’s completely smooth and glossy. Stir in the unsalted butter until fully melted and incorporated. You’ve just made magic!
Cool the Ganache: Let the ganache cool down to a spreadable consistency. It should be thick enough to cling to a spoon but still pourable. This might take 30-60 minutes at room temperature, or speed it up with short stints in the fridge (stirring frequently).
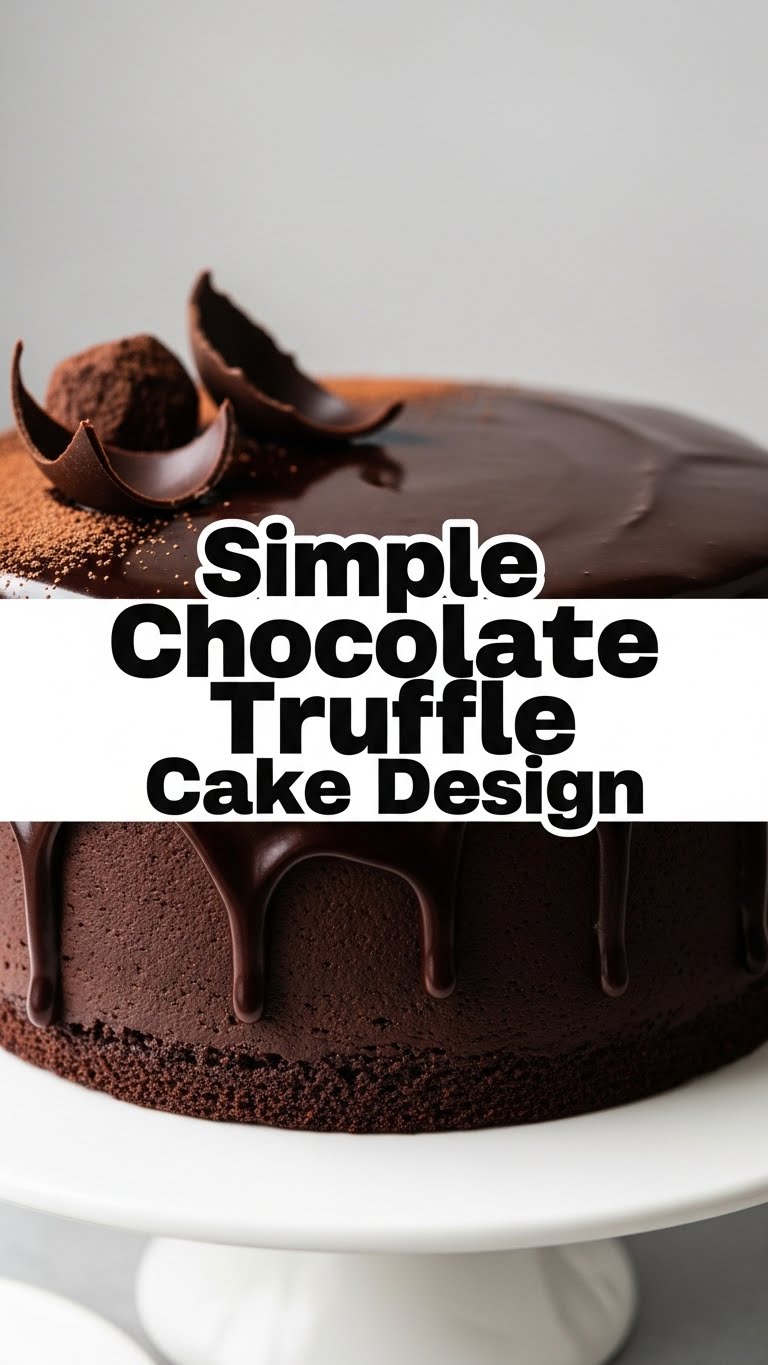
Assemble Your Masterpiece: Once your cake is completely cool and your ganache is the right consistency, place your cake on a serving plate. Pour about half of the ganache over the top, letting it drip artfully down the sides. No need for perfection here; the drips are part of the charm! Smooth the top with an offset spatula if you want.
The Truffle Effect: Let the first layer of ganache set a bit (about 15-20 minutes in the fridge). Then, pour the remaining ganache over the top, creating a thicker, more luxurious layer. Before it fully sets, sprinkle generously with cocoa powder. You can also press some chocolate shavings or fresh berries onto the sides or top for extra flair. Voila! You’re basically a dessert god/goddess.
Common Mistakes to Avoid
Nobody’s perfect, but we can avoid the glaring errors. Learn from my chocolate-stained mistakes!
- Not Cooling the Cake Enough: Trying to frost a warm cake is a one-way ticket to a melted, sludgy mess. Patience is key here.
- Overheating the Cream: Boiling the cream too aggressively can make your ganache greasy or separate. Gentle simmer, folks!
- Stirring the Ganache Too Soon: Remember the 5-minute wait? It’s not just for dramatic effect. It actually helps the chocolate melt evenly. Rushing this step can lead to gritty ganache.
- Using Low-Quality Chocolate: This isn’t the time for those questionable chocolate chips you found at the back of the cupboard. The chocolate is the star here; let it shine!
- Forgetting to Grease the Pan: Rookie mistake! Unless you want your cake to become one with the pan forever, grease and flour it properly.
Alternatives & Substitutions
Feeling creative? Or just ran out of something? I get it!
- Chocolate Type: While dark chocolate is king for that rich truffle flavor, you can absolutely use milk chocolate for a sweeter ganache, or even a mix of dark and semi-sweet. Just adjust the cream slightly if needed, as milk chocolate melts easier.
- Add-ins: Want to level up your ganache? Stir in a teaspoon of espresso powder with the chocolate for an intensified chocolate flavor, or a splash of rum, Kahlua, or Grand Marnier for an adult twist (after the ganache has cooled a bit).
- Cake Base: Not a fan of chocolate cake? Use a vanilla or red velvet base! The dark chocolate ganache would still be divine.
- Toppings: Instead of cocoa powder, try toasted coconut flakes, chopped nuts, mini chocolate chips, or even a dusting of powdered sugar. Anything goes, honestly!
FAQ (Frequently Asked Questions)
- Can I use margarine instead of butter in the ganache? Well, technically yes, but why hurt your soul like that? Butter adds a richness and sheen that margarine just can’t replicate. Stick to butter for the best results.
- My ganache looks lumpy! What did I do wrong? Chances are the chocolate didn’t melt completely or the cream wasn’t hot enough. Try gently reheating the ganache over a double boiler (or in 10-second bursts in the microwave), stirring constantly, until smooth. A quick whisk with an immersion blender can sometimes rescue it too!
- How do I store this masterpiece? Cover loosely and store at room temperature for up to 2 days, or in the fridge for up to 5 days. If refrigerated, let it come closer to room temperature before serving for the best texture.
- Can I make this a two-layer cake? Absolutely! Just double your cake mix and ganache recipe. You’ll layer the cakes with ganache in between. More chocolate, more fun, right?
- What if my ganache is too thick/thin? If it’s too thick, gently warm it over a double boiler or microwave for a few seconds, adding a tiny splash of cream (half a teaspoon at a time) until it’s pourable. If too thin, chill it in the fridge for 10-15 minute increments, stirring frequently, until it reaches the desired consistency.
Final Thoughts
See? That wasn’t scary at all, was it? You’ve just whipped up a show-stopping dessert that tastes incredibly rich and looks like it came straight from a fancy patisserie, all while barely breaking a sweat. Now go impress someone—or yourself—with your new culinary skills. You’ve earned that chocolate indulgence! Enjoy every single bite!


