
So you’re craving something warm, comforting, and seriously delicious, but the thought of a complicated recipe makes you want to just order takeout? **Same, friend, same.** If you’ve got some bananas hanging around your kitchen, looking a little… *experienced*, then you’re officially in the right place. We’re about to turn those spotty beauties into a simple, mind-blowingly good banana nut bread. No stress, just yummy vibes.
Why This Recipe is Awesome
Okay, first things first: this isn’t just *any* banana nut bread recipe. This is THE banana nut bread recipe for people who want maximum deliciousness with minimum effort. Seriously, it’s so **idiot-proof, even I haven’t messed it up** (and that’s saying something, believe me). It comes together faster than you can say “where did all those bananas go?”, uses basic pantry staples, and the result? A perfectly moist, tender loaf packed with flavor and those delightful nutty crunches. It’s basically a hug in bread form. You’re welcome.
Ingredients You’ll Need
Gather ’round, pantry explorers! Here’s your shopping list – mostly stuff you probably already have lurking in your cupboards, tbh.
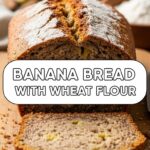
- **1 ½ cups all-purpose flour:** The sturdy backbone of our delicious bread.
- **1 teaspoon baking soda:** Our leavening MVP, making it light and fluffy. Don’t skip it!
- **½ teaspoon salt:** Just a pinch to balance all that sweet goodness.
- **½ cup (1 stick) unsalted butter, melted:** Because everything is better with butter. **FYI**, melted is key here for that perfect texture.
- **¾ cup granulated sugar:** Sweetness for your soul.
- **2 large eggs, lightly beaten:** The binders of our culinary dreams.
- **1 teaspoon vanilla extract:** A little splash of magic. Don’t cheap out on this!
- **3 very ripe medium bananas, mashed:** This is where the magic happens! **The spottier, the better.** Seriously, black is good.
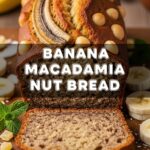
- **½ cup chopped walnuts or pecans:** For that satisfying crunch and classic “nut bread” vibe.
Step-by-Step Instructions
Alright, apron on, good tunes playing, let’s get baking! This is super chill, you got this.
- **Preheat Your Oven & Prep Your Pan:** First, crank that oven up to **350°F (175°C)**. Then, grab a 9×5-inch loaf pan, grease it up, and lightly flour it. This step is super important unless you want your masterpiece stuck forever.
- **Whisk the Dry Stuff:** In a medium bowl, whisk together the flour, baking soda, and salt. Just a quick swirl to combine everything evenly.
- **Mix the Wet Goodness:** In a separate, larger bowl, pour in your melted butter and sugar. Whisk them together until they’re nice and smooth. Then, crack in your lightly beaten eggs and add the vanilla extract. Mix well until everything is incorporated and looking glorious.
- **Add the Mashed Bananas:** Now for the stars of the show! Fold in your mashed, super-ripe bananas to the wet mixture. Don’t worry about getting every lump out; a few small chunks are totally fine and add character!
- **Combine Wet & Dry:** Gradually add the dry flour mixture to the wet banana mixture. **Mix *just* until combined.** A few lumps of flour are okay! **Overmixing is a no-no** here, it leads to tough bread. Nobody wants tough bread.
- **Fold in the Nuts:** Gently fold in your chopped walnuts or pecans. If you’re feeling fancy, save a few to sprinkle on top before baking.
- **Pour & Bake:** Pour your glorious batter into your prepared loaf pan. Pop it into the preheated oven and bake for about **50-65 minutes**.
- **Check for Doneness:** How do you know it’s ready? Insert a toothpick into the center of the loaf. If it comes out clean or with just a few moist crumbs, you’re golden!
- **Cool It Down:** Let the bread cool in the pan for about 10-15 minutes before carefully transferring it to a wire rack to cool completely. Patience, young padawan! It’s worth it.
Common Mistakes to Avoid
We’ve all been there. Learn from my (and others’) missteps so your bread can shine!
- **Using Under-Ripe Bananas:** This is perhaps the biggest sin. Green-ish bananas just won’t cut it. You want **brown, spotty, almost-black bananas**. They’re sweeter and easier to mash, giving you that quintessential banana flavor and moisture.
- **Overmixing the Batter:** I know, it’s tempting to keep stirring until it’s perfectly smooth. Don’t! **Overmixing develops the gluten in the flour**, leading to a dense, rubbery bread. Mix until *just* combined, even if there are a few streaks of flour.
- **Forgetting to Grease the Pan:** Rookie mistake! Unless you want to perform surgery on your loaf to get it out, **always grease and lightly flour your pan**. Parchment paper slings are also your friend.
- **Opening the Oven Door Too Soon:** Resist the urge! The first 30-40 minutes are crucial for the bread to set and rise properly. Opening the door can cause it to collapse.
Alternatives & Substitutions
Feel free to get creative! This recipe is pretty forgiving.
- **Chocolate Chip Heaven:** Not a nut person? Swap the walnuts for **½ cup of chocolate chips** (dark, milk, or white – your call!). IMO, chocolate and banana are a match made in heaven.
- **Different Nuts:** If walnuts aren’t your jam, try **pecans, almonds, or even hazelnuts**. Or mix ’em up!
- **Spice It Up:** A pinch of **cinnamon or nutmeg** (about ½ teaspoon) can add a lovely warm spice note.
- **Dairy-Free:** You can easily swap the butter for **¼ cup of vegetable oil or melted coconut oil**.
- **Less Sugar:** If your bananas are super, super ripe, you can reduce the sugar slightly, maybe to **½ cup**, but don’t go too low or you’ll miss out on some caramelization and tenderness.
FAQ (Frequently Asked Questions)
Got questions? I’ve got (casual) answers!
- **Can I use frozen bananas?** Absolutely! Just make sure to thaw them completely and drain any excess liquid before mashing. They tend to be even sweeter!
- **My bananas aren’t super ripe, what do I do?** You could try baking them in their peels at 300°F (150°C) for 15-20 minutes until they turn black. Or, you know, just wait. Good things come to those who wait for ripe bananas.
- **Can I make this into muffins instead?** Heck yeah! Just spoon the batter into a greased muffin tin (filling about ¾ full) and bake for about 20-25 minutes. So easy!
- **How do I store banana bread?** Keep it tightly wrapped in plastic wrap or in an airtight container at room temperature for up to 3-4 days. It actually gets *better* on day two!
- **Can I freeze banana bread?** You bet! Wrap the cooled loaf (or slices) tightly in plastic wrap, then aluminum foil. It’ll last in the freezer for up to 2-3 months. Just thaw at room temp when you’re ready for a treat.
- **Why is my banana bread dry?** Chances are, you either overmixed it or overbaked it. Keep an eye on that baking time and remember to mix *just* until combined.
Final Thoughts
See? That wasn’t so scary, was it? You just whipped up a glorious loaf of simple banana nut bread! Your kitchen probably smells amazing right now, and you’re about to enjoy a piece of pure, unadulterated comfort. Whether you share it (if you’re feeling generous) or hoard it all to yourself (no judgment here!), you’ve earned every single delicious bite. Now go impress someone—or yourself—with your new culinary skills. You’ve earned it!
