So you’re craving something tasty but too lazy to spend forever in the kitchen, huh? Same, friend, same. We’ve all been there – staring into the fridge, dreaming of baked goods, but then the thought of complex recipes and a sink full of dishes just sends us straight back to the couch. Well, buckle up, buttercup (or should I say, *cream* cup?), because I’m about to drop a scone recipe on you that’s so easy, it should probably be illegal. And yes, it only uses THREE ingredients. You heard me right. Three. Count ’em!
Why This Recipe is Awesome
Let’s be real, most scone recipes involve like, ten steps and a degree in pastry making. Not this bad boy. This recipe is the culinary equivalent of a high-five and a hug from your favorite person. Why is it so awesome? Let me count the ways:
- It’s ridiculously simple. We’re talking idiot-proof. Even I didn’t mess it up, and my track record with baking is, shall we say, “adventurous.”
- Only 3 ingredients! No obscure flours, no special rising agents you have to order from a shaman in Tibet. Just basic stuff.
- Minimal washing up. Seriously, one bowl, maybe a cutter, and a baking tray. Your future self will thank you.
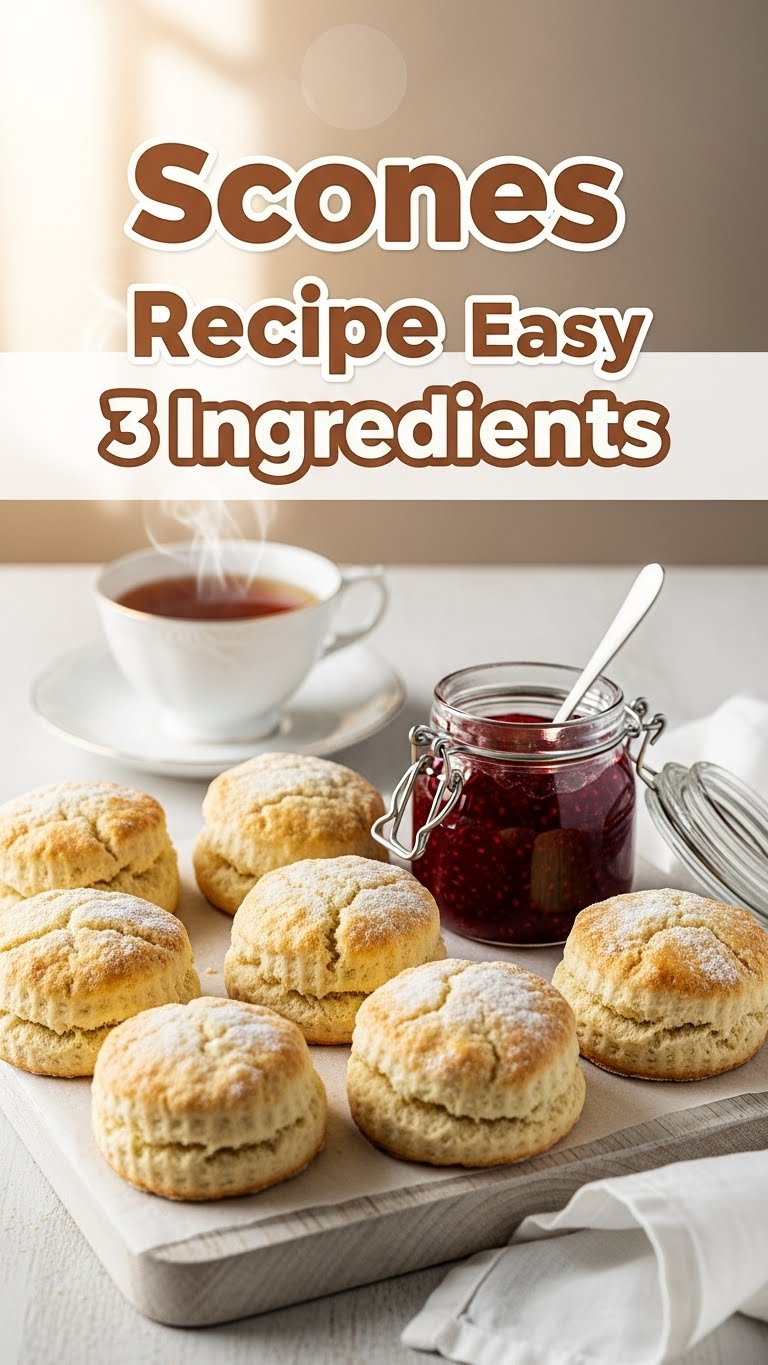
- It tastes amazing. Fluffy, tender, and just begging for jam and cream (which, FYI, don’t count towards the three ingredients because they’re toppings, not part of the scone. Genius, right?).
- Instant gratification. From start to devour, you’re looking at under 30 minutes. Bam!
Ingredients You’ll Need
Get ready for the shortest shopping list of your life. Seriously, go grab these:
- Self-Raising Flour: This is the undisputed MVP of this recipe. The self-raising part means it’s got leavening agents already mixed in, saving us a whole step (and an ingredient!). Don’t even THINK about substituting plain flour here unless you want flat, dense hockey pucks. You’ve been warned.
- Thickened Cream (or Heavy Cream): This is where the magic happens. It’s rich, it’s luscious, and it does double duty as both fat (like butter) and liquid (like milk). No need for cold butter cubes, no need to rub anything in. Just pour and stir!
- Caster Sugar (Superfine Sugar): Just a little sprinkle to give our scones that touch of sweetness. Caster sugar dissolves easily, making for a smooth scone. Granulated will work too, but caster is the subtle star here.
Step-by-Step Instructions
Alright, apron on, game face on (or don’t, we’re not taking life too seriously here). Let’s do this!
- First things first: Preheat your oven to 200°C (400°F). This is crucial! Scones need a hot oven to rise beautifully. Line a baking tray with baking paper while it’s heating up.
- In a large bowl, combine 2 cups of self-raising flour and ¼ cup of caster sugar. Give it a quick whisk with a fork to mix them evenly.
- Now for the magic. Pour in 1 cup of thickened cream. Grab a butter knife or a spatula and gently mix until it just comes together into a shaggy dough. Do NOT overmix! This is not bread dough. We want light, fluffy scones, not tough ones.
- Turn your dough out onto a lightly floured surface. Gently bring the dough together with your hands, pressing it into a disk about 2-3 cm (around 1 inch) thick. We’re not rolling it out like a pizza, just patting it into shape.
- Use a scone cutter (or even a round cookie cutter, or the rim of a glass if you’re feeling rustic!) to cut out your scones. Don’t twist the cutter when you push down; just press straight down to get a clean cut, which helps with the rise.
- Place your cut scones on the prepared baking tray, leaving a little space between them. For extra golden tops, you can brush them lightly with a little extra cream or milk (optional, but it makes them look extra pretty).
- Pop them into your preheated oven and bake for 12-15 minutes, or until they’re beautifully golden brown on top and sound hollow when tapped on the bottom.
- Remove from the oven, let them cool slightly on a wire rack, then slather them with jam and cream. You’ve earned this!
Common Mistakes to Avoid
Nobody’s perfect, but we can avoid some common scone blunders. Learn from my past (many) mistakes:
- Overmixing the Dough: I cannot stress this enough. If you keep kneading and mixing, you’re developing gluten, and that means tough scones. We want tenderness! Mix *just* until combined.
- Not Preheating the Oven: Thinking you don’t need to preheat? Rookie mistake! Scones need that initial blast of heat to puff up quickly and become light and airy. Cold oven = sad, flat scones.
- Rolling Too Thin: Remember, we want fluffy. Aim for that 2-3 cm thickness. If you roll them too thin, they’ll be crispy instead of soft.
- Twisting the Cutter: When cutting your scones, press straight down and lift. Twisting the cutter can seal the edges of the scone, preventing it from rising evenly.
- Using the Wrong Flour: This is the 3-ingredient challenge, folks. Self-raising flour is key. Plain flour will not work unless you add extra leavening, which defeats the ‘3 ingredients’ point, doesn’t it?
Alternatives & Substitutions
So, you’re feeling adventurous after mastering the basics? I like your style! Here are a few tweaks, but remember, the “3 ingredients” magic works best with the core recipe:
- Savory Scones: Ditch the caster sugar entirely! Instead, add a sprinkle of salt, a handful of grated cheese, some chopped chives, or even a pinch of dried herbs to the dry ingredients. Serve with soup or a hearty stew.
- Fruity Fun: Want to get fancy? Gently fold in some dried cranberries, raisins, or even finely chopped glacé cherries after the dough comes together. A little lemon zest also works wonders. Just don’t tell anyone it’s still ‘3 ingredients’ unless you’re a math magician!
- Sugar Swap: While caster sugar is ideal for its fine texture, regular granulated sugar will also work. Just make sure to mix it well with the flour.
- Cream Options: Stick with thickened or heavy cream for the best results. Lighter creams might not give you the same richness or lift. This is one ingredient where you really want to go full-fat for that classic scone texture.
FAQ (Frequently Asked Questions)
Got questions? I’ve got (casual and humorous) answers!
- Can I use plain flour instead of self-raising?
Well, technically yes, but then it’s no longer a 3-ingredient recipe, is it? You’d need to add baking powder (about 2 teaspoons per cup of plain flour) and a pinch of salt. But for this specific recipe, self-raising is non-negotiable!
- My scones didn’t rise, what went wrong?
Uh oh! Did you use self-raising flour? Was your oven hot enough? Or did you overmix the dough? These are the usual suspects. Pick your poison!
- Can I make these ahead of time?
Scones are always best eaten fresh, warm from the oven. They lose their charm pretty quickly. If you *must* make them ahead, bake them, then reheat briefly in the oven before serving. But honestly, they’re so quick, just make them on demand!
- Can I freeze the dough?
You can freeze unbaked scones! Cut them out, place them on a tray in the freezer until solid, then transfer to an airtight bag. Bake from frozen, adding a few extra minutes to the baking time.
- What if I don’t have a scone cutter?
No worries, my friend! You can use a sharp knife to cut the dough into squares or triangles, or even use the rim of a drinking glass. Rustic charm is totally in!
- Why are my scones dense and heavy?
Two main culprits: overmixing the dough (which develops gluten and makes them tough) or not using enough cream (which results in dry dough that doesn’t rise well). Be gentle!
Final Thoughts
See? Told ya it was easy! You’ve just whipped up a batch of delicious, fluffy scones with minimal fuss and maximum reward. You’re practically a culinary wizard now. Go forth and conquer that scone craving! Share them with friends (or don’t, I won’t judge), impress your family, or just enjoy a quiet moment of pure, buttery (well, creamy) bliss all by yourself. You’ve earned it!


