So you’re craving something warm, spicy, and utterly delicious, but the thought of a complicated bake makes you want to just order takeout? Been there, bought the T-shirt. But what if I told you we could whip up some dreamy Scandinavian Cinnamon Rolls – the ones with that cardamom hug – without breaking a sweat or your kitchen?
Why This Recipe is Awesome
Okay, let’s be real. Most cinnamon roll recipes look like a commitment to culinary school. Not this one. This recipe is your secret weapon for looking like a baking guru without actually being one. It’s so **foolproof**, even my cat could probably follow the steps (if she had opposable thumbs and a sweet tooth). We’re talking fluffy, aromatic rolls that taste like hygge in edible form, and guess what? They’re surprisingly quick to put together. Plus, your kitchen will smell like a dream, which is a definite bonus, IMO. Instant mood booster, guaranteed!
Ingredients You’ll Need
- **For the Dough:**
- **Milk:** About 1 cup (240ml). Warm, but not scorching hot. Think baby bathwater, not molten lava.
- **Active Dry Yeast:** 2 ¼ teaspoons. The stuff that makes magic happen.
- **Granulated Sugar:** ¼ cup (50g) for the dough. Just enough to keep the yeast happy and add a whisper of sweetness.
- **All-Purpose Flour:** About 3 ½ cups (420g), plus more for dusting. Your carb canvas.
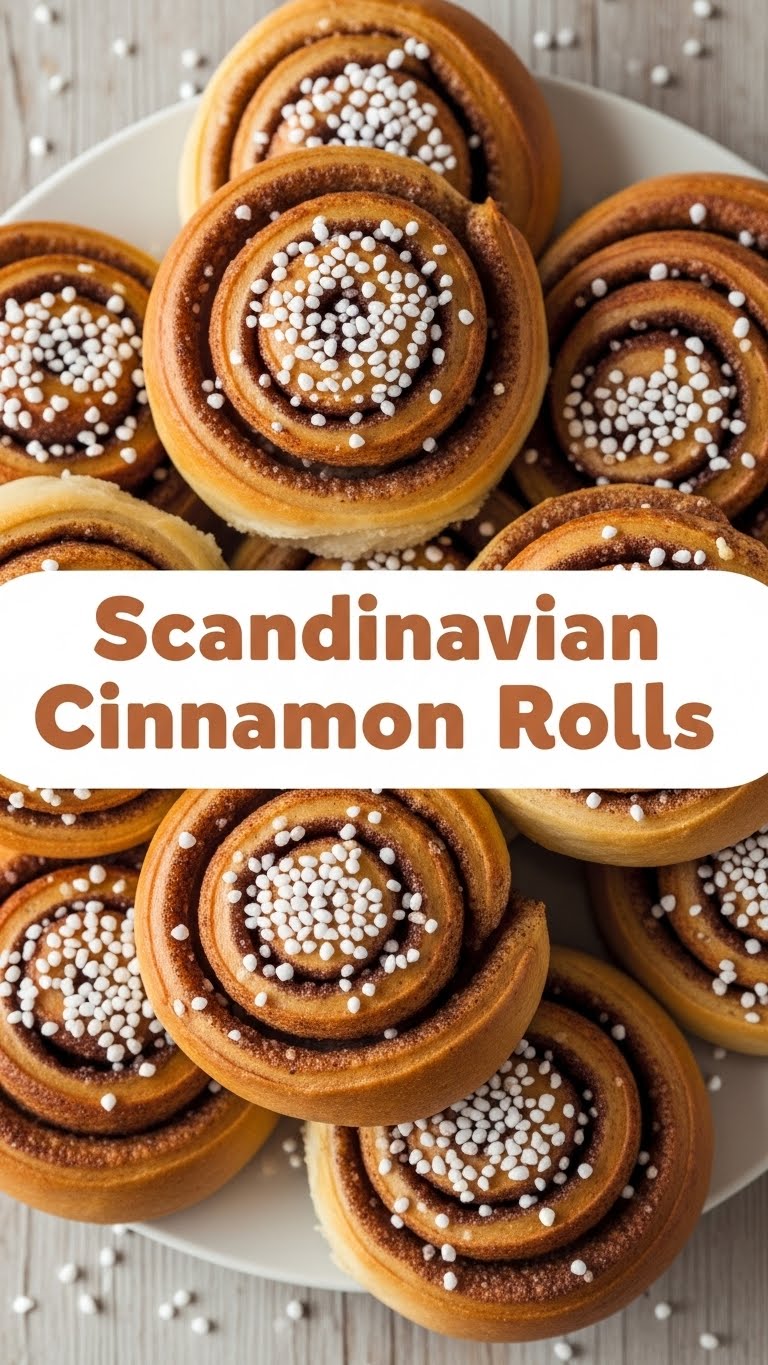
- **Cardamom:** 1 teaspoon, ground. **This is the secret sauce**, people! Don’t skip it; it’s what makes them Scandinavian.
- **Salt:** ½ teaspoon. Just a pinch to balance things out.
- **Unsalted Butter:** ¼ cup (55g), melted and cooled. Because butter makes everything better, duh.
- **For the Filling:**
- **Unsalted Butter:** ½ cup (113g), softened. Not melted, not rock hard. Goldilocks butter.
- **Granulated Sugar:** ½ cup (100g). Sweetness overload, in the best way.
- **Ground Cinnamon:** 2 tablespoons. The star of the show, after cardamom, that is.
- **For the Glaze/Egg Wash (optional but recommended):**
- **Egg:** 1, beaten. For that shiny, golden finish.
- **Pearl Sugar:** A sprinkle, if you’re feeling fancy (and traditional). Otherwise, regular sugar works, or skip it.
Step-by-Step Instructions
- **Wake Up the Yeast:** In a large bowl (or stand mixer bowl, if you’re fancy), warm your milk. Stir in the sugar and then sprinkle the yeast over it. Give it about 5-10 minutes to get foamy and bubbly. This means your yeast is alive and ready to party!
- **Mix the Dry Stuff:** Add the flour, cardamom, and salt to the yeast mixture. Mix with a wooden spoon or a dough hook until it just starts to come together.
- **Butter Up:** Pour in the melted and cooled butter. Continue mixing and kneading for about 5-7 minutes until the dough is smooth and elastic. It should be slightly sticky but shouldn’t glue itself to your hands.
- **Rise and Shine:** Lightly grease a clean bowl, pop your dough in, and turn it once to coat. Cover it with plastic wrap or a clean kitchen towel. Let it rise in a warm spot for about 1 to 1 ½ hours, or until it has doubled in size. This is where patience pays off!
- **Prep the Filling:** While your dough is doing its thing, beat together the softened butter, granulated sugar, and cinnamon for the filling until it’s light and fluffy.
- **Roll it Out:** Once your dough has risen, punch it down gently (it’s therapeutic, trust me). Flour a clean surface lightly and roll out the dough into a large rectangle, roughly 12×18 inches (30×45 cm). Don’t overthink it!
- **Spread the Love:** Evenly spread your cinnamon-butter filling over the entire rectangle, right to the edges.
- **Roll ‘Em Up:** Starting from one of the longer sides, tightly roll the dough into a log. **The tighter you roll, the prettier your spirals!**
- **Slice and Dice:** Use a sharp knife or even unflavored dental floss (seriously, it works wonders!) to cut the log into about 12-15 equal slices, about 1-inch thick.
- **Second Rise:** Arrange your rolls in a greased 9×13 inch baking dish (or a round cake pan if you prefer). Cover and let them rise again for another 30-45 minutes. They should look puffy and happy.
- **Bake Away:** Preheat your oven to 375°F (190°C). If you’re using an egg wash, brush it lightly over the rolls now, and sprinkle with pearl sugar if desired. Bake for 18-22 minutes, or until they’re golden brown and smell absolutely irresistible.
- **Cool (a Little) and Devour:** Let them cool for a few minutes in the pan before serving. Seriously, try not to burn your tongue, but warm is best!
Common Mistakes to Avoid
- **Using scalding hot milk:** You’ll kill your yeast. Nobody likes dead yeast; it means flat rolls. Remember: baby bathwater, not a hot tub.
- **Forgetting the cardamom:** This isn’t just a regular cinnamon roll. The cardamom is its Scandinavian soul! Skip it and you’re just making a good roll, not a *great* Scandinavian one. Don’t disappoint the Nordic gods of baking.
- **Not letting the dough rise enough:** Patience, grasshopper! Underrisen dough means dense, sad rolls. Give them their time to puff up and get airy.
- **Overworking the dough:** Once the flour is incorporated, don’t knead it for an hour. 5-7 minutes is usually plenty. Overworked dough can get tough, and nobody wants a jaw workout from a cinnamon roll.
- **Slicing with a dull knife:** This will squish your beautiful spirals into sad blobs. Use a sharp knife, or grab that dental floss for clean cuts. **Trust me on the floss.**
Alternatives & Substitutions
- **Dairy-Free? No problem!** You can totally swap regular milk for a plant-based alternative like almond or oat milk. Just make sure it’s unsweetened. For butter, use a good quality dairy-free butter stick. Your rolls will still be delicious!
- **No Cardamom? Sacrilege!** Kidding (mostly). If you absolutely *can’t* find it, you can increase the cinnamon slightly, or add a pinch of nutmeg or allspice for a different kind of warmth. But seriously, go find some cardamom for next time!
- **Don’t have pearl sugar?** A simple icing sugar glaze (powdered sugar, a splash of milk/water, and a tiny bit of vanilla) drizzled over them when they’re slightly cooled is a classic. Or just enjoy them plain! They’re good enough on their own.
- **Whole Wheat Flour:** You can substitute up to half of the all-purpose flour with whole wheat pastry flour for a slightly healthier (ish) twist. Just know they might be a tad denser.
FAQ (Frequently Asked Questions)
- **Can I make these ahead of time?** Absolutely! You can let the dough do its first rise in the fridge overnight. Or, after forming the rolls, cover and refrigerate them overnight and then let them come to room temp for about an hour before baking in the morning. Fresh, warm rolls for breakfast? Yes, please!
- **My dough isn’t rising, what gives?** Oh no! Did you use hot milk that killed the yeast? Is your yeast old? Or is your kitchen just super cold? Warm up your rising spot, maybe put the bowl in a slightly warm (but OFF!) oven.
- **What if I don’t have a stand mixer?** Don’t sweat it! You can totally knead this dough by hand. It’s a great arm workout, honestly. Just be prepared for 10-15 minutes of elbow grease.
- **Can I freeze them?** You bet! Bake them, let them cool completely, then freeze them in an airtight container for up to 2-3 months. Thaw and reheat gently in the microwave or oven for a quick treat.
- **Why Scandinavian specifically? What’s the difference?** The **cardamom** and sometimes the pearl sugar! Scandinavian rolls often skip the super gooey cream cheese frosting for a lighter finish, letting the spiced dough truly shine. They’re less sweet overall, too.
- **My rolls are dry. Help!** Did you overbake them? Or perhaps your dough was too dry to begin with? **Always check for doneness** at the earlier end of the baking time. A perfectly baked roll is slightly gooey in the middle.
Final Thoughts
There you have it, folks! Your passport to a little bit of Nordic baking magic, right from your own kitchen. These Scandinavian Cinnamon Rolls aren’t just a treat; they’re an experience. The smell alone is worth the effort, and trust me, the effort is minimal for maximum reward. So go ahead, whip up a batch, invite some friends over for fika, or just hoard them all for yourself (no judgment here!). You’ve earned those warm, cardamom-spiced hugs. Now go impress someone—or yourself—with your new culinary skills. You’ve earned it!


