So you’re craving something tasty but too lazy to spend forever in the kitchen, huh? Same, friend, same. You want that juicy, fall-off-the-bone rotisserie chicken vibe, but the thought of wrestling a big bird into a hot oven and basting it every ten minutes makes you want to just order takeout. Been there, bought the “I’d rather be napping” t-shirt.
But what if I told you there’s a magical way to get that tender, flavorful goodness with minimal effort? A method so simple, you might actually feel guilty about how little work you did? Get ready to meet your new best friend: The Rotisserie Crockpot Chicken. Your life is about to get a whole lot tastier and easier. You’re welcome.
Why This Recipe is Awesome
Seriously, this isn’t just a recipe; it’s a life hack. It’s **foolproof**, even if your previous culinary achievements peaked at successfully microwaving popcorn. This method uses the low-and-slow magic of your trusty crockpot to transform a humble whole chicken into something that tastes like it came from a fancy rotisserie, but without the hassle or the mystery meat factor.
Your house will smell absolutely incredible, which is basically free aromatherapy, IMO. Plus, you literally just set it and forget it. No basting. No constant checking. Just pure, unadulterated chicken perfection waiting for you at the end of the day. It’s perfect for meal prep, weeknight dinners, or when you just want to feel like a culinary genius without, you know, actually *being* one. Lazy deliciousness achieved!
Ingredients You’ll Need
Gather your troops! Here’s what you’ll need for this culinary masterpiece:
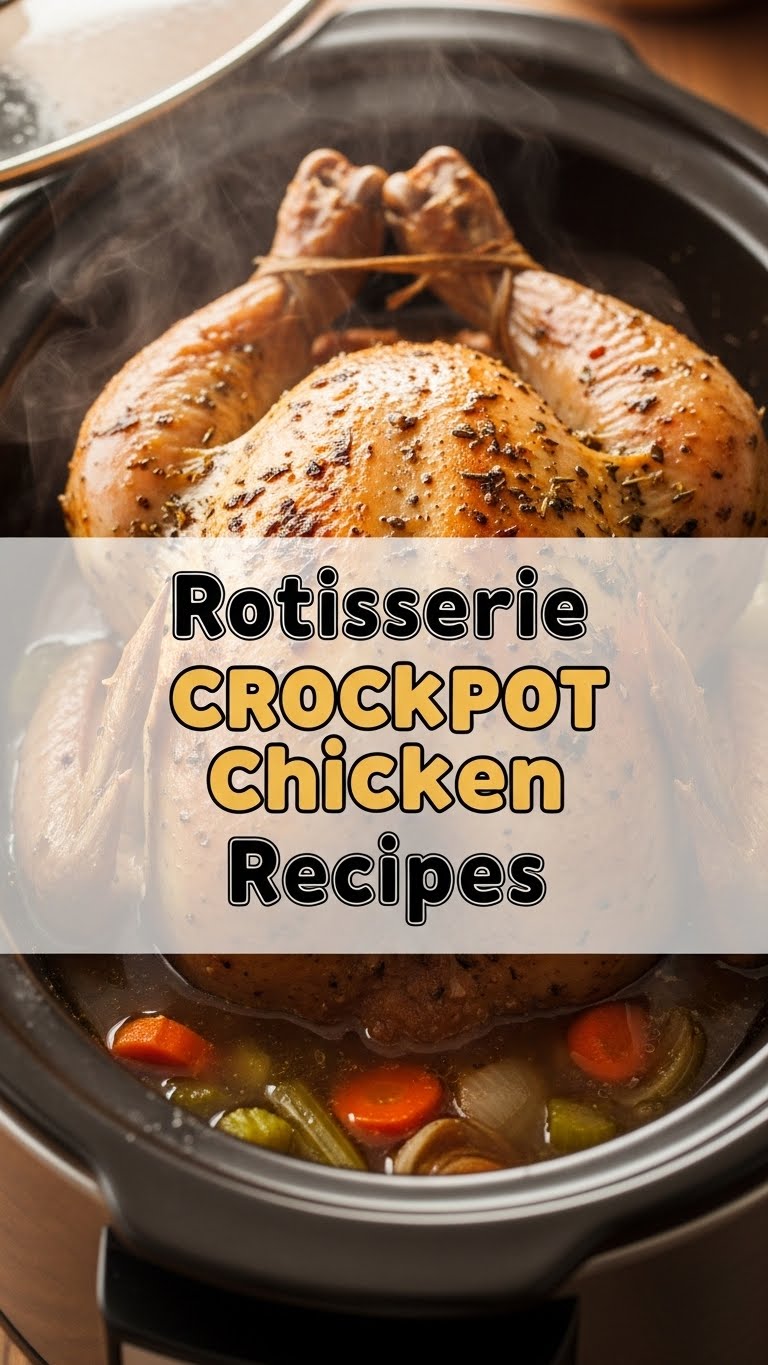
- One Whole Chicken: Around 3-5 lbs. The star of the show, obviously. Make sure it’s thawed, no frozen chicken stunts here, please!
- 1-2 Tbsp Olive Oil: Your chicken’s best friend for getting that spice rub to stick and locking in moisture.
- 1 Tbsp Salt: Don’t skimp. Salt is flavor.
- 1 Tsp Black Pepper: Gives it that nice kick.
- 1 Tbsp Paprika: For a lovely reddish hue and a touch of sweet, smoky flavor.
- 1 Tbsp Garlic Powder: Because everything’s better with garlic. Duh.
- 1 Tbsp Onion Powder: The unsung hero of savory flavor town.
- 1/2 Tsp Dried Thyme or Rosemary (Optional): If you’re feeling fancy and want to elevate your herb game.
- Aluminum Foil Balls or Chopped Veggies (Optional but Recommended!): To elevate the chicken off the bottom of the crockpot. Trust me on this one.
Step-by-Step Instructions
Let’s get cooking! These steps are so easy, you could probably do them in your sleep (but please don’t).
- Pat That Bird Dry: Take your chicken out of its packaging and pat it down thoroughly with paper towels. Seriously, get it as dry as a desert. This helps the rub stick and gives a better texture. **Do not skip this!**
- Rub It Down: Drizzle the olive oil all over the chicken. Use your hands (yes, get in there!) to rub it evenly over the entire surface.
- Season Like a Pro: In a small bowl, mix together your salt, pepper, paprika, garlic powder, onion powder, and any optional herbs. Now, sprinkle and rub this mixture all over your chicken. Don’t be shy! Get it under the wings, on the breast, everywhere.
- Prep the Crockpot: This is a key move for that “rotisserie” vibe. Ball up 3-4 pieces of aluminum foil into golf-ball-sized spheres and place them at the bottom of your slow cooker. Alternatively, you can use a bed of chopped onions, carrots, and celery. This lifts the chicken, allowing air to circulate and preventing a soggy bottom.
- Chicken In! Carefully place your seasoned chicken on top of the foil balls or veggies in the slow cooker.
- Set It and Forget It: Put the lid on your slow cooker. Cook on **LOW for 3-4 hours** or on **HIGH for 2-3 hours**. The exact time depends on your slow cooker and the size of your chicken. The internal temperature in the thickest part of the thigh (without touching bone) should reach 165°F (74°C).
- Broil for Glory (Optional, but awesome): If you want a little bit of that crispy skin, carefully transfer the cooked chicken to a baking sheet. Pop it under the broiler for 5-10 minutes, keeping a very close eye on it, until the skin is golden brown and crispy.
- Rest and Devour: Let the chicken rest for 10-15 minutes before carving. This locks in all those glorious juices. Then, dig in!
Common Mistakes to Avoid
We all make mistakes, but with this recipe, let’s try to avoid these rookie blunders for maximum deliciousness!
- Forgetting to Pat Dry: It’s like trying to get a tan in a raincoat – it just doesn’t work. A dry surface is crucial for the rub to adhere and for any chance of non-soggy skin.
- Under-Seasoning: This isn’t a bland chicken competition. Be bold! A whole chicken needs a good amount of salt and spices to truly shine. Don’t be timid.
- Overcooking: Dry chicken is sad chicken. Invest in a meat thermometer, please! Pull the chicken once it hits 165°F. It will continue to cook slightly as it rests.
- Not Elevating the Chicken: Leaving the chicken sitting directly in its own juices for hours can lead to a mushy, less appealing texture. Those foil balls or veggies are your unsung heroes here.
- Peeking Too Much: Every time you lift that lid, you let out precious heat, extending the cooking time. Trust the process and your crockpot!
Alternatives & Substitutions
Feeling creative? This recipe is super flexible! Here are a few ideas to shake things up:
- Spice Blends: Instead of making your own, feel free to grab a pre-made rotisserie chicken seasoning, Cajun blend, lemon-herb mix, or even a smoky BBQ rub. Different day, different flavor!
- Aromatic Veggies: Instead of foil balls, you can create a bed of chopped onions, carrots, celery, or even potato chunks at the bottom of the crockpot. They’ll absorb all the delicious chicken drippings and make an amazing side dish or a fantastic base for gravy. Two birds, one crockpot!
- Citrus Kick: Stuff the cavity of the chicken with half a lemon and a few sprigs of fresh rosemary or thyme for an extra aromatic boost. FYI, it smells divine.
- A Splash of Liquid: While not strictly necessary, adding a half cup of chicken broth or white wine to the bottom of the crockpot (under the foil balls/veggies) can add extra moisture and flavor to the drippings, perfect for making a quick pan sauce later.
FAQ (Frequently Asked Questions)
Got questions? I’ve got (casual and humorous) answers!
- Can I use a frozen chicken? **Big nope!** Thaw that bird completely before attempting this recipe, friend. Cooking from frozen in a slow cooker isn’t safe and can lead to unevenly cooked (and potentially germy) chicken. Safety first, deliciousness second (but close second!).
- How do I get actual crispy skin without a broiler? Okay, so a crockpot isn’t exactly famous for its crisping abilities. If you don’t have a broiler, you can try giving the chicken a quick pan-sear in a hot skillet with a little oil after it’s cooked, but honestly, the broiler is your best bet for that true “rotisserie” skin. Embrace the tender, fall-off-the-bone meat instead!
- What size slow cooker do I need? A 6-quart slow cooker is usually perfect for a standard 3-5 lb whole chicken. If your chicken is on the larger side, make sure it fits comfortably with the lid on!
- Can I use boneless chicken breasts or thighs instead? Sure, but this recipe is really designed for a whole chicken. Boneless cuts will cook much, much faster (think 1-2 hours on low). Adjust your cooking time accordingly to avoid dry, rubbery chicken.
- How long do leftovers last? Cooked chicken is usually good for about 3-4 days in the fridge. Perfect for shredding into salads, sandwiches, or tacos! BTW, the bones make an excellent stock!
- Why use foil balls? Can’t I just put it directly in? You *can*, but the foil balls (or veggies) lift the chicken out of the accumulated liquid, which prevents the bottom from getting soggy and steamed. It’s a small step for a much better result!
Final Thoughts
And there you have it! A rotisserie-style chicken that practically cooks itself, leaving you with more time to binge-watch your favorite show, conquer the world, or just, you know, chill. You’ve unlocked a secret level of culinary convenience and deliciousness.
Now go impress someone—or yourself—with your new culinary skills. You’ve earned it, you magnificent, lazy-gourmet chef, you! What are you waiting for? Get cooking!


