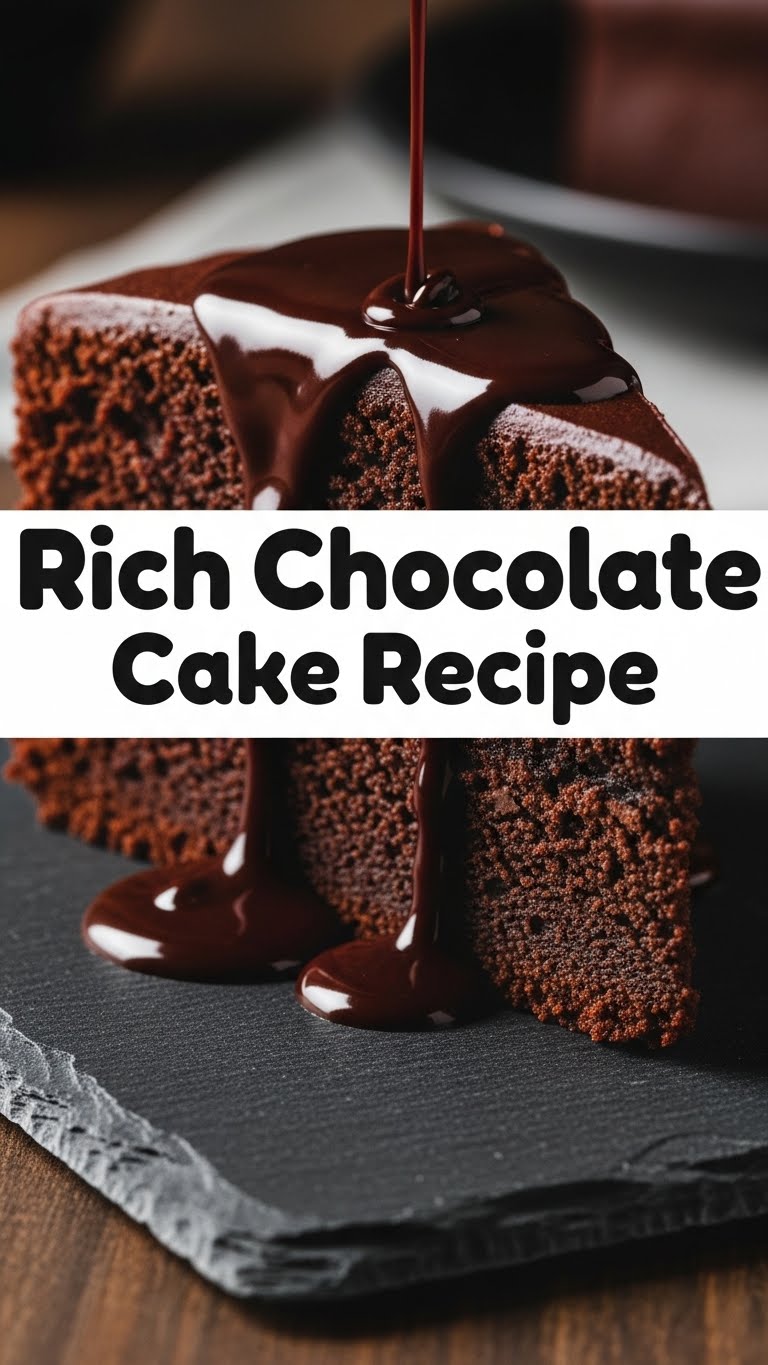
Ever had one of those days where you just *need* chocolate, but the thought of a complicated recipe makes you want to curl up with a bag of chips instead? Yeah, me too. This isn’t that kind of recipe, my friend. This is the “I want amazing chocolate cake now, without selling my soul to the kitchen gods” kind of recipe. So, let’s get messy (but not *too* messy) and bake some chocolatey goodness!
Why This Recipe is Awesome
Okay, let’s be real. There are a million chocolate cake recipes out there. But this one? This one is *different*. It’s basically magic. We’re talking one-bowl wonder territory for most of it, minimal fuss, and maximum chocolate payoff. Seriously, it’s so straightforward, even your pet goldfish could probably bake it (if they had opposable thumbs and an oven, obvi). Plus, it comes out moist, rich, and utterly divine every single time. Prepare for applause.
Ingredients You’ll Need
- All-Purpose Flour: About 1 ½ cups. The backbone of our cake, keeping it together. Don’t go fancy with almond flour here, unless you’re feeling wild.
- Granulated Sugar: 1 ½ cups. Because sugar makes everything better, duh.
- Unsweetened Cocoa Powder: ¾ cup. The darker, the better, IMO. This is where the rich chocolate magic happens.
- Baking Soda: 1 ½ teaspoons. Our little leavening hero.
- Salt: 1 teaspoon. Don’t skip it! It actually makes the chocolate taste *more* chocolatey. Science!
- Large Eggs: 2. Room temperature, please! It helps with emulsification – fancy word for “mixes better.”
- Whole Milk: 1 cup. Again, room temp if you can swing it.
- Vegetable Oil: ½ cup. For that incredible moistness. No, butter is not a direct sub here for the texture we’re going for.
- Vanilla Extract: 2 teaspoons. Essential for depth of flavor. Get the good stuff!
- Boiling Water: 1 cup. The secret ingredient that makes this cake next-level fudgy. Don’t be scared!
Step-by-Step Instructions
- Get Prepped & Ready: First things first, preheat your oven to 350°F (175°C). Then, grab a 9×13 inch baking pan (or two 9-inch round pans if you’re feeling layer-cakey). Grease it well, and dust lightly with cocoa powder instead of flour for an extra chocolatey edge and no white dust on your dark cake!
- Whisk the Dry Stuff: In a *large* mixing bowl, combine the flour, sugar, cocoa powder, baking soda, and salt. Give it a good whisk until everything is nicely incorporated. No lumpy bits allowed!
- Add the Wet Stuff (Mostly): Now, pour in the eggs, milk, vegetable oil, and vanilla extract. Beat everything on medium speed with an electric mixer for about 2 minutes, or until the batter is smooth and well combined. Scrape down the sides of the bowl to make sure you get everything.
- The Secret Weapon: Carefully pour in the boiling water into the batter. This will make your batter very thin – don’t panic! It’s supposed to be like that. Gently mix until just combined. Overmixing here is a no-no.
- Bake to Perfection: Pour the thin batter into your prepared pan(s). Pop it into the preheated oven. Bake for 30-35 minutes for a 9×13 pan, or 25-30 minutes for round pans. The cake is done when a toothpick inserted into the center comes out with moist crumbs, but not wet batter.
- Cool Down: Let your gorgeous cake cool in the pan for about 10-15 minutes before transferring it to a wire rack to cool completely. Patience is a virtue, especially when chocolate cake is involved! Frost when completely cool, unless you want a chocolate lava mess (which, sometimes, is also a vibe).
Common Mistakes to Avoid
- Forgetting to Preheat: Rookie move! Your oven needs to be hot and ready to go for proper rising. Don’t make your cake sit around waiting.
- Overmixing the Batter: Once the wet and dry ingredients are *just* combined, stop. Seriously. Overmixing develops gluten, which can lead to a tough, dry cake. Nobody wants that.
- Skipping the Boiling Water: You might think, “Hmm, this batter is thin, maybe I should just skip the water?” Don’t you dare! That boiling water is key for the cake’s ultimate fudginess and texture. Trust the process.
- Opening the Oven Door Too Soon: Resist the urge to peek! Especially in the first 20 minutes. It can cause your cake to sink in the middle. Be strong!
- Not Cooling Completely Before Frosting: Unless you’re specifically going for a “warm cake with melting frosting” look (and mess), let it cool. Completely. You’ve come this far, don’t ruin the grand finale!
Alternatives & Substitutions
So, you’re out of something, or just feeling a little rebellious? I get it. Here are a few swaps that generally work:
- Milk: If you’re out of whole milk, 2% milk is totally fine. Almond milk or soy milk can work in a pinch for a dairy-free version, but the cake might be slightly less rich. Just sayin’.
- Vegetable Oil: Canola oil or any other neutral-flavored oil will do the trick. Don’t use olive oil unless you want a *very* interesting chocolate cake.
- Cocoa Powder: For an extra dark, almost black cake, try using Dutch-processed cocoa powder. It’ll give you a deeper color and slightly milder chocolate flavor.
- Coffee Instead of Boiling Water? Okay, this isn’t a *substitution* per se, but an enhancement! You can totally use hot brewed coffee instead of boiling water for an even richer, deeper chocolate flavor. Coffee enhances chocolate like nobody’s business, without tasting like coffee cake. Try it!
FAQ (Frequently Asked Questions)
- Can I make this dairy-free? You betcha! Swap the whole milk for a non-dairy alternative like almond or soy milk. The cake will still be delicious, just maybe a tiny bit less decadent.
- What if I don’t have boiling water? You really, *really* should use boiling water. It’s crucial for the texture. If you literally can’t boil water (is your kettle broken?!), hot tap water might work, but it won’t be quite the same. Just boil it, friend!
- Can I add chocolate chips to the batter? Oh, you fancy, huh? Yes, absolutely! Toss about ½ cup of chocolate chips into the batter before baking for an extra chocolatey punch. Mini chocolate chips are great for an even distribution.
- How long does this cake last? If you manage to have any left, it’ll stay fresh at room temperature for 3-4 days in an airtight container. In the fridge, maybe a day or two longer, but it’s best at room temp.
- Do I need a stand mixer? Nope! A hand mixer works perfectly, and if you’ve got strong arms, a good old whisk can do the job too (though it’ll be a bit more of a workout).
- What kind of frosting should I use? A simple chocolate buttercream is classic and always a winner. Or, if you want to keep it simple, a dusting of powdered sugar or a dollop of whipped cream is divine. Go wild!
Final Thoughts
See? I told you it was easy peasy! You just whipped up a seriously delicious, ridiculously rich chocolate cake without breaking a sweat (well, maybe a little sweat if your kitchen’s hot, but you get my drift). This cake is perfect for celebrations, commiserations, or just a Tuesday night because you deserve it. Now go impress someone – or, more importantly, yourself – with your new baking prowess. You’ve earned every single glorious crumb. Happy baking, my friend!

