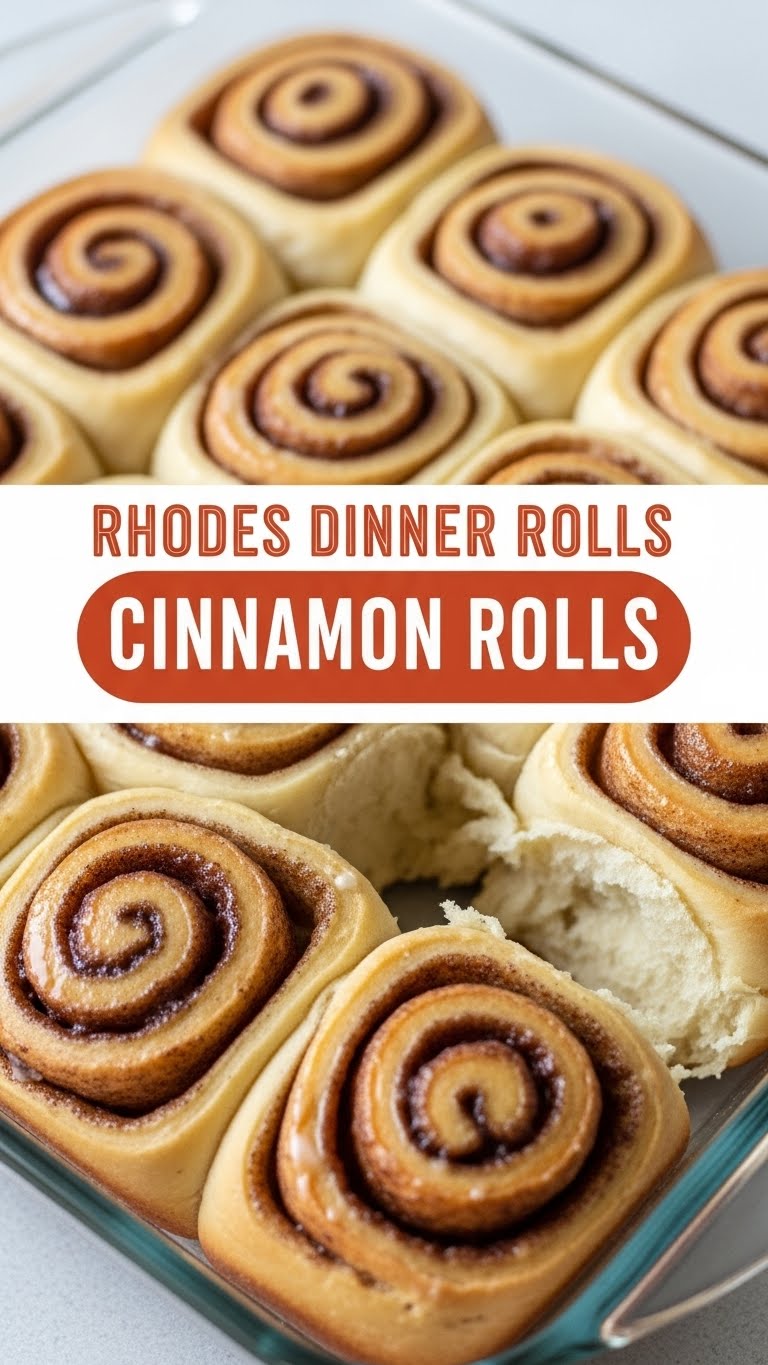
So you’re craving something warm, gooey, and absolutely *decadent* but the thought of spending an entire afternoon wrestling with yeast and dough makes you want to crawl back into bed? Same, friend, same. Welcome to the club of culinary geniuses who appreciate a good shortcut. Today, we’re taking those humble Rhodes Dinner Rolls and transforming them into cinnamon roll magic that’ll make your kitchen smell like a bakery and your taste buds do a happy dance. No judgment, only deliciousness!
Why This Recipe is Awesome
Because, my dear, it’s basically cheating in the best possible way. This isn’t just a recipe; it’s a life hack. We’re talking minimal effort, maximum reward. Think about it: fluffy, tender cinnamon rolls without having to kneer, proof, or even *think* about yeast. The Rhodes rolls do all the heavy lifting, giving you more time for important things, like binging your favorite show or, you know, just existing. It’s so idiot-proof, even I didn’t mess it up, and that’s saying something. Seriously, if you can spread butter, you can make these.
Ingredients You’ll Need
- 12 Rhodes Frozen Dinner Rolls: The unsung heroes of this entire operation. Don’t grab the Texas rolls unless you want monster cinnamon rolls (which, TBH, isn’t a bad idea).
- ½ cup (1 stick) Unsalted Butter: Softened. Because everything is better with butter.
- ½ cup Brown Sugar: Packed. For that deep, molasses-y sweetness.
- 1 tablespoon Ground Cinnamon: Don’t be shy! This is a *cinnamon* roll, after all.
- Pinch of Salt: Just to balance everything out and make the flavors pop.
For the Frosting (because what’s a cinnamon roll without frosting?):
- 4 oz Cream Cheese: Softened. The good stuff.
- ¼ cup (½ stick) Unsalted Butter: Softened. Again, more butter. We’re not health gurus here.
- 2 cups Powdered Sugar: Sifted, if you’re feeling fancy (or just hate lumps).
- 1 teaspoon Vanilla Extract: A good quality one, please.
- 1-2 tablespoons Milk or Cream: To get that perfect drizzly consistency.
Step-by-Step Instructions
- First things first: grab those frozen Rhodes rolls and let them thaw. You can do this by placing them on a greased baking sheet or in a lightly greased 9×13 inch pan. Cover them loosely with plastic wrap and let them sit at room temperature for about 1-2 hours, or until they’re soft and puffy. You want them squishy enough to work with.
- While your rolls are thawing, let’s make that glorious filling. In a small bowl, combine the softened butter, brown sugar, cinnamon, and a tiny pinch of salt. Mix it all up until it forms a lovely, spreadable paste. Set aside.
- Once your rolls are thawed and pliable, gently flatten each roll into a roughly 4×6 inch rectangle. Don’t go crazy, just get them flat enough to spread the filling. You can use a rolling pin or just the palm of your hand.
- Now for the fun part! Evenly spread your cinnamon-sugar mixture over each flattened roll, going almost to the edges. Don’t be stingy, but don’t overdo it to the point where it oozes everywhere.
- Carefully roll each rectangle up from one of the longer sides, creating a log. Pinch the seam gently to seal it. Then, using a sharp knife or even unflavored dental floss (yes, really!), slice each log into 3 equal pieces.
- Place your newly formed cinnamon roll swirls into a lightly greased 9×13 inch baking pan. Make sure they’re snuggled up but not crammed. Cover the pan again with plastic wrap and let them rise in a warm place for another 1-2 hours, or until they’ve doubled in size and are super puffy. This rising step is crucial for fluffy rolls!
- Preheat your oven to 350°F (175°C). Once the rolls have risen beautifully, pop them into the preheated oven and bake for 15-20 minutes, or until they’re golden brown and smell absolutely divine.
- While your rolls are baking, whip up that frosting. In a medium bowl, beat the softened cream cheese and butter together until smooth. Gradually add the powdered sugar, vanilla extract, and milk (or cream), beating until light and fluffy. Add more milk if you want a thinner glaze.
- Once the rolls come out of the oven, let them cool for just 5-10 minutes. Then, go ahead and generously slather that glorious cream cheese frosting all over them. Don’t wait too long, because warm rolls and melting frosting are a match made in heaven.
- Serve immediately and prepare for compliments!
Common Mistakes to Avoid
- Impatience is NOT a virtue here: Thinking you can skip or shorten the thawing and rising steps. **Don’t do it!** You’ll end up with dense, sad rolls. Let them do their thing.
- Being too aggressive with the rolls: Pounding them flat like a schnitzel. Gentle is the key, my friend. You want to flatten, not destroy.
- Forgetting to preheat the oven: Rookie mistake! A cold oven will give you unevenly baked, hard rolls. Always preheat.
- Overfilling: Spreading too much butter/sugar mixture means it will just melt out and burn on the bottom of your pan. A generous but controlled spread is what you’re aiming for.
- Not enough frosting: Is there such a thing? Maybe, but usually the mistake is *under* frosting. Be bold!
Alternatives & Substitutions
Feeling a little adventurous, or just missing an ingredient? No worries, we’ve got options:
- Different Fillings:
- **Nutty Delight:** Add a sprinkle of finely chopped pecans or walnuts to your cinnamon filling for extra crunch and flavor.
- **Chocolate Swirl:** Mix in some mini chocolate chips or a drizzle of melted Nutella with your cinnamon mixture. Hello, heaven!
- **Orange Zest:** Add a teaspoon of fresh orange zest to your filling for a bright, citrusy kick. So good, FYI.
- Frosting Variations:
- **Simple Glaze:** If you’re out of cream cheese, a basic glaze of powdered sugar, a splash of milk, and a dash of vanilla extract works perfectly.
- **Maple Goodness:** Substitute some of the milk in your cream cheese frosting with maple syrup for a delicious fall-inspired twist.
- **Brown Butter Frosting:** Brown your butter before adding it to your cream cheese frosting for an extra layer of nutty flavor. This one’s a game-changer, IMO.
- Baking Dish Sizes:
- You can bake these in an 8×8 inch square pan for thicker, taller rolls, or spread them out in a larger pan if you prefer. Just adjust baking time slightly.
FAQ (Frequently Asked Questions)
Got questions? I’ve got (casual) answers!
Can I prepare these the night before?
Absolutely! After step 6 (placing the sliced rolls in the pan and covering), pop the pan into the fridge overnight. In the morning, take them out and let them come to room temperature and finish rising for about an hour or two before baking. Easy peasy!
My rolls didn’t rise, what gives?
Oh no! Usually, this means your dough wasn’t warm enough or didn’t have enough time. Make sure your kitchen isn’t super cold, and give them ample time to puff up. Patience, grasshopper!
Can I use margarine instead of butter?
Well, technically yes, but why hurt your soul like that? Butter just tastes better in baking, especially for something as glorious as cinnamon rolls. If you must, use a high-quality stick margarine, but my heart says butter.
How do I store leftovers?
If there *are* any leftovers (a big if!), store them in an airtight container at room temperature for a day or two, or in the fridge for up to 5 days. You can microwave them briefly to warm them up and make the frosting gooey again.
Can I freeze the baked cinnamon rolls?
Yep! Once they’re baked and cooled (you can frost them or leave them unfrosted), wrap them individually in plastic wrap, then place them in a freezer-safe bag or container for up to 1-2 months. Thaw at room temperature and warm gently.
My rolls are too doughy in the middle. Help!
This usually means they needed a few more minutes in the oven. Next time, bake them until they’re golden brown on top and the edges are firm to the touch. A toothpick inserted into the center shouldn’t come out gooey.
Final Thoughts
See? I told you it was easy! Now you’ve got a secret weapon in your baking arsenal: delicious, homemade-tasting cinnamon rolls without all the fuss. Go ahead, make these for brunch, dessert, or just a Tuesday afternoon pick-me-up. You deserve it. And who knows, you might even convince someone you spent hours slaving away in the kitchen. Your secret’s safe with me. Now go impress someone—or yourself—with your new culinary skills. You’ve earned it!


