So, you’re craving something that screams “fancy dessert” but secretly requires zero culinary wizardry and minimal stress, huh? Same, friend, same. You want that ‘wow’ factor without the ‘where did my entire day go?’ feeling. Well, clear your schedule for exactly one hour (and maybe another for eating a slice… or three), because we’re diving headfirst into the glorious, utterly irresistible world of Red Velvet Chocolate Cake!
Why This Recipe is Awesome
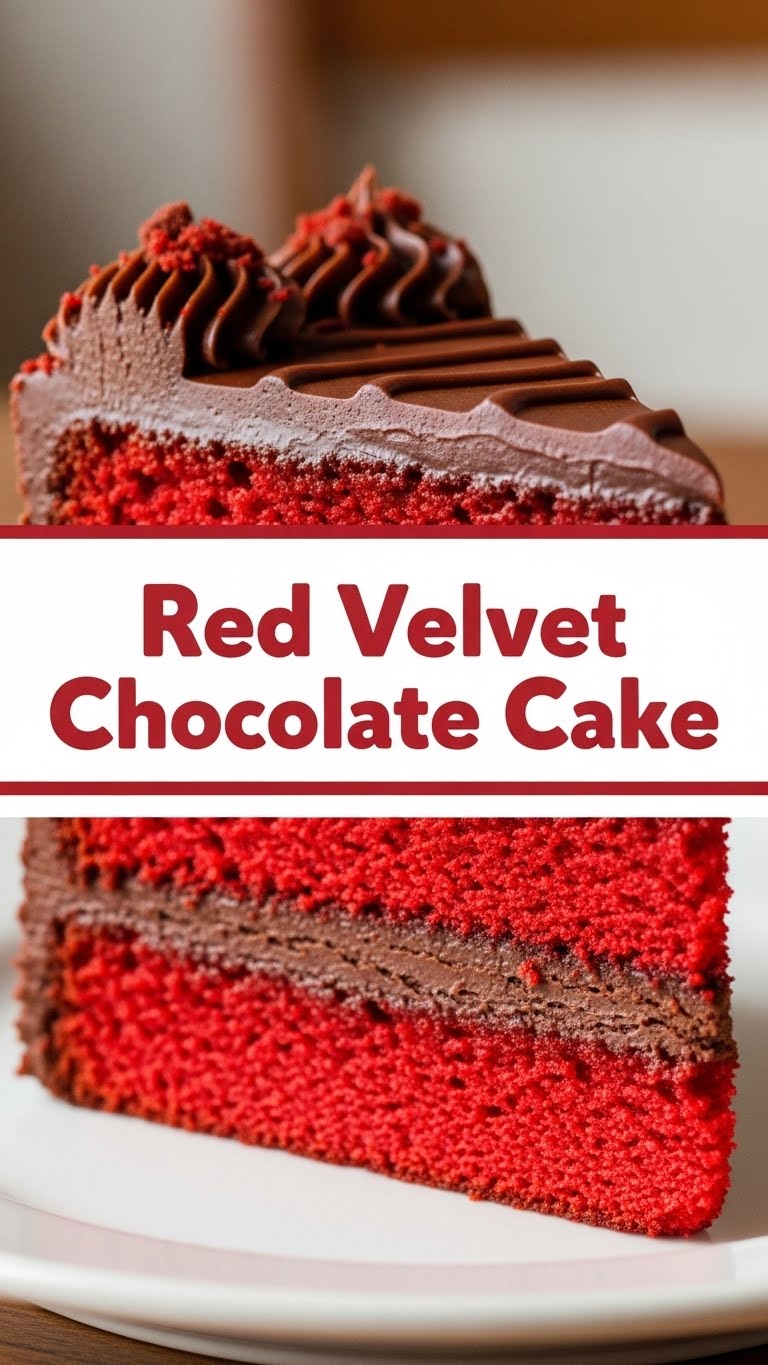
Okay, let’s be real. This isn’t just *any* Red Velvet recipe. This is THE Red Velvet recipe. Why? Because it’s practically **idiot-proof**. I mean, if I, a person who once set off the fire alarm microwaving popcorn, can nail this, so can you. It’s moist, it’s fluffy, it’s got that signature subtle chocolatey tang, and it’s smothered in the kind of cream cheese frosting that makes you question all your life choices (in a good way).
Plus, it looks like a million bucks with its vibrant color, making you seem like a baking prodigy. Nobody needs to know how easy it actually was. It’s our little secret. 😉
Ingredients You’ll Need
Gather your baking squad! Here’s what you’ll need to make this masterpiece happen:
For the Cake:
- 2 ½ cups All-Purpose Flour: The foundation of all deliciousness. Don’t eyeball this, use a proper measuring cup!
- 1 ½ cups Granulated Sugar: Because life’s sweet, and so should your cake be.
- 1 tsp Baking Soda: Our trusty rising agent.
- 1 tsp Salt: Don’t skip it! It balances everything out and makes the chocolate pop.
- 1 tbsp Unsweetened Cocoa Powder: For that subtle chocolatey depth. Go for natural, not Dutch-processed, for the best reaction with the buttermilk.
- ½ cup Unsalted Butter (room temp): Softened, not melted! This is key for that fluffy texture.
- 2 Large Eggs (room temp): Also room temp, please. They mix better.
- 1 cup Buttermilk: The secret to moistness and that signature tang. No buttermilk? See FAQs!
- 1 tsp Vanilla Extract: The universal enhancer. Don’t be shy with good quality stuff.
- 1 tbsp White Vinegar: Sounds weird, works wonders with the baking soda and buttermilk.
- 2 oz Red Food Coloring (liquid or gel): Gel gives a deeper color, liquid is fine too. Don’t be afraid!
For the Cream Cheese Frosting:
- 8 oz Cream Cheese (softened): Full fat, please. This is not the time for diet decisions.
- ½ cup Unsalted Butter (softened): Again, soft, not melted.
- 4 cups Powdered Sugar (Confectioners’ Sugar): Sifted, if you’re feeling fancy (and to avoid lumps).
- 1 tsp Vanilla Extract: Because good frosting deserves good vanilla.
Step-by-Step Instructions
Alright, apron on, game face on. Let’s bake some magic!
Prep Time! Preheat your oven to 350°F (175°C). Grease and flour two 8-inch round cake pans. You can also line the bottoms with parchment paper for extra non-stick insurance. Trust me, you don’t want your masterpiece stuck to the pan.
Dry Mix Shenanigans: In a large bowl, whisk together the flour, sugar, baking soda, salt, and cocoa powder. Give it a good whisk to break up any lumps. This is where your cake’s lightness begins!
Wet Mix Magic (Part 1): In a separate, smaller bowl, whisk the buttermilk, vanilla extract, and red food coloring until it’s a glorious, uniform red. Seriously, get that color vibrant!
Cream it Up: In another large bowl (or stand mixer), cream together the softened butter and eggs until light and fluffy. This should take about 3-5 minutes. Don’t rush this step, it adds air to your cake.
Combine and Conquer: Gradually add the dry ingredients to the butter-egg mixture, alternating with the red buttermilk mixture. Start and end with the dry ingredients. Mix until *just* combined. Do not overmix! A few streaks of flour are better than a tough cake.
The Vinegar Twist: In a tiny cup, mix the vinegar and baking soda (if you haven’t already combined it with the dry ingredients—my bad if you did, use one less tsp of baking soda for the dry mix then!) until it foams slightly. Quickly fold this into your cake batter. This creates that extra lift and tenderness. You’ll hear a little fizz; that’s science!
Bake It Off: Divide the batter evenly between your prepared cake pans. Bake for 25-30 minutes, or until a toothpick inserted into the center comes out clean. **Keep an eye on it!** Ovens vary.
Cool Down: Let the cakes cool in the pans for about 10-15 minutes before inverting them onto a wire rack to cool completely. **Patience, young grasshopper.** Trying to frost a warm cake is a recipe for disaster (and melty frosting).
Frosting Time! While the cakes cool, beat the softened cream cheese and butter together in a bowl until smooth and lump-free. Gradually add the powdered sugar, one cup at a time, beating until smooth after each addition. Stir in the vanilla extract. Beat until light and fluffy. If it’s too thick, add a tiny splash of milk or cream. Too thin? More powdered sugar!
Assemble Your Masterpiece: Once the cakes are completely cool, level them with a serrated knife if needed. Place one layer on your serving plate, spread a generous amount of frosting, then top with the second layer. Frost the top and sides of the entire cake. Garnish with cake crumbs or chocolate shavings if you’re feeling extra fancy. Now go eat it!
Common Mistakes to Avoid
Listen up, buttercup! We’ve all been there. Here are some rookie errors to dodge:
- Using Cold Ingredients: Seriously, room temp butter and eggs make a world of difference for a smooth, cohesive batter. Planning ahead is key here.
- Overmixing: Once you add the dry ingredients, mix only until *just* combined. Overmixing develops gluten, which makes your cake tough and chewy. We want fluffy, not rubbery!
- Not Greasing Your Pans Properly: There’s nothing sadder than a perfectly baked cake that refuses to leave its pan. Grease AND flour, or use parchment. No shortcuts!
- Opening the Oven Door Too Early: Resist the urge! Opening the door lets cold air in, which can make your cake sink. Wait until at least 20 minutes in.
- Frosting a Warm Cake: Unless you enjoy a soupy, sliding mess, wait until your cakes are COMPLETELY cool. Like, not even a little bit warm. Seriously.
Alternatives & Substitutions
Got a fridge that’s seen better days, or just feeling adventurous?
- No Buttermilk? No Problem! You can make your own! Add 1 tablespoon of white vinegar or lemon juice to a measuring cup, then fill the rest of the way to 1 cup with regular milk. Let it sit for 5-10 minutes until it slightly curdles. Voila! Instant buttermilk.
- Food Coloring Woes: If you’re really against artificial colors, you *can* leave it out. Your cake will be a beautiful, subtle cocoa brown, not “red velvet.” It’ll still taste amazing, just won’t have the iconic look. FYI.
- Cream Cheese Frosting Alternatives: If cream cheese isn’t your jam (weird, but okay), a simple vanilla buttercream or even a chocolate ganache would be delicious. But, IMO, the cream cheese is non-negotiable for classic Red Velvet!
- Less Sweet Frosting: If 4 cups of powdered sugar sounds like a sugar coma waiting to happen, you can reduce it to 3 or 3.5 cups for a less sweet, tangier frosting.
FAQ (Frequently Asked Questions)
Because you’ve got questions, and I’ve got answers (and probably more cake):
- “Can I make this as a bundt cake?” Totally! You’ll likely need to bake it a bit longer, maybe 45-55 minutes. Just make sure your bundt pan is *super* well-greased and floured.
- “My cake isn’t very red! What gives?” You probably need more food coloring! Gel food coloring usually gives a more intense color than liquid. Don’t be shy; Red Velvet is meant to be VIBRANT.
- “How long does Red Velvet Cake last?” If you can resist eating it all immediately, it’ll last about 3-4 days in an airtight container in the fridge (because of the cream cheese frosting!).
- “Can I freeze the cake?” Absolutely! Unfrosted cake layers can be wrapped tightly in plastic wrap and then foil, and frozen for up to 2-3 months. Thaw in the fridge overnight before frosting. Frosted cake can also be frozen, but it’s best to freeze individual slices for easier thawing.
- “My cream cheese frosting is too runny! Help!” This usually happens if your butter or cream cheese was too soft (melted, even) or if you added too much liquid. Pop it in the fridge for 20-30 minutes to firm up, then beat it again. You can also add a bit more powdered sugar.
- “Is this really ‘chocolate’ cake if it only has a tablespoon of cocoa?” Ah, the great Red Velvet debate! It’s more of a *hint* of chocolate, designed to complement the tangy buttermilk and cream cheese. It’s not a rich, dark chocolate cake, but rather a unique flavor all its own where the cocoa plays a supporting role.
Final Thoughts
And there you have it, folks! Your very own, absolutely stunning, ridiculously delicious Red Velvet Chocolate Cake. You’ve conquered the kitchen, faced the oven, and emerged victorious with a dessert that will make everyone swoon. Now go impress someone—or just yourself, because you totally deserve it—with your new culinary superpowers. You’ve earned every single glorious bite!


