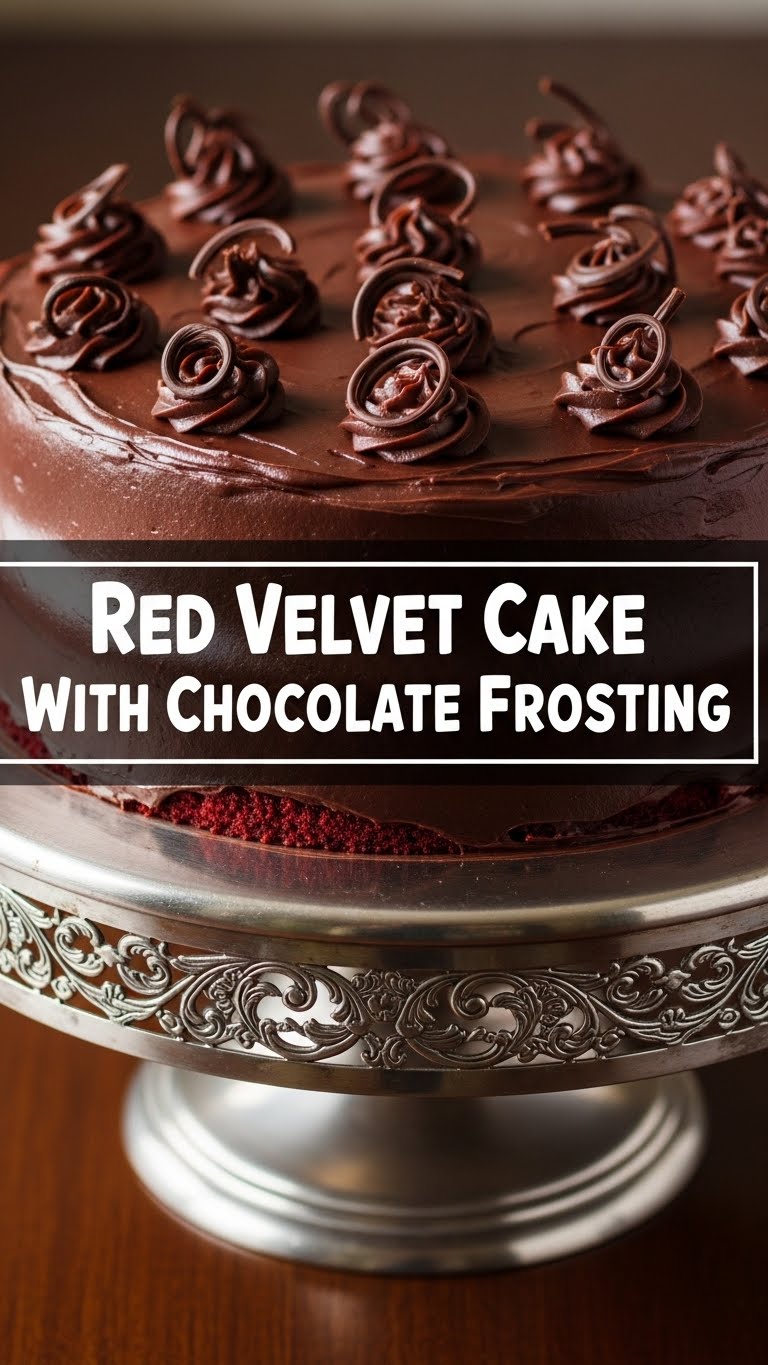
Ever stared at a bakery display, eyes locked on that majestic, crimson masterpiece, and thought, “Yeah, I could totally make that… if I wasn’t so busy adulting?” Well, friend, today’s your lucky day! We’re diving headfirst into the glorious world of Red Velvet Cake with a rich, decadent Chocolate Frosting. Because, why settle for just red, when you can have red *and* chocolate?
Why This Recipe is Awesome
Listen, this isn’t just any cake; it’s a statement. It’s the “I baked this, aren’t I amazing?” kind of cake. You’ll look like a culinary wizard without actually having to perform any dark arts (unless you count dealing with red food coloring, which can get a little messy, NGL). This recipe is **surprisingly straightforward**, even if your current baking repertoire consists mainly of toast. It delivers that perfect balance of tang from the buttermilk, a hint of cocoa, and that unmistakable velvety texture. And let’s not forget the chocolate frosting – because sometimes, plain cream cheese just isn’t extra enough. Trust me, even *I* didn’t mess this up, so you’re basically guaranteed success!
Ingredients You’ll Need
Time to gather your edible treasures! Here’s what you’ll need to conjure up this masterpiece. Pro tip: Room temperature ingredients are your best friend for a smooth batter, so pull out your butter and eggs a bit before you start.
For the Red Velvet Cake:
- 2 ½ cups (300g) all-purpose flour: The foundation of your dreams.
- 1 teaspoon baking soda: Our magical leavening agent.
- 1 teaspoon salt: Balances everything out like a wise old sage.
- 2 tablespoons (10g) unsweetened cocoa powder: Just a kiss of chocolatey goodness.
- ½ cup (113g) unsalted butter: Softened, because stiff butter is no fun.
- 1 ¾ cups (350g) granulated sugar: Sweetness overload (the good kind).
- 2 large eggs: At room temp, for optimal emulsification, darling.
- 1 teaspoon vanilla extract: A classic for a reason. Don’t skimp!
- 1 cup (240ml) buttermilk: This is key for that signature tang and moisture. If you don’t have it, see the “Alternatives” section!
- 1 tablespoon white vinegar: Works with the baking soda for that lift and velvety texture. Science!
- 1-2 ounces (30-60ml) red gel food coloring: **Gel is crucial** for that deep, vibrant red without watering down your batter. Liquid just won’t cut it, unless you want a sad, pinkish-brown cake.
For the Chocolate Frosting:
- 8 ounces (226g) cream cheese: Softened, full-fat is best for richness.
- ½ cup (113g) unsalted butter: Softened, again. See a pattern?
- 1 teaspoon vanilla extract: A little extra oomph.
- ½ cup (50g) unsweetened cocoa powder: Make it a good quality one, it makes a difference!
- 4-5 cups (480-600g) powdered sugar (confectioners’ sugar): Sifted, unless you like lumpy frosting (you don’t).
- 2-4 tablespoons milk or heavy cream: To get that perfect, spreadable consistency.
Step-by-Step Instructions
Alright, apron on, good vibes only! Let’s get baking!
Cake Time!
- Get Prepped: Preheat your oven to 350°F (175°C). Grease and flour two 8 or 9-inch round cake pans. You can also line the bottoms with parchment paper for easy release. Nobody likes a stuck cake.
- Dry Mix Magic: In a medium bowl, whisk together the flour, baking soda, salt, and cocoa powder. Give it a good whisk to break up any cocoa lumps. Set it aside.
- Wet Mix Whimsy: In a large bowl, cream together the softened butter and granulated sugar with an electric mixer until light and fluffy. This usually takes 2-3 minutes.
- Egg-cellent Addition: Beat in the eggs one at a time, making sure each is fully incorporated before adding the next. Stir in the vanilla extract.
- Color Burst: In a separate small bowl or liquid measuring cup, stir the red gel food coloring into the buttermilk. This helps distribute the color evenly.
- Alternate Additions: With the mixer on low speed, gradually add the dry ingredients to the wet ingredients, alternating with the red buttermilk mixture. Start and end with the dry ingredients. Don’t overmix! Just mix until barely combined.
- The Secret Sauce: In a small bowl, combine the white vinegar and the remaining baking soda (if you’re using separate amounts for the recipe, otherwise add the tablespoon of vinegar directly to the batter now). It will fizz up! Quickly fold this bubbly mixture into your cake batter. This is where the magic velvety texture truly happens.
- Bake It Up: Divide the batter evenly between your prepared cake pans. Bake for 25-30 minutes, or until a toothpick inserted into the center comes out clean.
- Cool Down: Let the cakes cool in the pans for about 10-15 minutes before inverting them onto a wire rack to cool completely. **This is crucial!** Frosting a warm cake is a one-way ticket to a soupy disaster.
Frosting Fun!
- Creamy Dreamy Base: In a large bowl, beat the softened cream cheese and softened butter together with an electric mixer until smooth and creamy. No lumps allowed here!
- Chocolatey Goodness: Add the vanilla extract and cocoa powder. Beat until combined.
- Sweeten Up: Gradually add the sifted powdered sugar, one cup at a time, beating well after each addition. The frosting will start to thicken.
- Perfect Consistency: If the frosting is too thick, add milk or cream one tablespoon at a time until you reach your desired spreadable consistency. If it’s too thin, add a bit more sifted powdered sugar.
- Frost Away: Once your cakes are completely cool, frost your glorious Red Velvet Cake. Go wild!
Common Mistakes to Avoid
Nobody’s perfect, but we can learn from past blunders! Steer clear of these common pitfalls:
- Warm Cakes = Melty Frosting: I know, you’re excited, but please, for the love of all that is holy, **let your cakes cool completely** before frosting. Even slightly warm means your beautiful frosting will slide right off. Rookie mistake!
- Overmixing: Once you add the flour, treat your batter like a delicate flower. Overmixing develops the gluten too much, leading to a tough, dense cake. We want velvety, not chewy!
- Skimping on Food Coloring: Unless you *want* a brownish-red cake that makes people question if it’s actually red velvet, use enough **gel food coloring**. The amount might seem like a lot, but it’s necessary for that iconic hue.
- Not Sifting Powdered Sugar: Tiny lumps of sugar in your frosting? No thanks! A quick sift makes all the difference for a smooth, luscious frosting.
- Forgetting Room Temperature Ingredients: Butter and cream cheese straight from the fridge are hard to cream smoothly, leading to a lumpy batter/frosting. Patience, grasshopper.
Alternatives & Substitutions
Life happens, and sometimes you don’t have that *exact* ingredient. Here are some quick fixes:
- No Buttermilk? No Problem! You can easily make your own. For 1 cup, pour 1 tablespoon of lemon juice or white vinegar into a liquid measuring cup, then fill the rest with regular milk (dairy or non-dairy works!) Stir and let it sit for 5-10 minutes until it curdles slightly. Boom, instant buttermilk!
- Less Red? If the thought of all that red food coloring makes you twitch, you can reduce the amount to half or even a quarter. Your cake will be more of a “rustic” red or even brownish, but the flavor will still be spot-on. It’s your cake, your rules!
- Different Frosting? While we’re rocking chocolate today, a traditional cream cheese frosting is always a classic pairing. Or, for something super quick, a simple chocolate ganache could work too!
- Gluten-Free Flour: I haven’t tested this specific recipe with GF flour, but generally, a 1:1 gluten-free baking blend (especially one with xanthan gum) should work. Just be mindful of overmixing, as GF flours can sometimes dry out cakes.
FAQ (Frequently Asked Questions)
- Why is it called “Red Velvet” if it has cocoa? Good question! Historically, the chemical reaction between cocoa, buttermilk, and vinegar would produce a subtle reddish-brown hue. Modern recipes amp up the “red” with food coloring, but the “velvet” refers to its super soft, smooth texture.
- Can I use liquid food coloring instead of gel? Well, technically yes, but why hurt your soul like that? Liquid coloring isn’t as concentrated, meaning you’d need a ton more to get a vibrant red. This could throw off your batter’s consistency and give you a muted, sad red. **Gel is king here.**
- Does the vinegar make the cake taste vinegary? Nope! The vinegar is crucial for reacting with the baking soda to give the cake its signature lift and tender crumb. It also helps activate the cocoa powder’s natural red pigments. You won’t taste it, promise!
- My cake came out dry, what happened? Oh no! This is usually due to **overbaking**. Keep a close eye on your oven, and start checking for doneness a few minutes *before* the recipe suggests. Every oven is a little different!
- Why chocolate frosting instead of the classic cream cheese? Because sometimes you just need that extra chocolatey hug! While traditional red velvet often has plain cream cheese frosting, the subtle cocoa in the cake pairs beautifully with a rich chocolate frosting. It’s a delightful twist, IMO.
- Can I make this into cupcakes? Absolutely! Just fill cupcake liners about two-thirds full and bake for 18-22 minutes. Keep an eye on them, as baking times will be shorter. Instant party!
Final Thoughts
You did it! You’ve officially conquered the majestic Red Velvet Cake with Chocolate Frosting. Take a moment, admire your handiwork, and then dig in. This cake isn’t just delicious; it’s a testament to your newfound (or rediscovered) baking prowess. So go ahead, impress your friends, wow your family, or just hoard it all for yourself (no judgment here!). You’ve earned every single velvety, chocolatey bite. Now go forth and spread the cake joy!

