So, you’re looking to whip up something that screams “I tried hard!” but actually whispers “I took a shortcut, don’t tell anyone!”? My friend, you’ve come to the right place. We’re diving headfirst into the glorious world of pumpkin pie, but with a little razzle-dazzle on top: a decorative crust that will make your guests (or just your cat) gasp in awe. And guess what? It’s ridiculously easy. Seriously, if I can do it without burning down the kitchen, so can you. Let’s get baking!
Why This Recipe is Awesome
Okay, let’s be real. Pumpkin pie is delicious. But a *plain* pumpkin pie? A little… basic, no? This recipe takes your standard, comforting, hug-in-a-slice pumpkin pie and gives it a glow-up. We’re talking about that moment when someone says, “Wow, you made this?!” and you can just casually shrug and say, “Oh, this old thing?” while secretly high-fiving yourself in your head.
It’s **idiot-proof** (trust me, I’ve tested this theory extensively). It uses mostly pantry staples, which means fewer trips to the grocery store where you inevitably buy things you don’t need (looking at you, impulse gummy bear purchase). Plus, the decorative crust? It’s basically a fancy hat for your pie. Minimal effort, maximum impact. You’re welcome.
Ingredients You’ll Need
Gather your troops! Here’s what you’ll need to assemble this masterpiece. No fancy-pants, obscure stuff here, promise.
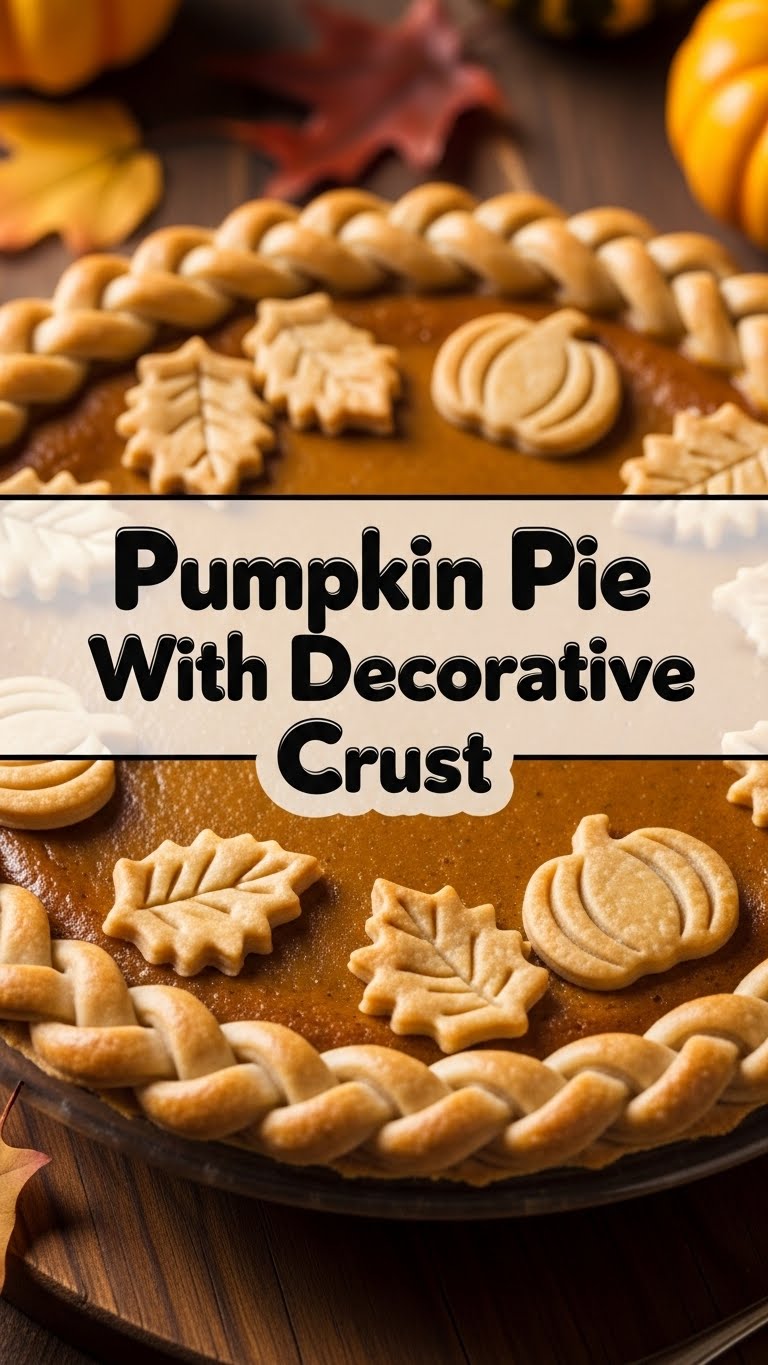
- 2 Store-Bought Pie Crusts: Yes, *two*. One for the base, one for the fancy bits. Don’t let anyone shame you for using store-bought. Life’s too short, and your sanity is important.
- 1 (15 oz) Can Pumpkin Puree: Make sure it’s *puree*, not pie filling. Unless you like surprises, then go wild.
- 1 (14 oz) Can Sweetened Condensed Milk: The secret to that silky smooth, perfectly sweet filling. Your taste buds will thank you.
- 2 Large Eggs: For binding all that creamy goodness together.
- 1 tsp Pumpkin Pie Spice: Your shortcut to autumnal bliss. Don’t have it? A mix of cinnamon, nutmeg, ginger, and a pinch of cloves will do the trick.
- ½ tsp Salt: Balances out all that sweetness. Because pie needs balance, just like your life.
- Optional: 1 tbsp Melted Butter (for brushing decorative crust): Gives it a lovely golden sheen.
Step-by-Step Instructions
Alright, apron on (or don’t, I won’t judge), let’s get messy (just a little)!
- Preheat & Prep: Set your oven to a cozy 375°F (190°C). Unroll one of your pie crusts and gently press it into a 9-inch pie plate. Trim any excessive overhang if you’re feeling meticulous, or just leave it for a rustic vibe.
- Mix the Magic: In a large bowl, whisk together the pumpkin puree, sweetened condensed milk, eggs, pumpkin pie spice, and salt until everything is beautifully combined and smooth. Don’t overmix; we’re not making soufflé here, just a pie!
- Pour It In: Carefully pour your pumpkin filling into the prepared pie crust. Fill it up, but leave a tiny bit of room at the top because pie needs breathing space.
- Time for Art (Decorative Crust!): Unroll your second pie crust onto a lightly floured surface. Now, grab those cute cookie cutters! Think leaves, acorns, mini pumpkins, stars, or whatever festive shapes make your heart sing. Cut out as many as you can.
- Decorate & Brush: Gently arrange your cut-out shapes on top of the pumpkin filling. You can overlap them, create a pattern, or just randomly sprinkle them like culinary confetti. If using, lightly brush the decorative pieces with melted butter for that gorgeous golden finish.
- Bake Away! Carefully transfer your pie to the preheated oven. Bake for 60-70 minutes, or until a knife inserted near the center comes out clean. The crust should be golden, and the filling set.
- Cool Your Jets: This is the hardest part: let your pie cool completely on a wire rack for at least 2-3 hours. Seriously, it needs to set up properly. Don’t be impatient; good things come to those who wait!
- Serve & Show Off: Once cooled, slice it up and bask in the glory of your fancy-but-easy pumpkin pie!
Common Mistakes to Avoid
Nobody’s perfect, but we can try to avoid these classic pie pitfalls, right?
- Overmixing the Filling: Whisk until smooth, then stop. Overmixing can lead to a less creamy texture. We want silky, not sad.
- Not Letting it Cool: Thinking you can cut into it 10 minutes after it leaves the oven is a rookie move. It’ll be a hot, runny mess. Patience, young Padawan. Cool it completely!
- Overbaking: An overbaked pumpkin pie can crack in the middle and get a weird, dry texture. Keep an eye on it! It should still have a slight jiggle in the center when you pull it out.
- Forgetting the Decorative Crust (or doing it too late): Don’t get so wrapped up in the filling that you forget your whole “fancy pie” mission. Make those cutouts *before* you pour the filling.
- Using the Wrong Canned Pumpkin: Double-check that label! Pumpkin puree, NOT pumpkin pie filling. Trust me on this.
Alternatives & Substitutions
Feeling adventurous? Or maybe you just ran out of something. No worries, we’ve got options!
- Homemade Pie Crust: If you’re feeling extra ambitious (or have a vendetta against store-bought), go for it! Just make sure it’s chilled and ready for rolling. Kudos to you, baker!
- Spice It Up (or Down): Don’t have pumpkin pie spice? Mix 1 tsp cinnamon, ½ tsp ground ginger, ¼ tsp ground nutmeg, and a pinch of ground cloves. Or adjust to your preferred spice level. Your pie, your rules!
- Dairy-Free? You can absolutely find dairy-free sweetened condensed coconut milk. It works beautifully and adds a subtle tropical hint.
- No Cookie Cutters? Freehand shapes with a knife! Or just use the second crust for a traditional top crust (cut some vents!) or skip the decor altogether if you’re feeling lazy. No judgment here.
FAQ (Frequently Asked Questions)
Got questions? I’ve got (mostly sarcastic) answers!
- Can I use fresh pumpkin instead of canned?
Well, technically, yes, you *can*. But you’d have to roast, peel, and puree it first. Why hurt your soul when canned puree is perfectly good and saves you approximately two hours? Just sayin’. - How do I prevent the crust from getting soggy?
Using a good quality store-bought crust helps a lot. And ensuring your oven is at the correct temperature so the crust bakes through. You can also give the bottom crust a quick “blind bake” for 10-15 minutes before adding the filling, if you’re paranoid. - My pie cracked! What did I do wrong?
Chances are, it was slightly overbaked or cooled too quickly. It’s still delicious, though! A dollop of whipped cream can hide a multitude of sins (and cracks). - Can I make this pie ahead of time?
Absolutely! Pumpkin pie is a fantastic make-ahead dessert. Bake it a day or two in advance, let it cool completely, then cover it loosely and refrigerate. It actually tastes better the next day, IMO. - What if I don’t have pumpkin pie spice?
Don’t fret! A mix of cinnamon, ginger, nutmeg, and a tiny bit of cloves will give you a similar vibe. Experiment a little! - Can I use margarine instead of butter for the decorative crust?
Well, technically yes, but why hurt your soul and taste buds like that? Butter just tastes better and gives a richer color. Treat yourself!
Final Thoughts
And there you have it, folks! A pumpkin pie that’s not just a pie, but an *experience*. You’ve learned how to make something delicious, visually stunning, and surprisingly easy. Now go impress someone—or yourself—with your new culinary skills. You’ve earned it! Seriously, pour yourself a cuppa, grab a slice, and revel in your domestic glory. Happy baking, my friend!


