So you’re craving something warm, sweet, and comforting, but the idea of making a whole pie from scratch makes you want to curl up in a ball and cry? Been there, friend. Lucky for us, there’s a cheat code, and it involves two of life’s greatest inventions: puff pastry and apple pie filling. Get ready to have your mind (and taste buds) blown with minimal effort!
Why This Recipe is Awesome
Why is this your new favorite go-to? Because it’s practically magic! Seriously, it takes about 10 minutes of active work, tastes like you slaved away for hours, and uses store-bought shortcuts that even professional chefs secretly adore (don’t tell anyone I told you). It’s the ultimate ‘I tried but also I didn’t’ dessert. Perfect for impressing unexpected guests or, let’s be real, just treating your fabulous self. Plus, the crispy, flaky pastry combined with warm, gooey apple filling? Pure bliss, no pie crust drama required. Win-win-win.
Ingredients You’ll Need
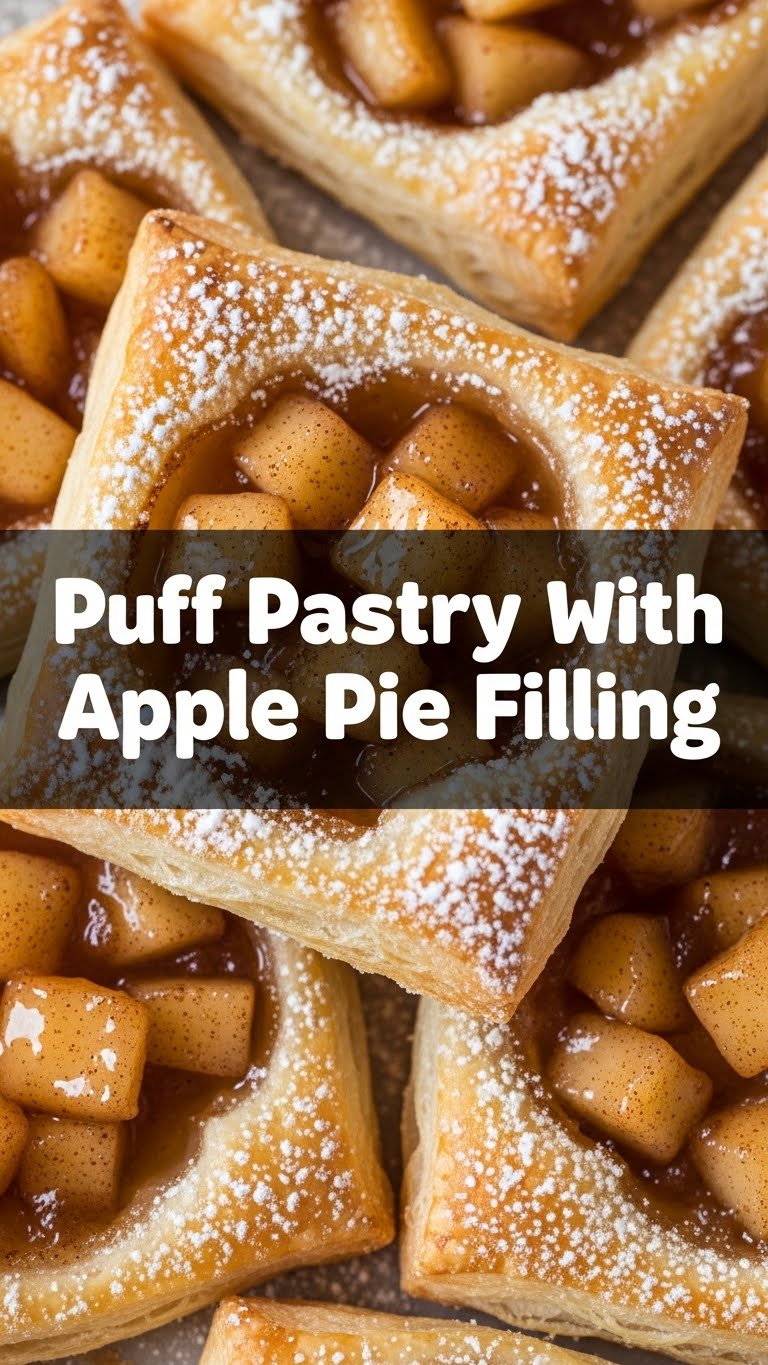
- Puff Pastry: One box (usually two sheets). Thaw it in the fridge overnight or for about 30-40 mins on the counter. Don’t rush it, or it’ll crack like my patience on a Monday morning.
- Canned Apple Pie Filling: One can (20-21 oz, give or take). Feel free to use your favorite brand. No judgment if it’s the super sugary one; we’re here for a good time, not a health kick.
- Egg (optional, but recommended for shine): Just one, beaten. This is for that fancy golden-brown crust. If you skip it, your pastry will still be delicious, just a little less ‘gram-worthy.
- Cinnamon (optional, but highly encouraged): A sprinkle. Because apples and cinnamon are like Bonnie and Clyde, but way tastier.
- Turbinado sugar or regular granulated sugar (optional, for sparkle): Just a pinch. Adds a nice crunch and a sparkly finish. Fancy!
Step-by-Step Instructions
- **Preheat & Prep:** First things first, get that oven screaming hot at 400°F (200°C). While it’s doing its thing, unroll your thawed puff pastry sheets onto a lightly floured surface or parchment paper. If you’re using parchment, just put it straight on your baking sheet.
- **Slice & Dice (Sort Of):** Take one sheet of puff pastry and cut it into roughly 4-6 rectangles or squares, depending on how big you want your individual pastries. Think personal-sized deliciousness.
- **Fill ‘Er Up:** Spoon a generous dollop of that glorious apple pie filling onto one half of each pastry rectangle. Don’t overfill it, unless you enjoy cleaning up sugary lava in your oven (I don’t). Leave a small border around the edges.
- **Fold & Seal:** Gently fold the other half of the pastry over the filling, creating a little apple pie pocket. Press the edges together firmly with your fingers, or for a fancy touch, use the tines of a fork to crimp them shut.
- **Egg Wash & Sprinkle (If You’re Feeling Extra):** If you’re using the egg wash, brush it lightly over the top of each pastry. Then, sprinkle a little cinnamon and/or sugar on top. It makes them look professional, trust me.
- **Bake It Baby!** Pop your beauties into the preheated oven for about 15-20 minutes. Keep an eye on them! You’re looking for a beautiful golden-brown color and puffiness that says, “I’m ready to be devoured.”
- **Cool (If You Can Wait):** Let them cool on a wire rack for a few minutes. They’ll be molten hot inside, so resist the urge to burn your tongue immediately. A warm pastry is amazing, but a scorched mouth is not.
Common Mistakes to Avoid
- **Not Thawing the Pastry Properly:** Trying to unfold frozen puff pastry is like trying to fold a map in a hurricane – it’s going to rip. Patience, young padawan! Thaw it gently.
- **Overfilling:** We talked about this. It’s a messy affair, and nobody wants apple goo bubbling over and sticking to the baking sheet. A little less is more here.
- **Skipping the Fork Crimping:** You can just press the edges, but a good crimp with a fork provides a much better seal and helps prevent blowouts. Also, it looks cute.
- **Not Preheating the Oven:** This is a big one. Puff pastry needs that initial blast of heat to puff up beautifully. Cold oven = sad, flat pastry. Don’t do it!
- **Baking Too Long/Not Long Enough:** Keep an eye on them. Overbaked means dry, potentially burnt edges. Underbaked means doughy, raw spots. Go for golden perfection!
Alternatives & Substitutions
- **Filling Frenzy:** Not an apple fan? No problem! Try cherry pie filling, blueberry, or even peach. Heck, you could go savory with some cheese and ham if you’re feeling wild (though that’s a different vibe entirely). Just grab a can of your favorite fruit filling.
- **Spice It Up:** Beyond cinnamon, a tiny pinch of nutmeg or allspice would be divine with apples. Or, if you’re feeling extra, a smidge of cardamom.
- **Homemade Filling:** If you are feeling ambitious, go ahead and make your own apple pie filling! Just make sure it’s cooled before you put it into the pastry, or it’ll melt everything prematurely.
- **Sweet Toppings:** Drizzle a simple glaze (powdered sugar + a tiny bit of milk/water) over them once they’re cool. Or a scoop of vanilla ice cream. IMO, ice cream is always the answer.
FAQ (Frequently Asked Questions)
- Can I use frozen puff pastry directly from the freezer? Absolutely not! Unless you want to wrestle with a brick of dough that shatters into a million pieces. Thaw it first. Seriously.
- How do I know if my puff pastry is thawed enough? It should be pliable and easy to unroll without cracking. If it resists, give it more time.
- Can I make these ahead of time? You can assemble them and keep them in the fridge for a few hours before baking. But honestly, they’re best baked fresh. The magic of puff pastry is in that fresh, flaky texture.
- My pastries didn’t puff up! What went wrong? Did you preheat the oven? Was your pastry still too cold or too warm? Puff pastry is a diva – it needs the right temp to perform. FYI, expired pastry also won’t puff!
- Can I reheat leftovers? Yes! Pop them in a toaster oven or regular oven at 350°F (175°C) for a few minutes until warmed through and crispy again. Microwaving works, but they’ll lose their crispness.
- What if I don’t have an egg for the egg wash? No worries! You can use a little milk or cream for a slight shine, or just bake them as is. They’ll still be delicious, just less shiny.
Final Thoughts
So there you have it, folks! A ridiculously easy, unbelievably tasty treat that will make you feel like a culinary genius without actually breaking a sweat. Whether you’re making these for a lazy Sunday brunch, a quick dessert for unexpected company, or just a Tuesday evening pick-me-up (no judgment here!), you absolutely can’t go wrong. Now go impress someone—or yourself—with your new culinary skills. You’ve earned it!


