“`html
So, You’re Dreaming of Cake, But Your Motivation is MIA?
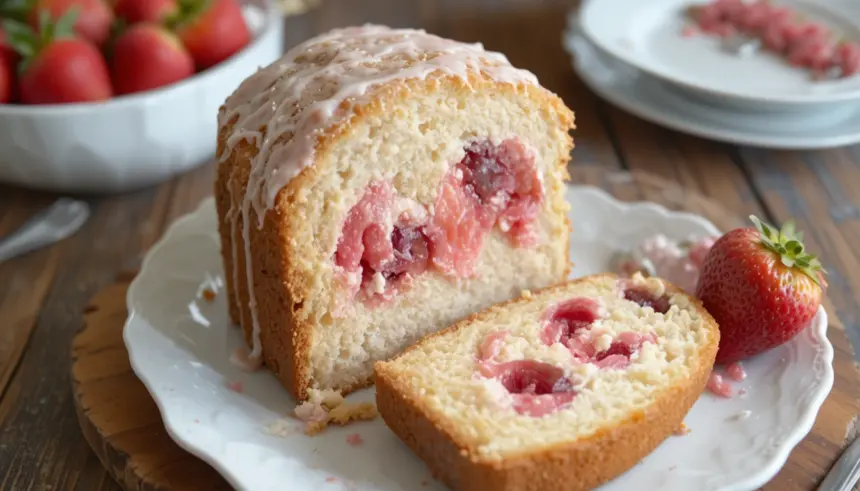
Let’s be real. Sometimes the siren song of a perfectly moist cake is just too loud to ignore, but the thought of a multi-step, Pinterest-perfect masterpiece makes your eyes glaze over. Well, my friend, you’ve come to the right place. We’re talking pound cake, but not just any pound cake. We’re talking pound cake with a secret, delicious strawberry heart. It’s the perfect amount of fancy without the fuss, and trust me, it’s going to be your new go-to.
Why This Recipe is Basically a Hug in Cake Form
Okay, so why should you bother with *this* pound cake recipe? Because it’s ridiculously good, for starters. It’s got that classic, dense, buttery goodness that pound cake is famous for, but then – BAM! – a burst of sweet, slightly tart strawberry filling that makes your taste buds do a happy dance. It’s like the most sophisticated surprise party for your mouth. Plus, it’s pretty forgiving. Even if your measuring skills are a little… *enthusiastic*, you’ll probably still end up with something amazing. It’s practically idiot-proof, and that’s saying something.
Ingredients You’ll Need (Don’t Freak Out, It’s Not That Scary)
- 3 cups all-purpose flour: The backbone of our cakey dreams.
- 1.5 cups granulated sugar: For that sweet, sweet life.
- 1 cup (2 sticks) unsalted butter, softened: This is non-negotiable, people. Let it get friendly with room temperature.
- 5 large eggs: The glue that holds our deliciousness together.
- 1 cup sour cream: For that extra moist, tender crumb. It’s a game-changer, seriously.
- 1 teaspoon vanilla extract: The MVP of all things dessert.
- 1 teaspoon baking powder: Just a little lift, nothing too dramatic.
- 1/2 teaspoon salt: Balances out all that sweetness.
- For the Strawberry Filling:
- 2 cups fresh or frozen strawberries, hulled and chopped: Fresh is great, but frozen works in a pinch. No judgment here.
- 1/4 cup granulated sugar: Adjust to your sweetness preference.
- 1 tablespoon lemon juice: Brightens everything up.
- 1 tablespoon cornstarch (optional, for thickening): Only if you like a super-set filling.
Step-by-Step Instructions (You Got This!)
- Preheat your oven to 325°F (160°C). **Grease and flour a 9×5 inch loaf pan** like you mean it. Nobody likes a cake that’s stuck.
- In a medium bowl, whisk together your flour, baking powder, and salt. Set aside. This is your dry crew.
- In a large bowl, cream together your softened butter and sugar until it’s light and fluffy. Think clouds. Dreamy, buttery clouds.
- Beat in the eggs, one at a time, making sure each one is fully incorporated before adding the next. Then, stir in the vanilla extract and sour cream. This is your wet squad, looking good.
- Gradually add the dry ingredients to the wet ingredients, mixing until just combined. **Don’t overmix**, or you’ll end up with a tough cake. We want tender, not tortured.
- While your batter is chilling (metaphorically), let’s make the filling. Combine the chopped strawberries, sugar, and lemon juice in a small saucepan. Cook over medium heat, stirring occasionally, until the strawberries soften and release their juices. If you want a thicker filling, whisk the cornstarch with a tablespoon of water and stir it into the simmering strawberries. Cook for another minute or two until it thickens. Let it cool completely.
- Pour about half of your cake batter into the prepared loaf pan. Spoon the cooled strawberry filling over the batter, leaving a little border around the edges.
- Carefully pour the remaining cake batter over the strawberry filling, making sure to cover it completely.
- Bake for 60-75 minutes, or until a toothpick inserted into the center comes out clean (avoiding the strawberry pockets, obviously). If the top is browning too quickly, tent it loosely with foil.
- Let the cake cool in the pan for about 15 minutes before **inverting it onto a wire rack to cool completely.** Patience, my friend, patience.
Common Mistakes to Avoid (Don’t Be That Guy/Gal)
- Butter that’s too cold: Seriously, let that butter come to room temp. It makes *all* the difference in creaming.
- Overmixing the batter: We’re not making playdough. Gentle mixing is key for a tender crumb.
- Not preheating the oven: Rookie mistake. Your cake will thank you for giving it a hot start.
- Cutting into it too soon: It needs time to set! Resist the urge.
- Filling exploding out: Make sure you leave a little border when you add the strawberry filling. No one wants a cake lava flow.
Alternatives & Substitutions (Because Life Happens)
Don’t have sour cream? Greek yogurt is a great substitute, and it adds a nice tang. Not a fan of strawberries? Feel free to use raspberries, blueberries, or even a mix! Just keep the amount roughly the same. If you’re feeling wild, you could even try a dollop of your favorite jam, though it might be a bit sweeter.
FAQ (Your Burning Questions, Answered Casually)
- Can I use melted butter instead of softened? While technically possible, it changes the texture. Softened butter creates that lovely airiness when creamed. IMO, stick to softened for the best results.
- My strawberries are watery. What gives? That’s totally normal! Cooking them down a bit helps evaporate some of that liquid. Adding cornstarch is your secret weapon for a thicker filling.
- Can I make this recipe into cupcakes? You absolutely can! Just adjust the baking time. Start checking around 20-25 minutes.
- How do I store this masterpiece? Store it in an airtight container at room temperature for up to 3 days, or in the fridge for up to a week. Though, let’s be honest, it probably won’t last that long.
- Can I use artificial vanilla extract? Sure, but real vanilla extract just has that extra something special. It’s worth the splurge if you can swing it!
- Why is it called “pound cake”? Legend has it that it was originally made with a pound of each main ingredient: flour, butter, sugar, and eggs. Fancy, right?
Final Thoughts
And there you have it! A ridiculously delicious strawberry-filled pound cake that looks like you spent hours slaving away, but secretly, you didn’t. It’s the perfect treat for brunch, dessert, or just a Tuesday afternoon when you need a little something special. So go forth, bake with joy, and most importantly, enjoy every single bite. Now go impress someone—or yourself—with your new culinary skills. You’ve earned it!
“`
