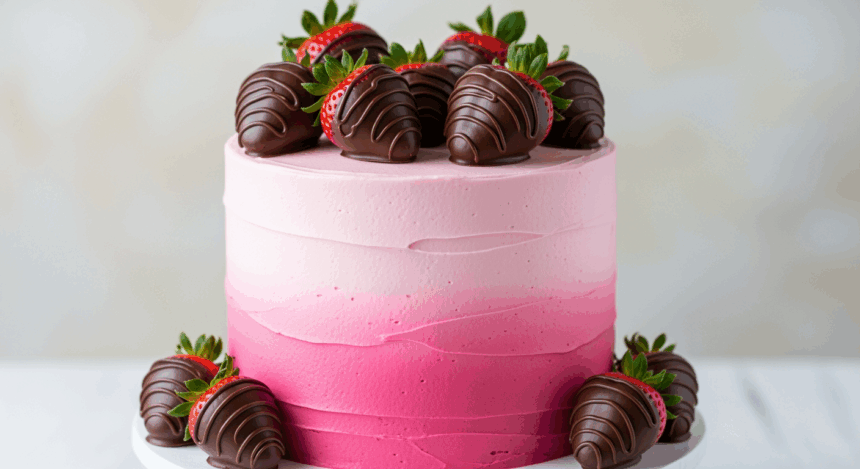
So, you want to make everyone at your next party gasp with delight (and a little bit of envy)? Trust me, this Pink Ombre Cake with Chocolate Strawberries doesn’t just look fancy-schmancy—it’s actually doable, even for those of us who consider not burning toast a major culinary achievement. The best part? Those gorgeous color gradients that look like you spent hours perfecting them? Total smoke and mirrors, friend. Let’s get baking!
Why This Recipe is Awesome
Look, we’ve all been there—scrolling through Pinterest, saving elaborate cake recipes we’ll “totally make someday,” then ordering takeout for dinner. But this cake? It’s the unicorn of desserts—both impressive-looking AND achievable. The ombre effect screams “I went to pastry school” when really it took you less time than your last Netflix binge. Plus, chocolate-covered strawberries make everything better—it’s basically science.
What makes this recipe truly awesome is the gasp-to-effort ratio. Maximum gasps, minimum effort. And unlike other fancy cakes that taste like sweetened cardboard, this one’s actually delicious. You’re welcome.
Ingredients You’ll Need
For the Cake:
- 2 boxes white cake mix (yes, boxes—we’re not martyrs here)
- 6 egg whites (save those yolks for… something else, I guess?)
- 1 cup vegetable oil
- 2 cups water
- Pink food coloring (gel works best unless you want to dump in half a bottle of the liquid stuff)
For the Frosting:
- 3 sticks unsalted butter, softened (no, margarine isn’t the same, sorry not sorry)
- 6 cups powdered sugar (your kitchen will look like a cocaine crime scene)
- 1/4 cup heavy cream
- 2 teaspoons vanilla extract
- Pink food coloring (same as above)
- Pinch of salt (to make the sweetness less slap-you-in-the-face)
For the Chocolate Strawberries:
- 12-15 strawberries (the prettier ones, not those sad misshapen ones)
- 8 oz semi-sweet chocolate chips
- 1 tablespoon vegetable oil
- White chocolate chips for drizzling (optional but makes you look fancy)
Step-by-Step Instructions
Prep Work:
- Preheat your oven to 350°F (180°C). Do this first! I know you always forget.
- Grease and line three 8-inch cake pans. If you only have two pans, that’s fine—you’ll just be here longer. Sorry.
- Mix your cake batter according to the box instructions, but substitute butter for oil if you’re feeling fancy.
Creating the Ombre Effect:
- Divide your batter equally into 3 bowls.
- Leave one bowl plain white (this will be your top layer).
- Add a few drops of pink food coloring to the second bowl for a light pink.
- Add more coloring to the third bowl for a deeper pink. The trick is to make each shade distinctly different but still in the same color family. Like the Kardashians, but pink.
- Pour each batter into its own pan and bake according to package directions, usually 25-30 minutes or until a toothpick comes out clean.
Making the Frosting:
- Beat the butter until fluffy—like, really fluffy. Give it a good 3-4 minutes. This is your arm workout for the day.
- Gradually add the powdered sugar, 1 cup at a time. Your kitchen is now officially a winter wonderland.
- Pour in the cream, vanilla, and salt. Beat until you’ve got a smooth, spreadable consistency.
- Divide the frosting into 3 bowls and color them to match your cake layers—white, light pink, and darker pink.
For the Chocolate Strawberries:
- Wash and thoroughly dry your strawberries. They must be completely dry or the chocolate will seize and you’ll be sad.
- Melt chocolate chips with oil in the microwave in 30-second intervals, stirring between each, until smooth.
- Dip each strawberry into the chocolate, twisting to coat evenly, then place on parchment paper.
- If using white chocolate, melt it the same way, then drizzle over the dipped strawberries with a fork. Instant fancy-pants status.
- Refrigerate until set, about 20 minutes.
Assembly Time!
- Once cakes are completely cool (seriously, COMPLETELY cool), level them if needed. No one likes a wonky cake… unless you’re going for “rustic charm.”
- Place the darkest pink layer on your cake stand and top with a layer of matching dark pink frosting.
- Add the medium pink layer, top with medium pink frosting.
- Finish with the white layer.
- Apply a thin crumb coat of white frosting over the entire cake and chill for 30 minutes. This is not optional unless you enjoy cake crumbs in your frosting (you monster).
- Frost the cake with the remaining white frosting, starting from the bottom with the darkest pink, then middle layer with medium pink, finishing the top and sides with white.
- Arrange chocolate-covered strawberries on top in whatever pattern makes you feel like a dessert goddess.
Common Mistakes to Avoid
Impatience is the enemy of good cake. Here’s what not to do:
- Frosting warm cakes. Unless you want a frosting avalanche, wait until those layers are cold. Like, refrigerator cold.
- Skipping the crumb coat. Yes, it’s an extra step. No, you can’t skip it unless you want your pretty pink cake to look like it has a skin condition.
- Getting water in your melting chocolate. Even a single drop will make your chocolate seize faster than tickets to a Taylor Swift concert.
- Using too much food coloring. Unless “radioactive Barbie” is your aesthetic, start with tiny amounts and add gradually.
- Trying to rush the strawberry-setting process. Warm chocolate + cake frosting = slip-and-slide disaster.
Alternatives & Substitutions
Not everyone has a fully-stocked kitchen or the desire to follow rules. Here are some tweaks:
- No cake mix? Use your favorite white cake recipe. Just make sure it’s sturdy enough to hold up in layers.
- Different color scheme? Go for it! Blue ombre, purple ombre, rainbow if you’re feeling especially ambitious (or have had too much coffee).
- No strawberries? Any berry works, or try mandarin segments for a cool color contrast. Even Oreos work if you’re in a chocolate-on-chocolate mood.
- Dietary restrictions? Most box mixes have vegan versions now. For gluten-free, there are decent GF cake mixes available that won’t taste like sweetened cardboard.
- Don’t have heavy cream? Milk works for the frosting, but it won’t be as rich. Your call on whether that matters to you.
IMO, the cake mix shortcut is non-negotiable unless you’re trying to show off. Life’s too short to make cake from scratch when the box stuff tastes this good.
FAQ (Frequently Asked Questions)
Can I make this cake in advance?
Absolutely! The cake layers can be baked up to 3 days ahead and wrapped tightly in plastic wrap. The fully assembled cake (minus the strawberries) can sit in the fridge overnight. Just add the strawberries a couple hours before serving so they don’t leak all over your masterpiece.
How do I get those perfect smooth sides on my cake?
First off, lower your expectations slightly. Then, invest in an offset spatula and a bench scraper. After applying your frosting, run the bench scraper around the sides while slowly turning the cake stand. It’s like pottery, but delicious.
My colors aren’t distinct enough. What went wrong?
You probably didn’t add enough coloring to the darkest layer. The difference between shades should be pretty noticeable in the bowl before baking. And remember, gel food coloring is much more concentrated than the liquid stuff.
Do I really need three separate bowls for the frosting?
Want to hear something wild? You can actually frost the cake with plain white frosting, then use a food-coloring-dipped brush to create the ombre effect directly on the cake. It’s more artsy and less precise, but who doesn’t love a good shortcut?
My strawberries are “sweating” and ruining my frosting. Help!
This happens when your berries go from cold to room temperature. The fix? Add the berries as close to serving time as possible, or pat them extra dry before placing them on the cake.
How do I transport this cake without destroying it?
Carefully, with prayer, and ideally in a cake carrier. No cake carrier? Stick toothpicks into the top of the cake and loosely tent foil over them—the toothpicks will prevent the foil from touching your frosting. Then drive like you’re carrying nitroglycerin.
Final Thoughts
There you have it—a cake that looks like you spent days on it when really you were binging that new Netflix show for most of the afternoon. The beauty of this pink ombre cake is that even if it’s not perfect, it still looks intentional. Frosting a bit messy? “Rustic charm.” Colors blending too much? “Watercolor effect.” Strawberries looking wonky? “Artisanal placement.”
The real secret ingredient here is confidence. Cut that first slice like you’re a pastry chef who trained in Paris, not someone who just followed instructions from the internet while wearing pajama pants.
Now go forth and collect compliments! And when people ask for your secret, just smile mysteriously and say it’s an old family recipe. Your secret is safe with me.
