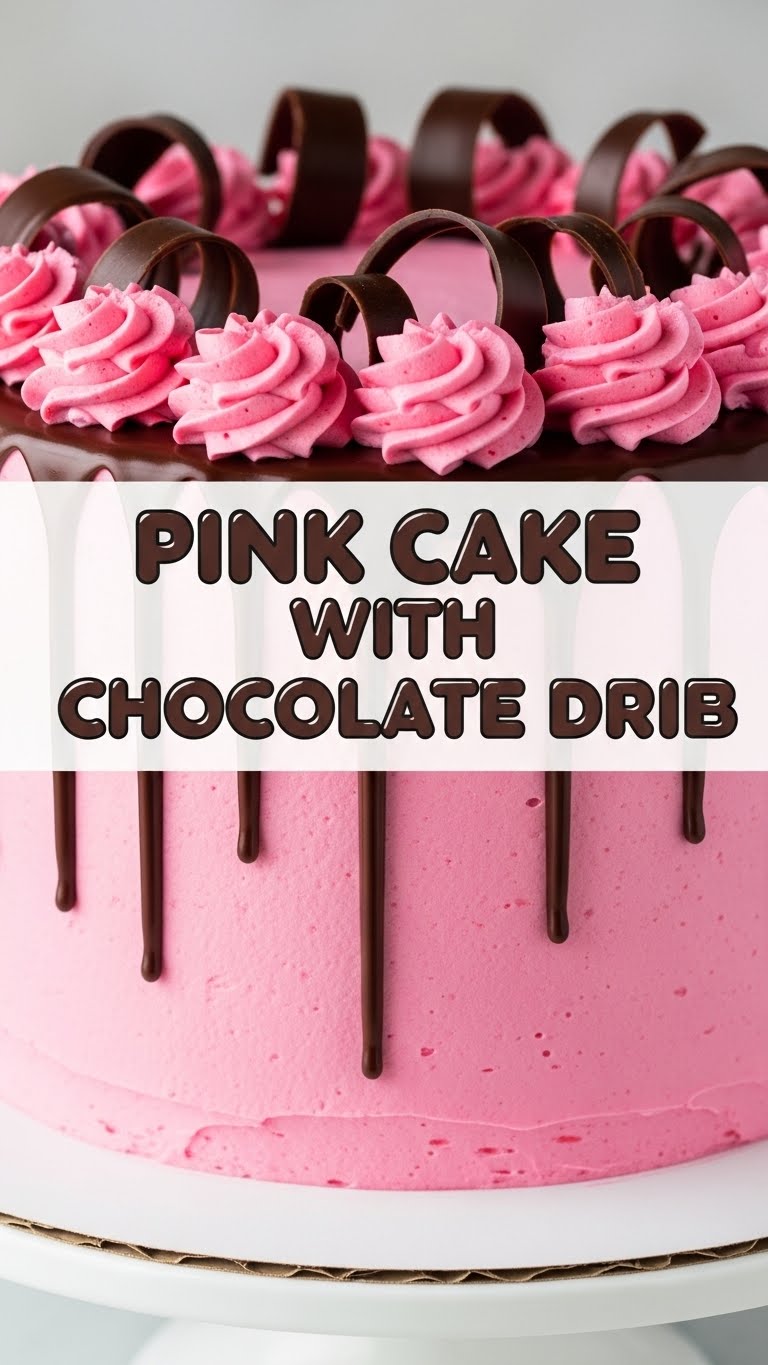
So, you’re looking for a cake that screams “I’m fabulous and I know it” but also “I didn’t spend my entire weekend slaving over this,” right? My friend, you’ve come to the right place. We’re diving headfirst into the glorious world of Pink Cake with Chocolate Drip, because life’s too short for boring desserts!
Why This Recipe is Awesome
Let’s be real, why settle for basic when you can have brilliant? This recipe isn’t just good; it’s practically a magic trick. It looks like you spent hours in a fancy patisserie, but trust me, it’s shockingly simple. Seriously, if I can pull this off without setting off the smoke detector, you absolutely can too. It’s truly idiot-proof, even I didn’t mess it up! Plus, it’s pink! Instant mood booster. And chocolate? Well, chocolate just makes everything better, obviously.
Ingredients You’ll Need
Gather ’round, my baking comrades! Here’s your shopping list for edible joy:
- For the Cake:
- 2 ½ cups all-purpose flour: The unsung hero. Don’t cheap out unless you’re aiming for a frisbee.
- 1 ½ cups granulated sugar: For sweetness, duh.
- 1 cup (2 sticks) unsalted butter: Room temperature, please! Cold butter is the nemesis of fluffy cakes.
- 4 large eggs: Also room temp. They just mix better, trust me.
- 1 cup milk: Any kind works, but whole milk makes it extra lush.
- 1 tablespoon baking powder: Our little secret weapon for that perfect lift.
- 2 teaspoons vanilla extract: Liquid gold for flavor. Seriously, don’t skimp.
- Pink gel food coloring: Gel works best for vibrant color without messing with consistency. Go wild!
- For the Chocolate Drip:
- ½ cup dark chocolate chips (or chopped bar): The good stuff! Quality chocolate equals quality drip.
- ½ cup heavy cream: For that perfect, luscious cascade.
- 1 teaspoon unsalted butter (optional): Adds a lovely shine, because we’re fancy like that.
Step-by-Step Instructions
- Prep Time! Preheat your oven to 350°F (175°C). Grease and flour two 8-inch round cake pans. Don’t skip this, unless you want your cake to be “rustic” (aka stuck to the pan forever).
- Cream It Up. In a large bowl, beat the softened butter and sugar together until the mixture is light and fluffy. This step is super key for a tender crumb.
- Egg-cellent Addition. Add the eggs, one at a time, beating well after each addition. Make sure to scrape down the sides of the bowl to catch all those sneaky bits.
- Dry Meets Wet. In a separate bowl, whisk together the flour and baking powder. Gradually add the dry ingredients to the wet mixture, alternating with the milk, starting and ending with flour. Mix just until combined. Overmixing is a cardinal sin in cake world!
- Pink Perfection. Stir in the vanilla extract. Now for the fun part: add a few drops of pink gel food coloring. Start small and add more until you hit that dreamy shade of pink you’re aiming for. More is more, right?
- Bake Baby, Bake! Divide the batter evenly between your prepared pans. Bake for 25-30 minutes, or until a toothpick inserted into the center comes out clean.
- Cool Down. Let the cakes cool in the pans for about 10 minutes. Then, carefully invert them onto a wire rack to cool completely. Patience, grasshopper. Trust me on this one.
- Drip, Drip, Hooray! While the cakes are chilling out, make your chocolate drip. Heat the heavy cream in a small saucepan until it just simmers (don’t let it boil!). Pour it over your chocolate chips in a heatproof bowl. Let it sit for a minute, then stir until it’s super smooth and shiny. Stir in the optional butter for extra gloss.
- Assemble Your Masterpiece. Once the cakes are totally cool (and I mean totally!), level them if needed. Stack them with your favorite frosting in between (vanilla buttercream is a classic choice). Pour the slightly cooled chocolate drip over the top, letting it artfully cascade down the sides.
- Admire and Devour. Chill your glorious creation for a bit to let the drip set. Then, slice it up and bask in the glory of your culinary genius. You did it!
Common Mistakes to Avoid
We’ve all been there, making rookie errors. Learn from my mistakes, people!
- Cold Ingredients: Using cold butter and eggs is a express train to a dense, sad cake. Room temperature is your best friend! I cannot stress this enough.
- Overmixing: Once the flour goes in, mix only until just combined. Overmixing develops gluten, which leads to a tough, chewy cake. We’re aiming for tender, not tire rubber.
- Opening the Oven Door Too Soon: Resist the urge to peek! Your cake needs consistent heat to rise properly. Wait at least 20 minutes before even thinking about cracking that door.
- Not Cooling Cakes Completely: Trying to frost warm cakes is a messy, melty nightmare. Seriously, cool them completely before frosting. Your future self (and your sanity) will thank you.
- Skipping the Grease and Flour: Unless you genuinely enjoy chiseling cake out of a pan (and who does?), prep those pans well. Parchment paper on the bottom is also a lifesaver.
Alternatives & Substitutions
Feeling rebellious? Here are a few ways to tweak this recipe to suit your mood or pantry:
- Food Coloring: No pink? Red works! Or skip it for a classic vanilla cake. It’s your cake, your rules.
- Chocolate Drip: Feel free to use semi-sweet, milk chocolate, or even white chocolate for the drip! Though, IMO, dark chocolate provides a fantastic contrast to the sweet pink cake.
- Milk: Almond milk or oat milk works too if you’re dairy-free, but whole milk generally gives the best richness and texture.
- Butter: Shortening *can* be used, but you’ll sacrifice some of that delicious buttery flavor. Margarine? Well, technically yes, but why hurt your soul like that?
- Frosting Between Layers: While a simple vanilla buttercream is divine, feel free to get wild! Strawberry jam, raspberry preserves, or even a tangy cream cheese frosting would be amazing. Go nuts!
FAQ (Frequently Asked Questions)
- My cake looks more red than pink. What happened? Oops, probably went a bit heavy on the food coloring. Next time, start with just a tiny drop and gradually add more until you achieve your desired shade. Live and learn!
- Can I make this into cupcakes instead? Absolutely! Just adjust the baking time (usually 18-22 minutes) and keep a close eye on them. Pink cupcakes? Yes, please!
- My chocolate drip is too thick/thin. Help! Too thick? Add a *tiny* splash more warm cream, stir, and repeat until it reaches that perfect pourable consistency. Too thin? Add a few more chocolate chips, let it sit for a minute, then stir. It’s all about finding that sweet spot.
- How long does this cake last? Covered at room temperature, it’s typically good for 2-3 days. In the fridge, it might last a bit longer, say 4-5 days, but let’s be real, it probably won’t last that long anyway.
- Do I have to use unsalted butter? It’s preferred because it gives you precise control over the salt content in your baking. If you *only* have salted butter, just reduce any additional salt in the recipe by a tiny pinch. But FYI, for baking, unsalted is generally king.
- Can I freeze slices of this cake? Heck yeah! Wrap individual slices tightly in plastic wrap, then foil, and freeze for up to a month. Thaw them at room temperature for a spontaneous, delicious treat.
Final Thoughts
Phew! You made it. See? Not so scary, right? This Pink Cake with Chocolate Drip isn’t just a dessert; it’s a statement. It says, “I’m a domestic goddess/god, and I also like pretty things.” Now go impress someone—or yourself—with your new culinary skills. You’ve earned it! And maybe send me a slice? Just kidding… mostly. 😉

